
No one likes to be cold at home,
not even if this is on Wheels!
In this article, I’ll show you all the possibilities
to warm up your Van / RV and enjoy the warmth
even on the coldest winter days.
HOW TO HEAT UP A DIY CAMPER VAN
Winter is definitely not the favorite season for most RVers and Vanlifers.
Cold, rain, and especially snow require twice as much preparation as during the summer season (both in terms of equipment and vehicle preparation) and this often discourages many vanlifers and RVers from using their vehicles in winter.
In my case, when designing my DIY Campervan, one of the essential things for me was to make my vehicle 4-season, so that I could travel year-round uninterrupted. This meant only one thing: I needed well-done thermal insulation (see Complete Guide to Insulating Your Van) and the heating system was essential!
After all, an RV is still a little house on wheels, and it’s never nice to freeze inside your own home!
For this reason, I researched all the heating options on the market, studied them and finally found the one that I thought would best meet my needs and those of my project.
Since it was a lot of work anyway, I decided to write this article so that the knowledge I gained wouldn’t be lost and to help others like you, who want to embark on a project similar to mine, To find the right solution for your project faster than I did.
Therefore, in this article, I’m going to tell you all you need to know about how to heat your motorhome: first I will show you all the most common RV heating alternatives on the market (with detailed description and resources for DIY installation) and then I will show you how I installed a JP Heater Combi on my van (with photos and a step-by-step explanation).
Get cozy, and let’s get started with the guide!
TABLE OF CONTENTS
Best Heating Options for a DIY Van Conversion
- Foreword: 4 Key Factors to Enjoy Vanlife in Winter.
- The main brands of heaters for RVs
- Diesel Campervan Heaters
- Gas Campervan Heaters
- Electric Campervan Heaters
- My Choice: How I Mounted a JP Heater Combi
- How Altitude Impacts the Operation of a Heater
- Choosing the Right Heater for Your Campervan – Conclusion

1. Foreword: 4 Key Factors to Enjoy Vanlife in Winter

Before you start thinking about what heater to install on your van, it’s important to understand that a heater, no matter how powerful it might be, is not enough on its own.
In fact, in order to live comfortably inside your RV (or converted van) in winter times, you need to keep in mind at least four essential factors that all together contribute to make your travel experience more enjoyable and relaxing.
These 4 factors for enjoying your RV in the winter are the following.
1.1 VENTILATION
Air exchange in your RV is as essential in winter as it is in summer.
We humans tend to produce humidity (breathing, cooking, showering etc.), and this humidity necessarily needs to be kept in check, especially in winter.
In fact, hot air in contact with very cold surfaces creates condensation that, in addition to dampening the equipment of your van, can infiltrate and come into contact with the metal parts of your van (which in the long run can lead to rust problems).
In addition to humidity, there is also the problem of odors! Without good ventilation and air recirculation, your RV after a night or two is likely to smell like the locker room at a teen gym!
For these reasons, ventilating your RV is essential. The best way to do this is definitely Installing a Ceiling Fan, but in smaller conversion cases it may be enough to create an air circulation between windows or by using vents.
Obviously, ventilating in the winter means that some cold (fresh) air will enter your vehicle, and this can potentially lower the interior temperature if there are no other heating systems to counterbalance (see below).
1.2 THERMAL INSULATION
Insulating an RV takes time. Depending on the material used, insulating is more or less easy, more or less messy. What’s important though, is to know that good insulation is essential if you plan to use your RV during the cold season (factory RVs almost all come insulated already).
In fact, insulation is what keeps heat from escaping through the metal walls of your RV in the winter (and entering in the summer). In fact, without insulating your vehicle, you may be able to install a heater, but it will keep you warm only until you turn it off and little more (as is the case when you ride in your car).
This would result in unnecessary fuel waste and easily avoidable fuel expenses.
If you’re thinking of converting a van or are already converting your van and still haven’t thought about thermal insulation, I recommend reading the article Van Conversion DIY: Complete Guide to Thermal Insulation., in which you will find all the information you need to make sure you don’t miss this crucial part of a any well-done van conversion project.
1.3 HEATING
After good ventilation and thermal insulation, here we come to the main topic of this article: heating .
Insulation is used to keep the heat inside your van, while heating is obviously used to generate it and to keep the humidity level in check along with good ventilation.
There are gas, diesel, electric and hybrid powered RV heaters on the market in various sizes for various needs.
Later in this article we’ll get into the details and specifics of each option and I’ll explain which ones are best suited for which type of projects.
1.4 PREPARATION
There is no perfect vehicle for dealing with unpreparedness.
When traveling by RV, and more so in the winter, you have to think about what you may face and be prepared for what the road may present before you.
To travel in winter it is important to prepare the right equipment for yourself (jacket, blanket, thermal clothing, thermal tents etc.) and for your vehicle (snow chains, snow tires, windshield defroster, broom to sweep the solar panels etc. …).
In addition, it is a good habit to inquire about the Weather conditions, temperatures, and road conditions that you are going to face: we now live in the future and all this information is just a click away, a minute’s attention first can help us then to go on the adventure with an extra hair of preparation and confidence.
Having said this important premise on the four factors to keep in mind to enjoy your motorhome in winter, let’s get to the heart of this article and analyze in depth one by one, the various types of heating on the market.
2. What are the main brands of van/RV heaters?

In the RV heater market, there are four main companies that over time have made a name for themselves among fans of this type of vehicle.
These companies are:
WEBASTO
Webasto is a German company based in Stockdorf (near Munich) which has been producing heaters for motorhomes and other vehicles for over 70 years.
It is one of the leaders in the RV heater industry and offers both electric and diesel/diesel working heaters.
TRUMA
Truma is another German company specializing in heating and cooling systems, based in Munich.
With 60 years of history, it is the other leader in the RV heater industry along with Webasto. Truma, too, offers the most varied solutions in terms of both power supply and size.
EBERSPACHER
Often referred to simply as Espar, Eberspacher is another German company that has been manufacturing car heaters for more than 50 years.
Espar offers fewer options than Truma and Webasto, focusing primarily on diesel/gasoline heaters.
EBERSPACHER
Planar is a Russian company that in recent years has made a name for itself even in Europe for offering excellent heaters at a much lower price than previous competitors.
Planar, like Espar, also offers primarily diesel-powered products.
These four companies, as we will see below, have made a name for themselves by offering quality products, guarantee of soundness over time, and developing an extensive network of dealers (in fact, they almost don’t sell to the end customer through their websites) who are responsible for their sale and installation (normally they are partner workshops and specialized mechanics).
The only downside to buying products from these 4 brands is one: price.
In fact, the renowned quality and name of these brands (as well as many other branded things in the RV world) allows these companies to sell their RV heaters at (rightly) high prices (Truma, Webasto, Eberspacher) or medium-high (Planar) prices.
The near absence of direct sales to the customer and the prices of branded products, however, not insignificant, has given way in recent years to another competitor that is slowly taking important shares of the market of heating for motorhomes (especially DIY): China.

CHINESE HEATERS
In the last few years a variety of Chinese heating manufacturers (called in slang: “Cinebasto”) have sprouted up like mushrooms, selling more or less identical copies of the most established brand products at prices up to a third of the original ones.
While searching for a heater for my camper van, I noticed that you can find almost identical copies of any Webasto, Truma, Espar or Planar heater on the internet.
Obviously, buying a Chinese product, you don’t have the same guarantee of quality and the product can be very good but also flawed or bad.
In the following chapters, we will take a closer look at the most important motorhome heaters Webasto, Truma, Eberspacher and Planar. For your convenience, I’ve decided to break the articles down by fuel type (diesel, LPG gap, electric).
For completeness, next to each branded product, I tried to leave you a link to a similar product from a “Made in China” brand.
Once you’ve seen all the best heating systems by power supply, I will show you which one I decided to install on my Volkswagen Crafter camper (advance notice: a JP Heater straight from China!) and I will show you step-by-step the various steps of my installation (however applicable to most Camper heaters).
3. Diesel/Diesel Camper Heating

Diesel (or gasoline) heaters are among the most widely used by modern RVs and the ones that are the most popular in Do-It-Yourself campers with permantent setups.
In fact, their main convenience is that they can operate by drawing fuel directly from the vehicle’s tank.
Low fuel consumption and the convenience of being able to get it just about anywhere are definitely the main reasons why many (including me!) have decided to go with a diesel heater.
3.1 HOW A DIESEL/DIESEL HEATER FOR MOTORHOMES WORKS
The operation of all RV diesel heaters, although they may differ from each other in shape and size, is essentially the same (and the connections/passages required to install them are the same).
Below, I will briefly explain what happens inside a diesel heater when it is put into operation (see image above for a visual explanation):
- Diesel/gasoline fuel (from a removable tank, or directly from the van’s tank) is pumped into a combustion cell, where it is burned.
2. The combustion cell burns fuel using fresh air drawn from outside the van (not indoor air!).
3. Once the fuel has been burned, the remains of the combustion (exhaust air) is expelled directly outside the van through a pipe (this prevents noxious fumes inside the vehicle)
4. A fan draws in cold air from inside the van, pushes it around the combustion cell where it is heated, and pushes it back out of the heater once it is warmed up
5. The heater runs on a 12V motor that is powered by the service batteries (uses very little power). Fuel is drawn from a diesel pump, also powered at 12V.
6. Modern RV heaters, normally have an external temperature sensor and display, to help you adjust the temperature to your preferences.
3.2 PROS AND CONS OF INSTALLING A 12V DIESEL HEATER ON YOUR RV
Like all RV heating systems, diesel heaters have pros and cons. Personally, I think the advantages far outweigh the disadvantages, but of course every project is its own story and it’s not certain that what works for me is the ideal solution for you and vice versa.
Below I leave you with the main Pros and Cons of a Diesel Heating:
PRO
- Fuel Available Everywhere
- One Fuel Tank for the Whole Vehicle
- Very Low Consumption (0.1-0.5max Liters/hour)
- Many Models to Choose From
- Prices for all Pockets
- Easy to Install, even Do-It-Yourself
AGAINST
- It is recommended to install a Carbon Monoxide Detector
- At high altitudes (1500+ meters), it’s often necessary a Specific Supplementary Kit (see chapter 7)
- Diesel pump is noisy, especially outside the van.
Instead, below I leave you with a list of the best diesel heaters for RVs (both branded and Chinese).
For each product I also leave you a link from which download the user manual, where you will be able to find installation instructions for the various models, safety tips to follow, product dimensions (useful for getting an idea of where to install it before you buy it), power consumption, fuel and heating power.


4. Gas Camper Heating – Operation and Options

Gas heaters are some of the most commonly used by older factory RVs, and they run powered by LPG (primarily propane). These days they are installed more and more infrequently as the world of wheeled homes is moving more and more toward diesel/gasoline and (slowly) electric as well.
Personally, I would only consider installing a gas heating system on a van or camper if the vehicle is already using gas for other appliances (e.g. kitchen, refrigerator, etc.) and the system is already set up.
In other cases, I believe that a Gasoline/Diesel (or even electric) heating system has more advantages, both in the ease of Do-It-Yourself installation, for maintenance and safety.
3.1 HOW A GAS HEATER WORKS
Operation of gas heaters suitable for a fixed installation, is very similar to that of the diesel heaters we have seen so far: everything remains essentially the same (12V DC motor, combustion chamber, air intakes and exhaust, etc.) except for the liquid fuel which is replaced with LPG gas (propane, and more rarely butane).
The gas can be drawn from common gas cylinders (normally it is good to travel with at least two cylinders to be sure of never being without, which can be mounted simultaneously through a small gas control unit), or in some cases you may consider installing a fixed tank under the vehicle to be recharged at the LPG stations.
NOTE: all gas heaters/stoves approved for RVs and trailers must still be connected to an outside air intake. Installing a common stand-alone gas heater (like the ones you can use in your home to be clear) can be very dangerous, as the space in a van is very small and the possibility of creating excessive amounts of carbon monoxide is very high.
3.2 PROS AND CONS OF INSTALLING A GAS HEATER ON YOUR RV
Like all RV heating systems, gas heaters have pros and cons.
Below I leave you with the main ones:
PRO
- With two cylinders you will have an autonomy of weeks
- Less Polluting than Diesel Heaters
- Low Electricity Consumption
- Low Maintenance Cost
- Convenient if you already cook or have a gas fridge
- Smoke less pollutants than a Diesel heater
AGAINST
- Recommended Install a Carbon Monoxide Detector
- If homologated in EU, the system requires specific TUV certification
- Need to Change Cylinders Regularly and Keep Consumption Under Control
- Sometimes on the road, cylinders are not so easy to find, and in remote locations they can cost a lot more
- Few models to choose from and all quite expensive
- Transporting gas in cylinders always involves an extra risk of fire/explosion if the installation is not done properly or in the event of an accident.
Below, as before, I leave you with the best models of gas heaters/stoves for campers with a brief description, approximate price, consumption and link to the manufacturer’s site.


5. Electric Camper Heating

Heating your vehicle solely using electricity, without any kind of combustion, is certainly an attractive idea that many people like (I’ve been dreaming about it for a long time too!).
Imagine: cleaner (no exhaust fumes), more practical to install Do-It-Yourself (no pipes, just plugging into a socket) and more convenient (no need to refill fuel). On the internet then, it is also easy to find electric heaters e electric fan heatersfor prices sometimes much less than 100 Euro.
All good up to here, but unfortunately there is bad news: to run an electric heater all night and ensure a warm and peaceful sleep, probably the only way is to connect to the 230V network of a campsite, a house or at least to a column.
In fact, electric heaters are damned energy-intensive devices that even the best service battery banks can hardly power for more than a few hours.
If your goal is to be as autonomous and independent from the power grid as possible (as mine was!), my advice is to think about a diesel/gas system: at the moment electric devices can be useful to supplement traditional heaters in some situations, but they are not yet ready to be a real alternative.
If, on the other hand, you plan to stay often in campsites or equipped facilities with access to the electrical network, then the electrical equipment I’ll show you below may be right for you.
3.1 PROS AND CONS OF INSTALLING AN ELECTRIC HEATER ON YOUR VAN
Like all RV heating systems, electric heaters have pros and cons. Below I leave you with the main ones:
PRO
- Without Combustion
- Fuel Free
- Small Size and Very Low Cost
- Easy to Use/Install Systems (one plug)
- They can integrate other systems and help save fuel when you’re plugged into the 230V grid
- They have no problem operating at high altitude
AGAINST
- Bloody energy-hungry devices that can hardly heat you for a whole night if running on batteries
- Require a connection to the grid to operate for long times
- Not suitable for wild camping / boondocking
Despite their many advantages, the high consumption of electrical heaters is currently one of the biggest limitations to their use in vans and RVs.
Below, I’ll leave you with 3 models of great electric heaters that could help you heat your van anytime you’re plugged in (to save gas/diesel, or just to have less noisy/polluting heating while parked).


6. My Choice: How I Ordered and Installed a JP Heater

After a bit (a lot!) of research on various blogs and specialized sites, I soon realized what I really wanted to install was a joint heating system for both water and air. After all, why install two separate devices when I could do everything with just one?
After researching, this time much longer, all the air/water hybrid options on the market and the various models from each brand, I fell in love with the Truma Combi 6DE, a combination air/water heater that can be powered by either diesel or, when plugged in, 220V electricity.
The power of the Truma Combi (6000Watts) was then perfect for a large vehicle like my long-wheelbase Volkswagen Crafter (7meters).
My falling in love with it unfortunately didn’t last long, just the time to find out the price: 3000/3500 Euro. Searching on the internet and asking for some quotes from dealers (Truma does not sell directly to the end user) they came to ask me up to 4000 euros (including installation).
Well, I wasn’t going to spend that kind of money at all: first, because being a DIY project I wanted to install my own heating system by myself as much as possible; and second, because it really was a boatload of money that I couldn’t invest to install just the heating!
Since I don’t like to give up easily, I kept searching in English as well (in case I could get a Truma Combi from abroad – I’m from Italy – for a lower price), but didn’t seem to have too much luck.
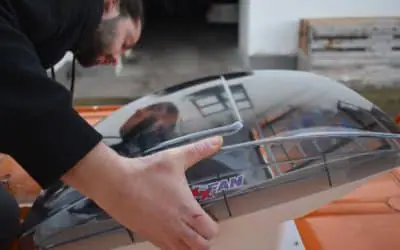
That is, until searching on Alibaba (China’s largest direct manufacturer-consumer sales marketplace) for a Truma Combi, I discovered something that caught my attention: the JP Heater .
The JP Heater (pictured on the left), from the description and photos looked like a perfect copy of the Truma Combi (pictured on the right), in every way except for one thing: the price!
JP Heater (Chinese Copy)
1000-1200EUR (shipping/customs included)

Truma Combi 6DE (Original)
3000-3500EUR
A bit hesitant, I started looking for reviews in English of someone who had tried it before, but unfortunately I didn’t find any really relevant experience/review that would take away the doubts and perplexities I had in my head.
So, I began to chat with the Chinese reseller and after a couple of days of thinking, I decided to embark on this adventure and take a chance, ordering the JP Heater directly from the Chinese manufacturer: the price difference was too tempting for a product that on paper had the exact same characteristics as the original.
I made the payment on a Wednesday afternoon (by card) and put myself on hold.
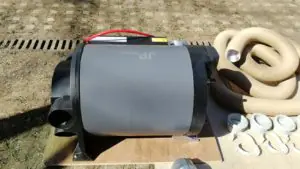
Once I ordered, the following Monday (so in the time of only 5 days!) I found two big boxes in front of my door waiting for me (with very fast customs procedures).
This is what I found at the opening:

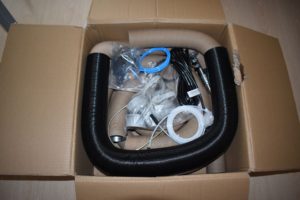
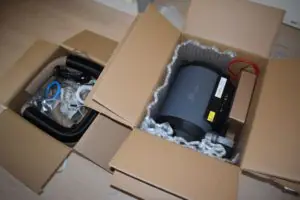
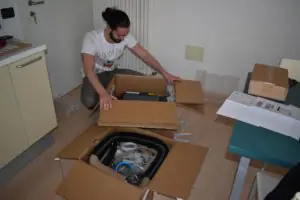
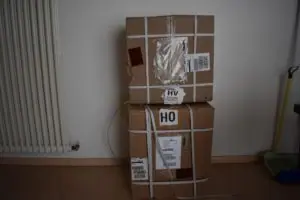
The boxes had arrived in excellent condition, the heater from the first impact seemed to me to be of good quality and workmanship, and the whole mounting kit was well packaged.
Instruction booklets (more than 50 pages) were written in an idiom that I would call “Chinglish” (not too accurate but understandable English) and I soon realized that they were nothing more than a copy of the instructions for the original Truma Combi (same pictures, same steps, same advice… in fact For almost the entire assembly I followed the instructions of the original Combi which were written in readable English).
Below, I leave you some photos I took of the complete kit that arrived at the total price of 1092Euro (shipping and customs included!).
CONTENTS OF JP HEATER + MOUNTING KIT
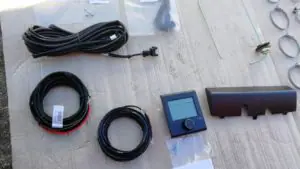
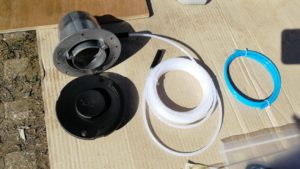
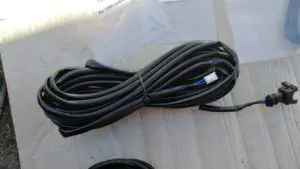
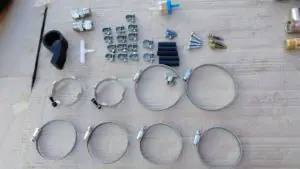
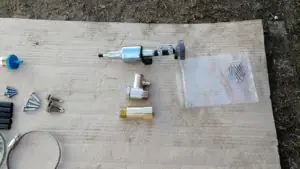

There was practically everything (and more!) that was needed for a DIY assembly. In fact, aside from the tools, I didn’t need to get any additional parts during the entire assembly!
Happy and thrilled with the deal, I immediately set about installing it. Below I’ll leave you with a quick step-by-step guide of how I did it!
3.1 DO-IT-YOURSELF INSTALLATION OF A JP-HEATER
The first part of installing any RV heater, is thinking: where to install it, where the electrical wiring, fuel lines, hot air lines, vents and exhaust will run from.
In my case, I decided to install the JP Heater at the bottom of my Van, under the dinette/bed, where I installed all the electrical (on one side) and water system (on the other side) of my converted van anyway.
Having the JP Heater 4 air outlets (all must be used according to the instructions!), I planned the following layout:
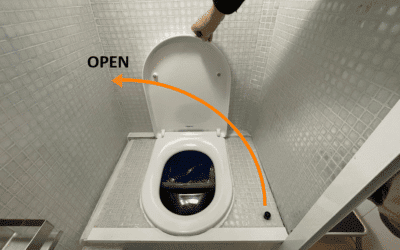
- an air outlet should have reached thebed/table area
- an air outlet would have to reach the bathroom (either to heat it or to use it to dry wet clothes)
- one exit would reach the kitchen/front of the living area
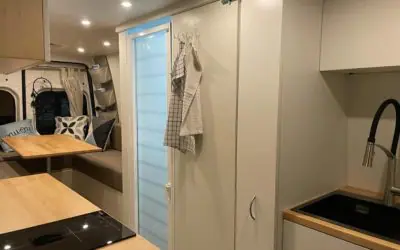
- one outlet should have reached thecockpit (beyond the thermal curtain) to avoid condensation/ice in winter
In addition, I planned to:
- draw fuel directly from the tank, located under the van
- install the air inlet/outlet directly next to the heater (as suggested by the instructions)
- a 12V connection directly from the fuse box
- Since I don’t plan to have a direct power supply from the grid for any part of my van (everything runs on batteries or inverters), I didn’t install the heater’s electric function at this time (while still leaving the cable accessible in case I need to install it in the future).
Below, I leave you with a simple diagram of my heating system.

Once the position of the heater and the various air vents had been defined (in the case of the JP Heater there are 4, most heaters have only one that can be bifurcated) it was time to Fix it permanently to the ground using the screws provided, and to begin with the actual installation.
NOTE 1: The heater is a component of your vehicle that will need maintenance over time. That’s why it’s important to place it in a place that’s easy to access and where it’s easy to work with in the future without having to disassemble half of your setup. I set it up under the head of the bed, which is an interlocking wooden panel that can be raised and removed if needed.
NOTE 2: The heater must be able to suck air from the surrounding environment in order to heat it. Therefore, it cannot be installed in a totally enclosed compartment or one with poor air access to the living area. The JP Heater instructions suggest leaving an air inlet (can even be a grate!) of at least 150cm2.
NOTE 3: to install it, in addition to the JP-Heater Manual written in more or less understandable English, I also used the Truma Combi 6DE manual (virtually identical!) written in both English and Italian (if you can use it too, download it from here: Manual Truma Combi 6DE).
UPDATE: I found online a JP Heater Combi Manual re-written in a decent English, I leave it here if you can use it or just to have a look 🙂
3.1.1 INSTALL THE EXTERNAL MUFFLER
1. The first step in installing a Do-It-Yourself JP Heater, is to cut an inlet into your van for the exhaust vent (from which air will enter for combustion and exhaust gases will exit).

2. The ideal location for the JP Heater’s exhaust vent (such as for a Truma Combi 6DE) should ideally be located:
- at least 30cm from windows or other openings (to prevent exhaust fumes from entering the interior),
- in a part of the flat wall of the vehicle (watch out for the outer grooves of the van!).
- at a distance of 60-100cm from the JP Heater exhaust outlet (to which it will be connected with the exhaust pipe)
- not lower than 20cm from the JP Heater exhaust vent

3. After checking that the location was right two/three forty times, I drilled the wall with the screwdriver drill and a small metal drill bit.
To open the hole in the sheet metal wall of my Volkswagen Crafter,I used an 85mm diameter hole saw, pointed at the center in the small hole I previously dug (this helps keep the saw in place and avoid messes). The hole saw should be used from the outside of the van to the inside. Important: don’t forget your safety glasses! (as I was about to do in the picture! 😉


5. Once the hole is done, it is important to treat it with a rust inhibitor and sheet metal paint.
Once the products are dry, we can continue with the insertion of the exhaust muffler.


6. To secure the muffler in the correct position (it must go up inside the van – this prevents water from accidentally reaching the heater), I used Sikaflex 521 glue and the 6 self-tapping screws provided.
- I didn’t use the supplied gasket because it didn’t look very reliable (I preferred to replace it with Sikaflex for a drop-proof muffler).
- To secure the screws perfectly in place, you should first drill guide holes with a very small metal drill bit, and then insert the screws. By doing so, they will enter more easily.
- To make sure that all the screws grip firmly to the sheet it is good to pull them all together a little at a time (better if alternating the screws opposite)


7. To finish the exterior muffler installation, I then installed (with the two screws provided) the plastic vent cover and wiped off the excess glue.


3.1.2 INSTALLING THE AIR HOSES
8. The exhaust pipe of a JP Combi (or a Truma Combi, or for that matter most diesel heaters) is actually composed of two tubes one inside the other.
- The outer (black) tube is the air draft tube, through which outside air is drawn and brought into the heater for combustion.
- The inner tube (aluminum-colored) is the actual exhaust pipe, the one through which the afterburner gases come out.
For this reason, it is important to
- first attach the smaller (exhaust) pipe, on one side to the muffler and on the other side to the heater inlet
- then, fix the external (air) pipe at the same ends, thus enclosing the exhaust pipe inside it
- Note: Use the hose clamps included in the installation kit to secure the hoses.
- Note 2: it is important that in the part immediately next to the muffler the pipe rises slightly upwards (to avoid accumulation of water coming from outside).


9. To fix the heating tubes instead (the brown corrugated ones), simply push them -by doing some pressure- inside the four vents of the JP Heater.
- NOTE: The two upper vents heat slightly more than the lower ones.
- NOTE 2: The heating pipes (about 7cm in diameter) are quite bulky (see photo); my advice is not to install them before time, but only when your setup is ready to receive them and fix them in place.


10. To connect the hoses to the air vents (also included with the kit), again just apply light pressure.
To securely attach the vents to the holes in the wood of my setup that I have specially created for them, I used the usual Sikaflex 521. Below I leave you with photos of two of the vents from the installed vents.


3.1.3 INSTALL WATER PIPES
11) Installing the hoses to use the boiler function of a JP Heater (or Truma Combi) on the motorhome is very simple: in fact, the device has a cold water inlet and a hot water inlet.
The inlets, in my case, were perfect for my 12mm diameter (internal) polyethylene pipes and all I had to do was secure them in place with pipe clamps (also from the Assembly Kit).

12) Before the cold water inlet, I installed a boiler drain valve and a check valve. This way I can protect my JP Heater both from overpressure (caused by hot water) and empty it in case temperatures drop too low and there is a risk of freezing (the boiler can be damaged by freezing).
If you’re interested in knowing in detail how I connected the entire water system of my van, I suggest you read the article Do-it-yourself motorhomes: the Complete Guide to Plumbing in which I explain all the components of a water system in detail (and included in them, the connections/valves needed to properly install a water heater).

3.1.4 INSTALL ELECTRICAL WIRING
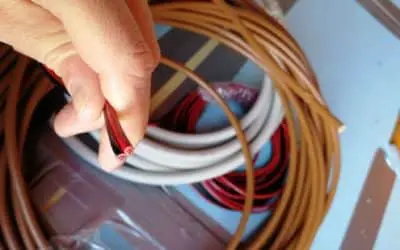
13) The JP Heater (like a Truma Combi) has several electrical wires that must be properly connected to their respective terminals. Without even one of these, the device is programmed to detect an error, report it on the screen, and not launch the starter. The cables to be connected are:
- 2 Cables for 12V Current (Red Cable (+) and Black Cable (-)) to connect to the fuse/battery box (in addition to the fuse to be used in the fuse box, the JP Heater has an internal 20A fuse)
- 1 Electrical cord to supply 12V power to the oil pump. (this cable from the JP Heater must exit the van through the floor and reach the pump that is installed underneath the van near the tank – as I will show you in the next paragraph)
- 1 Electrical cord for the Temperature Sensor: The temperature sensor is what helps the heater maintain a constant temperature as specified on the control screen. The sensor should be installed at a central point in the living space where it makes sense to measure the temperature (I installed it at the top of the wall between the bathroom and the dinette – behind the TV – in the area where we spend most of our time).
- 1 RJ12 electrical cable to power the control screen: This is the cable that sends data from the screen (to be flush mounted on a wall) to the heater.
- 1 Three-pole electric cable for 230V external power supply: This is the cable that allows the JP Heater (or Truma Combi 6DE) to run fully electrically when hooked up to the 230V post. It is the only “optional” cable, that it allows the device to work even when disconnected (for example, I have not connected it at the moment, as I do not plan to visit campings, if not very rarely).
All cables from the JP Heater connect to the electrical control box at the top of the heating unit.


3.1.5 INSTALL THE DIESEL PUMP
14) The diesel fuel pump shall be installed below the van in the following manner:
- Must be within 2 meters of the tank. (the nylon hose provided for the draft is the maximum length allowed)
- Must stay at a maximum distance of 6 meters from the JP Heater (important if you have a vehicle longer than 7-8 meters)
- It must be preceded by the Diesel Filter(also included in the installation kit).
- It should be inclined from the horizontal axis between 15/35°: this is the optimal recommended inclination, ideally the diesel pipe should proceed upward
- The pump as well as all nylon diesel fuel tubing must be installed in a location protected from mechanical damage: (as the installation is under the vehicle and close to the tank, it is important to verify that the installation does not interfere with other mechanical parts of the van. I ,for safety, installed the pipe following other pre-existing vehicle lines (VW Crafter electrical circuits).
Below I leave you with a diagram of the connections I had to make:

15. To run the diesel (white) hose, I had to drill holes in the floor of my van (I used a simple screwdriver with a metal bit). After treating it with rust inhibitor and paint, I used the hole to run the pump cable, diesel hose, and probe for my gray water tank (also located under my van).
Once the wires were through, I sealed the hole with antibacterial silicone.

16. For the last part of the assembly (inserting the tank suction hose) it was necessary to totally disassemble the tank of my VW Crafter. Since it was winter and I didn’t have an outdoor space, I preferred to ask for help to a auto body shop near my house that by lifting the van solved the problem in an hour (50 euros) and saved me some good headaches (honestly, I didn’t feel safe handling the tank and in addition doing it with the snow, would not have been the best xD).

Once the diesel pump installation was complete, the heater was finally ready to be tested and used. In summary, the key installation steps were:
- Drilling holes in the wall of the van and installing a muffler
- Connect the exhaust/heat lines after attaching the heater to the floor.
- Connecting Water Pipes
- Connect all Electricity Cables and connect the Control Screen
- Connect the Diesel Pump to the Tank
3.2 JP-HEATER REVIEW: MY EXPERIENCE

INSTALLATION
Mounting my JP Heater was definitely one of the most time consuming “projects” in the campering of my van.
In itself, the installation is not complicated and by following the instructions calmly and carefully it is possible to do everything Do-It-Yourself (for convenience, I only asked for help in removing the vehicle’s fuel tank as I had no suitable place to do so).
Despite this, installing the JP Heater was a project that I had to take back into my hands over and over again as it needed to be fully installed, Required other parts of the setup to be complete (the water system to install water pipes, that the electrical system for electrical connections, that the furniture to install air outlets etc.).
Certainly there are diesel heaters that are easier to install and less bulky than the JP Heater or Truma Combi (especially if they are not hybrid water/air heaters and have a single air outlet).
However, for larger vans (7m+) I would recommend this type of heating: having four air outlets ensures even heating inside the vehicle and also warms the cockpit to prevent condensation and frost.
SHIPPING AND PRICE
Compared to an original Truma Combi 6DE, the JP Heater allowed me to save about 2000 Euros for a product that is extremely similar to the original, and after several months of installation has still not given me any problems. It was a risk, but now I can say it was the real deal!
Shipping was super fast (5 days from China!) and everything arrived intact and well packed.
OPERATION
In the winter, even in sub-zero temperatures, I can warm up the van in about 10 minutes and get it to a temperature where I can stay in short sleeves. For the night, the temperature setting feature allows the heater to run only when needed to maintain the required temperature.
As for the water, the heater brings 10 liters of water to a temperature of 60°C in about 20 minutes.
The heater is moderately noisy when turned on, and very little when at full power. The “tick” of the diesel pump can be heard a lot on the outside of the vehicle and a little from the inside as well (I suggest to install a muffler, to muffle the sound).
In a whole night in winter, maintaining an internal temperature of 24°C, the consumption of diesel/diesel is less than one liter!
FINAL JUDGMENT
Personally, I love that the heater draws gasoline directly from the fuel tank of my Van: diesel is everywhere and given the very low consumption it is almost impossible to remain without it. Personally, I consider diesel heaters to be the best choice for being independent and free camping.
The heater so far is working exactly as advertised by the seller. Obviously, the downside of buying from a Chinese manufacturer is that in case of problems, compared to European brand products, getting assistance can be more problematic.
Nevertheless, all in all for my experience, I can recommend the JP Heater without any problems and can say that it is not a leap of faith, but a very good quality product.
7. How Altitude Impacts Heater Operation

Both gas and oil/diesel heaters are designed to operate with a certain percentage of fuel and a certain amount of oxygen (normally, that which is encountered at sea level).
As you go up in altitude, the amount of oxygen in the air drops and this impacts the quality of combustion inside the heater.
In fact, as altitude increases, the heater will tend to burn a higher ratio of diesel than oxygen.
This type of combustion is not a “clean” combustion as envisioned by manufacturers at sea level, but a “dirty” one that creates residue within the burner and exhaust pipe.
Spending several days at high altitude (normally 1500m and above) there is a risk that the residues will solidify into charcoal and the heater will stop working and need complex cleaning.
To avoid this problem, the major heater manufacturers (Truma, Espar, Webasto etc.) offer altitude kits that help the heaters reprogram their combustion and bring them up to heights of up to 2500/3000meters.
If you notice an excessive amount of black smoke coming out of the heater muffler, that is a sign that there is combustion residue within the exhaust/apparatus. Running the heater at maximum (wattage and temperature) can help clean it and fix the problem if it is not excessive.
Personally, I don’t have any altitude kit installed on my VW Crafter at the moment, but I don’t exclude to do it if I plan long trips in altitude above 1500m.
8. Choosing the right heating system for your motorhome
Conclusion

This was my complete guide to heating for a Do-It-Yourself camper van.
Personally, I have to admit that heating has been one of the most difficult topics to research, choose, install and even write an article about.
As I set out to find the right heater for me, I realized that the information on the internet was very scattered and confusing.
I hope with this article (which I will continue to update to tell you about my experience) that I have shed some light on the heater models available on the market and how they work. Also, I hope that my installation experience will give you an idea of the steps needed to install a heater in your DIY Campervan!
As always, I ask you to write me in the comments below if you notice any inaccuracies (which can always escape), if you have any doubts about what I wrote and if you have any ideas to improve this article and make it more complete for those who will read it in the future 🙂
Thanks for reading, and see you in the
upcoming insights
😀
BEFORE YOU GO, CAN I ASK YOU FOR SOME FEEDBACK?
Writing detailed articles like this takes a lot of time and effort..
If you liked it, can I ask you to leave me a feedback message in the comments at the bottom of the page?
For a content-creator, knowing that you are being read and that your efforts are useful to someone is the best motivation to keep writing and doing better 🙂
Let me know what you liked or what you think could be added.
If you’d like, you can also share the article to help other people find it!
Thanks for the help 🙂

Read the Van Conversion Guides
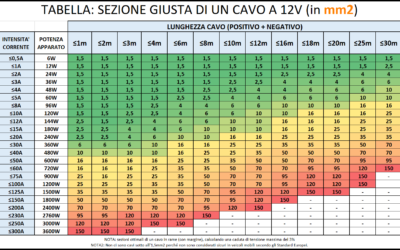
How to Calculate the Right Section of 12V Cables | EASY GUIDE
An undersized cable does not carry enough current. A cable that is too undersized can lead to a fire. An oversized cable, on the other hand, simply costs more and is a waste of money. Are you wondering what is the logicfor choosing one section of cable over...

Bluetti vs Ecoflow | Which is the Best Portable Power Station for RV/Vanlife?
The Portable Power Station is an increasingly used accessory on camper vans and RVs, but when does it really make sense to purchase and own or install one? In this article we try to shed some light on how these systems work, the best options on the market, and the...

Van Conversion DIY: How Much Does It Costs? | My Experience
How much does it cost an entirely DIY van to campervan conversion? The queen of all questions... In this article, I want to show you all the costs of my conversion from start to finish, so that you too can get an idea of what it might cost! ...
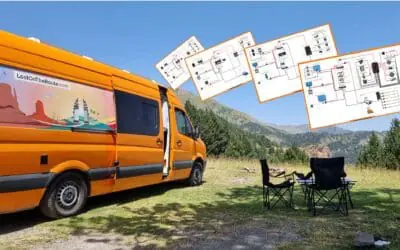
Van Electrical Diagrams for your DIY Project – Ready to Install
The Electrical System is often one of the most complicated steps in a DIY van conversion. How much energy is needed? What apparatus/devices to purchase? How to connect them? How much would it cost? These are all doubts and questions that normally everyone finds...

Van Interior Conversion: Best DIY Ideas for your Project!
The Interior Outfitting of a DIY converted van is both an aesthetic and structural choice. In this article, you will find useful information and inspiration ideas for customizing the Walls, the Ceiling, and the Floor of your Van! DIY CAMPERVAN SET-UP:...

Kitchen for Camper | Best DIY Ideas for your Van Conversion
Cooking in Camper is one of those things, that makes you feel at home wherever you are! Gas, Diesel or Electric Stove? What equipment and accessories you need on the Road? How much space do you need? How to assemble the kitchen in your Camper? In this article you will...

The Best Fridge for Your Campervan – Which One to Choose?
Buying a trivalent or compressor RV refrigerator? Horizontal or vertical? 12V or 110/220V? In this article you will find all the information you need to choose the best fridge for Your Van, tailored to your Needs! 🙂 THE REFRIGERATOR IN THE VAN:...

Van Conversion: How to Build a DIY Bed for your Camper Van
A Camper is not a Camper if it does not have a bed. Where to Sleep and... Dream! In this Guide you can find the inspiration you need for creating a DIY Bed in Your Campervan, And I'll show you step by step how I built a Complete Bed/Dinette on my VW Crafter....
DIY Camper Bathroom: How to Self-Build a Toilet
If you are Campering a Van you surely must have wondered: How does the Bathroom in a Motorhome work? In this Guide I show you the various types of Bathrooms on the market, I explain how they work, and I show you how you can Build yourself an entirely...
Best 12V Fan for RV | DIY Installation Guide | Van Conversion
A Roof Fan helps keep your Vehicle's humidity under control and change stale air. In this guide you will find everything you need to know about mounting a Maxxfan Deluxe fan on the roof of YOUR van. ROOF FAN: WHAT IS IT FOR? Keeping an RV's...
How to Build a Shower in a Do-It-Yourself Camper
A Shower in the RV for some people is not necessary, for others it is a real necessity to be totally independent! In this guide I'll tell you how I built the shower of my converted van entirely Do-It-Yourself! INSTALLING A SHOWER IN A...
Complete Guide and Electrical Scheme for your D-I-Y Van Conversion
You dream of transforming your Campervan DIY and have never touched an electrical cable before? Or do you want to implement some changes to your Factory RV? In this guide you will find EVERYTHING (absolutely EVERYTHING!) you need to know to create the perfect DIY...


Well written and very informative installation guide and review on the JP combo diesel heater.
It sounds like a great reasonable cost and economical option for a camper build.
Thanks
Great article. Extremly good explaind. I use 4Kw JP airheater in my sailboat. Heater is placed in a locker 3 meter from the cabin. I have isolated all blow-heating tubes inside and heating air is supplied from fresh air outside. Dry, clean and very hot air inside my boat.