
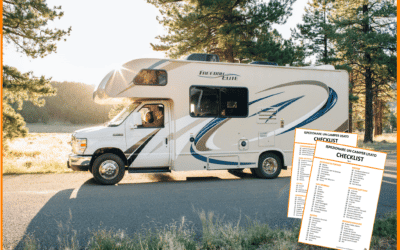
The Interior Outfitting of a DIY converted van
is both an aesthetic and structural choice.
In this article, you will find useful information and inspiration ideas for
customizing the Walls, the Ceiling, and the Floor of your Van!
DIY CAMPERVAN SET-UP: HOW TO CHOOSE AND ASSEMBLE THE VAN INTERIOR?
Reupholstering the interior of your van is one of those steps that perhaps more than any other will change the way you see your vehicle: from a simple cargo van to a future little house on wheels.
Once the floor, walls, and ceiling are installed in fact, the setup of your van conversion will begin to take shape; and you will begin to realize that really what seemed impossible at first is coming reality! 😉
In this article, I show you how I build the interior of my camper van (floor, walls, ceiling, doors, corners, and drawer above the driver’s cab) and leave you with all the useful information on materials, precautions, and tips for doing the same.
In this article, I will not talk about thermal insulation instead, but will start directly with the actual cladding (if you are interested in how I insulated the walls, floor and ceiling of my van, I suggest you read the article Complete Guide to Thermal Insulation).
Similarly, before lining the interior of your van, I recommend that you think carefully about how to set up the services (water, electricity, heating) of your camper van, as well as, of course, finishing the thermal insulation.
I leave below links to the in-depth discussions of each topic, in case you may need them:
- Complete Guide with Diagram of a DIY Van Electric System
- Complete Guide with Diagram of a DIY Van ‘s Water System
- Complete Guide to Heating a Campervan DIY
- Complete Guide to Heat Insulating for DIY Van Conversion
Let’s begin now with the Guide on the Van Interior Conversion for your Van! 😀 🙂
TABLE OF CONTENTS
Van Interior Conversion: How to Build and Customize the Interior of your Van

1. Van Interior Conversion: Paving the Floor

The floor in a camper van is probably one of those things that more than many others changes the perception of your vehicle from a simple van to a house on wheels.
There are so many options for floor covering in every color, texture and price: wood, vinyl, beadboard, rubber, steel, carpet, tile–each, of course, with its own pros and cons.
Before we look at the most recommended options in detail, however, let’s check that we have everything in order.
1.1 PREPARE THE SUB-FLOOR
Before choosing and installing your final floor (the one that will later remain in view and thus also have aesthetic value), it is important to make sure that the bottom of the van (sub-floor) is in the right condition.
If you’re converting a second-hand van, I recommend removing the old floorboard, giving the underneath a good cleaning (it’s the last chance you’ll get to do this!), and checking and possibly treating rust spots and/or rotten areas.
Similarly, if you are embarking on a permanent van conversion (so where everything will be fixed in place and not removable), you will probably want to consider putting a layer of thermal insulation underneath your floor.
All these points of floor preparation, I cover in detail (with step-by-step photos) in the Complete Guide to Thermal Insulation(Chapter 4) and in the following video where I show the whole construction of our interior insulation and coating:
Once the subfloor is settled and insulated, you’ll be ready to cover it with the definitive floor! 🙂
1.2 THE WOODEN PLATFORM

Regardless of the insulation material you will have chosen to insulate the floor, it will probably not be 100% flat and level (all insulation materials are more or less flexible/soft).
In order to avoid unpleasant problems in the future, but also to have a solid base on which to anchor all your furniture later in the van interior conversion, it is therefore important to create a solid floorboard on which you will then lay your final floor covering.
If you are fortunate enough to have a factory flatbed in good condition (like that of new vans, or well-maintained) you can think about leaving the original one in the vehicle (I, fortunately, was able to do this), otherwise, you will have to use the template of the original as the basis for cutting a new one.
Personally, I would recommend that you use a Plywood board with thickness between 8-10mm, so as to have a fairly solid base on which to anchor the rest of the setup, but slightly flexible both to withstand the slight torsions to which it might be subjected along the marchand to install it with ease.
Once you’ve got the floor in place, and you’ve secured it to the ground properly (interlocking if you don’t want to touch the bottom, otherwise with glue or screws for a permanent solution), it’s finally time to decide what to cover it with!
Below, I show you how we prepared our floor 🙂
1. After thoroughly cleaning the bottom, treating the rust, and thermally insulating it(see here how), we mapped our design onto the original flatbed using paper tape.

2. At that point, once the flatbed was repositioned in its original position, we attached it with 4x50mm self-tapping metal screws to the bottom of the vehicle (through the wooden batons and the metal underneath). NOTE:At this stage, it is important to be careful not to drill underlying services (be sure to check underneath the van to have space for screws)

3. Since our set-up is a fixed and permanent one, we chose to secure the platform with screws. Obviously, drilling holes in the bottom puts the vehicle at risk of rust, so additional treatment is needed.

4. For this, we treated each screw with a coat of rust inhibitor and, once dry, with two coats of black spray paint. It is important to be careful not to forget any screw.

5. There were holes in the original flatbed (originally used to attach the bottom to the ground). We filled them with wooden discs and neutral silicone.

6. To take advantage of all available inches, we created a continuation of the custom-made floorboard, using 8mm plywood.

1.3 MOST COMMON MATERIALS FOR COVERING A VAN FLOOR
Once the floor is in place, it will be time to choose the material your floor will be made of.
The options, as you will soon realize, are so many. To help you best choose what is right for you, I therefore recommend that you ask yourself and keep these 4 questions in mind :
- is it light? It goes without saying that every extra kilo you load onto your van will result in slightly more fuel consumption over the life of the vehicle. For this reason, between two similar alternatives, I would always advise you to go with the lighter one.
- is it easy to cut and shape? Since yours is a DIY project, it is important to choose a material that you know you can comfortably work with and install yourself, with the tools at your disposal.
- Is it waterproof? In the unfortunate (but highly likely) event that something spills on the floor sooner or later, is it easy to dry? Can water be prevented from sneaking into the subfloor giving rise to possible rust problems? If you are aiming at a serious/premium van conversion with a permanent setup in place, avoiding water infiltration should be one of your main priorities.
- is it easy to clean? Think ahead: the material you’ll be using needs to be something that in case it gets dirty, can be cleaned easily! Your mental and physical health depends on it 😉
Having made these four points, below I show you the most commonly used materials for DIY van conversions, each with its pros and cons.
1.3.1 LAMINATED WOOD AND PARQUET FLOORING

ADVANTAGES
- Elegant and Premium Style
- Pleasant to the touch
- Longevo
- Laminate can be found in Many Shades and Textures
CONS
- Expensive
- Heavier than other Options
- It scratches easily
- Permeable to Water (but there are ways to treat it)
Using real wood and building a real parquet floor is definitely an impressive and elegant option that helps give your van a “Chalet” style.
The downsides of using this kind of material however, are its water permeability, ease of scratching, it is more expensive than other materials to buy and maintain.
The laminated instead, is an option that can still give a parquet effect, but at a lower cost and with greater durability. In addition, laminate manufacturers can create color shades of any kind and even give a stone or tile-like finish.
1.3.2 PVC VINYL – “CLICK” LAMINATE

ADVANTAGES
- Totally waterproof
- Quick to Install Do-It-Yourself
- Lightweight and Easy to Cut
- Withstands Vibration very well
- Available in every Color and Gradation
CONS
- There are some very poor ones
- Medium-High Price if Quality
- Less long-lived than Parquet
- It looks like real wood, but feels slightly different to the touch
- Produced with Petroleum
Due to its incredible mechanical qualities and total waterproofing, it is no wonder that PVC vinyl is an extremely popular choice for flooring a DIY Vans (I too have chosen this route!).
Available in endless shades and textures, lighter than a parquet floor, and very easy to lay, cut, and install; PVC vinyl is a material that can be easily adapted to everyone’s needs. Also, it can feel a lot like wood to the touch, but also like tiles in case you choose other patterns.
Vinyl in “click” laminate is the most premium choice and with the greatest mechanical strength among the various PVC alternatives, followed by laminate to bond and full sheet.
Negative notes: vinyl is slightly less durable than wood, and being made from petroleum, it is also a less sustainable alternative.
1.3.3 PVC VINYL – WHOLE SHEET

ADVANTAGES
- Very Fast to Install
- Totally Waterproof
- Economical Solution
- Available in Every Color, Texture and Gradation
CONS
- Aesthetically Less Valuable
- Less Impressive to the Touch
- To the Touch quite different from Wood
- Difficult to Repair if Broken
The vinyl slab is perhaps the easiest floor covering ever to install: it is cut to size and glued/screwed to the wood floor underneath.
The advantages of this type of coating are: easy and quick to install, many textures/colors to choose from, waterproof and inexpensive (it is one of the materials that costs less!).
The major disadvantages, on the other hand, are aesthetic: at a glance and touch, a vinyl PVC sheet appears to be a definitely cheaperand less “premium”solution, not looking much like real wood.
Also, in case it cuts or breaks somewhere, it is very difficult to make a proper repair.
1.3.4 CARPETING AND RUGS

ADVANTAGES
- Soft, Cozy, Warm
- It can be Cheap
- It makes you feel at home
and DISADVANTAGES.
- Quality is Expensive
- Difficult to Keep Clean and Dust Free
- Expensive Maintenance
Walking on a carpet or rug is something that really makes you feel at home: soft, cozy, warm in winter, non-slip…
The main problem with this type of flooring, however, is one: maintenance! As it is easy to think in fact, the longevity of a carpet/carpet does not depend only on the initial quality of it, but also and above all on the care with which it is cleaned and sanitized every day.
For this reason, a carpet is an ideal floor covering for those people who are willing to take care of it; but it is something that should be avoided at all costs if you don’t take the responsibility of devoting the right amount of time to it.
In fact, unkempt carpeting can be an ideal nest for dust and bacteria.
1.3.5 RUBBER.

ADVANTAGES
- Waterproof
- Cheap
- Long-Lived Difficult to Ruin
- Non-slip
- Perfect for Garage/Hidden Areas
CONS
- Aesthetically it is nothing that makes you feel “at home”
- Heavy
Rubber coating is a bonding solution that is waterproof and costs very little.
These two features, make rubber ideal for covering those parts of floors not in sight and little used (like the back garage!) where installing expensive and valuable vinyl would be a waste.
On a negative note, this type of rubber flooring weighs a lot!
1.4 PAVING THE FLOOR OF ARANCINO: OUR CHOICE
After much deliberation, we decided to opt for a Laminated PVC vinyl of medium-high quality (cost around 40Euro/m2), and to cover the entire floor area (even under the furniture where it would not be in view and the garage).
The reasons that led us to this choice were:
- our goal was a van to live in Full-Time: and we wanted something comfortable reminiscent of wood and aesthetically beautiful
- we wanted a waterproof floor: for us this was an essential point that we did not want to compromise. Water leaks or accidents can always happen, and the idea of water penetrating the floor and reaching the metal at the bottom truly scares us
- we wanted something to clean: okay that in a van at the end it is only a few square meters to clean, but just because you only live in those, they are to be cleaned almost every day. We wanted to opt for something that was easy to clean with a vacuum or to simply wipe with a rag
- easy to install in no time: with all the projects we had in mind, we didn’t want to complicate our lives more than we had to 😉
In total, we used about 8sqm of vinyl to fully cover our Volkswagen Crafter L3, with virtually no waste (maybe we had half a plank left over, lucky lucky! ;D).
Despite finding great solutions on the internet for PVC laminates, for once we decided to let our beloved amazon courier rest (it was practically there every day ahah) and buy our laminate from a local retailer.
Personal tip: Before you buy a floor, you need See it and touch it for real to really understand if it is the right one for you! Many online sites send free flooring samples, in case you still want to buy online.
That said, below I will briefly show you how we assembled our floor 😉
7. A Click Laminate is relatively easy to assemble (each laminate has its own instructions included). You start at one corner and, fitting one plank at a time with the previous one, proceed to the opposite one.
8. To cut the planks (for example, to get around wheel arches or irregular profiles) you can use a simple box cutter, or (in my opinion much faster and more effective), a jigsaw.

9. Once all the planks are laid down, the result should look something like this… already with the floor, the little house on wheels begins to take shape 😉

10. To finish the edges of the floor near the sliding door and the rear doors, we thought of using aluminum corner profiles. To fix them, we used Sikaflex 521 and screws.

11. For the back trim, we wedged two profiles inside each other, and finished them with the jigsaw at the ends so that they followed the slight curvature of the walls.

12. For the side door step, on the other hand, we used a 3x2cm aluminium profile. Initially we thought of not putting the screws in, but we soon realized that in a transition area like the entrance, they were necessary.

Now let’s move on to the next chapter, in which I will show you how to cover the side walls 🙂
2. Van Interior Conversion: Covering the Walls

The walls of a camper van are an ever-present detail that greatly characterizes the final aesthetic result of your project.
In the vast majority of DIY campers, the most commonly used material (mainly because it is easy to work with and affordable) for wall cladding is definitely wood (whether this is in plywood, plywood or beadboard). That said, sometimes materials such as aluminum panels (ACP) or vinyl panels (PVC) can also be found.
But let’s go in order: whatever material you choose for your upholstery in fact (which is mainly a choice of personal taste), it will have to be firmly attached to the walls of your van (assuming you’re thinking of a fixed setup!).
Screwing panels or plank directly to the interior metal of your van is not the best choice for two reasons:
- Van walls are not always straigh, have ribs and protrusions: you can’t always put screws where you need them
- It would create thermal bridges: putting hot metal in summer or cold metal in winter in contact with your wall covers would create thermal bridges, that is, areas through which heat could be transmitted by conduction (contact). If you have thermally insulated your van (find the Complete Guide on How to Insulate a DIY Camper Van.), screwing the planks/walls directly to the metal would defeat some of your efforts.
And now you may be wondering: so how do we fix the wall covering? Don’t worry, nothing too complicated!
Before fixing it, you need to perform another step called cladding, which is to create a network of vertical and horizontal planks on the walls of your van, to which you will then screw your final cladding/planks/boards..
In the next paragraph, I show you how I did it.
2.1 CLADDING: PREPARING THE WALLS’ STRUCTURE
To build a supporting structure that best suits your needs, it is important to keep your final design in mind: where will you need to attach furniture? At what height? If I decided to use beads/planks, how long would they be? If you want to install shelves, where could you anchor them?
Asking these questions will surely help you to figure out how many planks you need and especially where you need them. Below, I show you what we did on our Arancino camper van.
13. To create the support for our walls, we used wooden planks 4cm wide and 1.5cm deep. We need the width of 4cm to be sure to center the support when mounting the walls, when the axis will no longer be visible.

14. First, we identified the main points (both horizontal and vertical) where we would need attachment points (to fix furniture, bed, walls etc. more firmly).

15. To fix the support planks, we used 3x35cm and 4x40mm self-tapping screws for metal. Before inserting each screw, it is important to make sure that there are no electrical wires, pipes, or other delicate components behind the sheet metal (and of course, make sure that the screws are not too long to come out of the van 😉 ).

16. Once the wooden structure was completed, we covered the walls with subfloor insulation to create extra protection against moisture (any kind of vapor barrier material or reflectix is fine) and sealed everything with aluminum tape.

Once the walls have been properly insulated and all the wooden structure prepared, it will finally be time to choose what material to use to cover them.
2.2 WALL COVERING: WHAT OPTIONS ARE THERE WITH PROS AND CONS
Below I briefly show you the materials that are most commonly used to cover the walls of DIY camper vans and that I personally find both easy to install DIY and convenient to modify and customize.
Obviously, the following list is not exhaustive of all the materials that exist (with creativity, there are many other materials that could be used ;), but these are simply the ones that I think you might be interested in considering more than any other.
2.2.1 PLYWOOD PANELS

ADVANTAGES
- Easy to Shape
- You can give an “house wall” effect
- Relatively fast installation
CONS
- Wood needs to be treated (impregnating agent + enamel)
- Difficult to mount unless there are at least 2 of you
- Eliminating post-installation screws takes time and labor
Multilayer plywood panels are easy solutions to custom shape and use for the interior trim of a van.
Available in various thicknesses and produced with various types of wood (poplar, birch, walnut etc.) and endowed with good flexibility and mechanical elasticity, these panels are also found in large sizes. This makes anchoring them to walls and ceilings easy and relatively quick.
2.2.2 WOODEN BEADS/PLANKS

ADVANTAGES
- Relatively inexpensive
- Easy to Carry
- Feeling “cabin, chalet, homey”
- They follow the curved walls well
- If a plank should break or become stained, it can be replaced
CONS
- Installation requires Time
- They require quite a lot of preparation (cladding)
- They may lengthen the approval paperwork in some EU countries
When we think of a DIY van interior conversion, most of us think of wooden beads.
In fact, these interlocking planks, in addition to being relatively inexpensive, are easy to use (although they do take some time to screw in!) and contribute to that “homey,” chalet-on-wheels style/feeling.
They can also follow the curves of even the most crooked interior walls.
Note: if you are planning to homologate your van in Germany, consult with the TUV/Dekra inspector who will have to carry out the inspection to make sure they will accept the beads as upholstery (some make a fuss about it as a matter of safety in case of an accident) and possibly get instructions on how to secure them safely.
2.2.3 PVC FOAM

ADVANTAGES
- Lightweight
- Anti-scratch and Flexible
- Quick to Install and Long-Lived
- Water Resistant and Insulating
- Maintenance Free
CONS
- Many prefer to work with wood
- Expensive
- Less Resistant for screwing in furniture
A innovative and modern material for those who like to experiment.
PVC foam beads are a material that to the touch resembles wood (it can also, however, trace marble or stone!), but much more technological: PVC foam makes the material lighter, scratch-resistant, and flexible, but at the same time mechanically very strong.
Unlike wood, which being a living material can wear/crack with temperature changes, PVC is a plastic material that can last unchanged for many years.
The negative notes why despite all its many advantages this material is still not widely used in DIY campers, are twofold: it costs more than wood and most people have never even seen it before.
PVC foam, certainly is a material with much potential for the future.
2.2.4 ALUMINUM COMPOSITE PANEL (APC BOARD)

ADVANTAGES
- Totally Waterproof
- Many different gradations
- Thin and Lightweight
- Once mounted, it requires no treatment
CONS
- Hard to Find in Physical Stores
- Same Material as “Factory” RVs
Aluminum composite panels are a suitable cladding material for color who seek a modern design or similar to factory campers.
This material consists of two very thin layers of aluminum sandwiched over a softer, more flexible inner material (usual polyethylene).
The main advantages of this material, is that it is thin (2-4mm thick is sufficient even for walls), available in many different textures and colors, and once installed, requires no treatment: it is already waterproof and easy to clean.
2.3 HOW WE CLAD OUR ARANCINO CAMPER VAN
After much thinking, we decided to use plywood panels to line our van from 8mm wall thickness e 4mm for the ceiling (less heavy),treated with two coats of impregnating agent (to prevent mold and water infiltration) and water-based enamel satin white to give a “home wall” feeling and to make the walls waterproof and easily washable with a damp rag.
Below, I show you how we created our walls interiors of our van.
17. Once the height was adjusted, with a jigsaw, we began to cut the space needed to fit the wheel arches and opening handles of the rear doors.

17. First, we adjusted the height of our panel to match the wall. Then, with a jigsaw, we began to cut the space needed to fit the wheel arches and the opening handles of the rear doors.

19. Next, we took measurements of each service (pipes/electrical cables etc.) that would run behind our walls, and carved in the walls of the exits.

20. Creating all the exits in the right places takes some time, and we found ourselves inserting and removing these large panels from the van a few times. To install such large multilayer panels, you need to be 2.

21. Once we were sure that each service had its own outlet, we began attaching the panels to the network of planks created earlier, always making sure to pass each pipe/cable into its outlet.

22. Since the walls of our VW Crafter are slightly curved, we had to fix our walls at various heights. We used a screwdriver and a manual screwdriver to pull the screws (flathead 3x25mm and 3x35mm) tight once inserted.

Note 1: Before installing your walls, make sure that all cables/pipes/ conduits are well protected. In fact, most vans have sharp sheet metal edges that over time and vibration could be dangerous to your cables, ruining them and possibly even cutting them (creating potential causes for fire or otherwise failure).
Note 2: Always keep accessibility in mind. In the unfortunate event that something breaks, you need to be able to access and repair it without perhaps having to disassemble half a van. Drilling holes in the walls into which your hand can pass is always a good idea. In case you chose beadboard siding instead, calculate that you may only need to remove some of them to access the backwall.
Note 3: If well protected, electrical cables theoretically do not deteriorate and will last you for the lifetime of your vehicle and beyond. Therefore, it is important to use coiled tubing, conduit and guards: pay attention to all potentially sharp edges.

24. To spread the putty properly, a small trowel is sufficient. Once the screw holes are invisible, all that remains is to wait for the putty to dry before going over the walls with a sanding stroke.

Before sanding the walls and covering them with stain and enamel, having chosen multilayer plywood for the ceiling as well, we installed the ceiling and then sanded and stained it all at once.
3. Coating the Ceiling

Coating the ceiling of your van is another one of those fundamental and highly aesthetic steps that helps transform the perception of those who see it.
When coating/covering the ceiling, it is important to keep two key points in mind:
- Services and Insulation must be finished: before covering the ceiling, whichever material you have chosen, it is important that the thermal insulation (if you have decided to install it) and the various direct services to the roof (grommets for solar panels, antennas, fan, lights, luminaries, awning hookups etc.) are finished. In fact, once the siding is installed, you will have no way to see directly to your sheet metal ceiling from inside the van, and getting your hands on it to create new holes will be much more complicated.
- Every millimeter (and gram!) counts: every extra millimeter of ceiling, is one less millimeter of available space in your entire van. The difference between a half-inch or 2-inch ceiling might for some people be the difference between standing comfortably or scratching with your head all the time. In addition, every extra millimeter is weight that your van will have to carry for a lifetime: so it is good to Finding the right balance between strength, aesthetics, and weight.
That being said, in this paragraph I will not show you the best materials for lining the ceiling of a camper van as these are essentially the same ones that are normally used to cover walls, only with generally lower thicknesses.
Instead, I show you how we built the ceiling of our VW Crafter, and how we treated it, along with the walls, to make it waterproof and washable.
3.1 HOW WE COATED THE CEILING OF OUR VAN AND HOW WE FINISHED THE WALLS
25. First, we measured the width of the van and cut a 4mm plywood panel to size. Then, we cut out the frame for our Maxxfan and the various holes for the LED spotlights.

26. In two, we placed the panels on the ceiling and screwed them to the wooden boards installed during the insulation phase (if you haven’t read the article where I show how, you can find it here). For each panel (2 in total) we used something like 60 screws (really a lot! 😉 )

27. Once the 4mm plywood panels were firmly attached to the ceiling, we pulled out the previously placed cables and, with quick clamps, prepared the power supply for each LED spotlight.

28. And finally, after much preparation, we had finally arrived at the most fun part: painting the whole thing!

29. After protecting the floor with a painter’s cloth, we gave both walls and ceiling two coats of water-based wood stain. This is to make the wood waterproof and protect it from mold.

30. Once the impregnating agent is dry, the first coat of color can be given. We, for our camper van, chose a water-resistant and easy-to-wash white satin enamel.

Note 1: When applying impregnant to the wood, this in absorbing it can twist and undulate. Don’t panic, though: in fact, once dry, the wood returns to its original shape (after putting on the first coat of impregnating agent we had a fit, but then we realized that some waviness is completely normal 😉 ).
31. Once the first coat was applied, we also grouted the ceiling screws, and with a sander we sanded all the places on the walls/ceiling where the grout was still visible.

32. At this point, we gave the second coat of white (the final one) on all the walls and ceiling. Our little house on wheels has finally begun to take shape and really look like a home 😉

31. Once the second coat was dry, we attached our LED spotlights to the ceiling clamps, and the overall result looked something like this.

Seeing the wall, ceiling, and floor covering surely is a very important step of a DIY van-to-campervan conversion, that gives much satisfaction and a boost to morale (it’s taking shapeeee! xD).
That said, to create the “home” effect we had in mind, the work was still far from finished. Indeed, a van (or at least a VW Crafter in our experience) is full of irregular areas, and for a project finished to the smallest detail, it was important to find a viable solution to cover each of these. In the next chapter, I will explain how we did it 🙂
4.1 ABOVE THE SLIDING DOOR
4. How to Cover Irregular Areas

Now that we’ve done the bulk of it, let’s get to the “fun”(or devilish 😉 ) part.
As you may have already noticed if you already have a van and are converting it, is that almost every van has irregular, curved, complicated areas that you can’t always clad in the same way and with the same materials that you’ve clad everything else with.
Even in our case, determined to cover any part of the orange on the walls of our van, we were faced with irregular and decidedly complicated areas. In this paragraph, I want to show you briefly how we thought of covering them .
Of course, every van is different, and what worked for us may not necessarily work in your case or be the best option anyway. These are just a few ideas we came up with for finishing the irregular parts, but surely there are many more 🙂
4.1 ABOVE THE SLIDING DOOR
33. The area above the sliding door of our van, besides being uneven, did not allow the use of screws (the thickness of the metal was only a few millimeters).
For this, we opted to create a custom-made wooden profile (4mm thick) (first shaped with cardboard), and glue it over the whole door.

34. After cutting the piece of wood to size with a jigsaw, we glued it to the sheet metal using Sikaflex 521 glue (praise always!).
Then, we used cloth tape and simple clamps to hold it in place while the glue dried.

Note 1: To cover the very uneven areas, where the wood most needed to flex to follow the shapes of the van, we used plywood of 4mm thick (more flexible!)while in the more straight areas, we used some 8mm thick plywood (more solid!).
35. Once the glue had dried and the piece was firmly attached, we painted it the same way as the walls (impregnant + enamel).

36. The orange sheet metal parts, on the other hand, we colored them black so that they would not stand out, using a paint for sheet metal.

4.2 BESIDE THE SLIDING DOOR
37. In the same manner as in the previous step, we also shaped the irregular edges around the sliding door with cardboard.
To create these profiles, as for the walls, we used 8mm thick plywood.

38. Again using Sikaflex 521 glue, and where possible some sheet metal screws, we also fastened the side profiles and treated them with impregnant and enamel.
After grouting the screws, we went over the edges with a sander to avoid splinters.

4.3 BACK CORNERS BETWEEN DOORS AND WALLS
39. Our VW Crafter had convenient cavities in the rear corners that we thought we could use to pass utilities (a reading light, a 220V outlet, and a USB-A charging outlet for each part of the van).

40. To cover this part of the walls therefore, we first shaped the irregular shape of the walls with cardboard and then transported it to an 8mm plywood panel.

41. After verifying the correct height of the utilities, and arranging the electrical connections properly(see Guide on Electrical Installation) we notched the appropriate holes for each utility.

42. We did the same thing with the profile above the doors (here we drilled a single inspection hole, which was useful in case we needed to pull new cables or otherwise access the upper raceway.

43. At that point, we pulled out the wires, protected them with paper tape, and treated our new wall with the usual primer + white water-based enamel.

44. Once the services are assembled, this is the final result. To finish the outer edge, we used machineU-Trim, and for the edge, simple paintable wall silicone.

4.4 THE DOORS
45. To put insulation in the doors, we had removed the original wood panels. Before reassembling them, we treated them with impregnating agent and 2 coats of white water-based enamel (the same as the walls and ceiling).

46. Using white sheet metal paint, we repainted the entire orange interior of the doors (2 coats), using paper tape to mask the edges and make them straight.

47. This is the result for the side door. At the moment it is still white, we have not yet decided how we want to decorate it 😉

48. And this is the result with the rear doors. To these, however, Isa added drawings with her artistic touch 😉 ).

Left door.

Right door.

4.5 HOW TO TRIM EDGES – HOME WALL EFFECT

Once walls, ceiling, and all irregular areas are fixed and covered, of course it is normal for small gaps to remain between one piece and another (e.g., between walls and ceiling, between over-doors and walls, between beads with different inclination etc.).
In fact, no matter how carefully you cut out the pieces, since the van is not a perfect parallelepiped (wheel arches, curved walls, etc.) it is obvious that some draft in the corners will always remain.
To “homogenize the whole,” eliminate aesthetic imperfections and still close the cracks so that moisture and condensation will not pass through, the simplest and most effective solution is definitely paintable silicone.
With silicone in fact, it is easy to fill any small cavities and, by pulling it with a finger, create a “round” corner that is pleasing to the eye. once dry, simply cover it with the same water-based enamel used for the walls to make it disappear completely.
Since a camper van is a mobile vehicle also, using a flexible material such as silicone prevents unpleasant cracks from forming in the future.
5. Dresser Above the Driver’s Cabin

At this point the covering of our camper van was almost complete: floor, walls, ceiling and irregular areas were covered. The last part we needed to cover to complete the living area was the space above the cockpit.
Since it is a very very spacious area, we, therefore, thought of turning it into a small “closet-mini loft.”
Below I show you how we created it.
49. To begin with, we removed all the factory coating. Then, we covered the ceiling with reflective bubble wrap (glued with 3M spray glue) and took measurements for the plywood siding.

50. We used 8mm-thick plywood board to make the bottom. With the same material, we also traced the side walls (in our case they were not symmetrical but different).

51. For the top coating, on the other hand, we used a very flexible 3mm panel. We wedged it between the bottom and the slanted wall of the van and glued it with the usual Sikaflex 521.

52. To create the front of the dresser, we used a 1.8mm-thick plywood panel, shaped to size with a jigsaw. To attach it to the bottom, we built a small “net” made of 4×4 wooden laths so that we would have a place to attach the front panel and doors with screws.

53. Inside the dresser we ran a colored 12V LED strip (with remote control!), which helps us illuminate the dresser (otherwise almost no light would come from the spotlights here).

54. At this point, we created two custom-made flaps, and attached them to the inner mesh with the use of common invisible cabinet hinges that allow them to open up to 110°.

55. Once everything was painted and the hinges were well calibrated, there remained a gap between the doors and the ceiling (if the doors were up to the ceiling, they would not open as the ceiling is curved and slightly higher in the middle and less at the sides.

56. With patience (a lot of patience!), here we set about carving and filing a piece that would complete the puzzle. Once the piece was glued, siliconed, filed, painted, and two handles added, this is the final result 🙂

6. DIY Van Interior Conversion – Conclusion
Conclusion

And with that we have finished. In this article, I have shown you the various materials that can be used to coat the interior of a camper van, and in more detail, I wanted to show you the various steps of our work and experience.
Our idea, was to create a covering that would make us feel at home: wooden floor, white walls and wide spaces.
Of course, the one I showed you is only ONE way of building and coating the interior of a van, and the upholstery options are really infiinite and really it all depends on your taste: some may like a more rustic all-bead van, and others perhaps closer to factory motorhomes with aluminum siding, fiberglass, or PVC foams.
I hope you found the article useful and that some ideas can help you with the construction of your project.
As always, I ask you, in case you find inaccuracies (which can always be there! 😉 ), have any doubts, questions, or like to share your experience with other readers, to write and let me know in the comments below! :)
As always, I thank you for reading,
and see you in the Mega-Guide and the others insights for building the DIY campervan of your dreams! ;D
BEFORE YOU GO, CAN I ASK YOU FOR SOME FEEDBACK?
Writing detailed articles like this takes a lot of time and effort..
If you liked it, can I ask you to leave me a feedback message in the comments at the bottom of the page?
For a content-creator, knowing that you are being read and that your efforts are useful to someone is the best motivation to keep writing and doing better 🙂
Let me know what you liked or what you think could be added.
If you’d like, you can also share the article to help other people find it!
Thanks for the help 🙂

Read the Van Conversion Guides
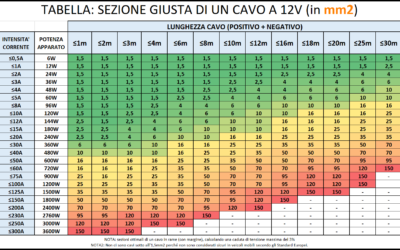
How to Calculate the Right Section of 12V Cables | EASY GUIDE
An undersized cable does not carry enough current. A cable that is too undersized can lead to a fire. An oversized cable, on the other hand, simply costs more and is a waste of money. Are you wondering what is the logicfor choosing one section of cable over...

Bluetti vs Ecoflow | Which is the Best Portable Power Station for RV/Vanlife?
The Portable Power Station is an increasingly used accessory on camper vans and RVs, but when does it really make sense to purchase and own or install one? In this article we try to shed some light on how these systems work, the best options on the market, and the...

Van Conversion DIY: How Much Does It Costs? | My Experience
How much does it cost an entirely DIY van to campervan conversion? The queen of all questions... In this article, I want to show you all the costs of my conversion from start to finish, so that you too can get an idea of what it might cost! ...
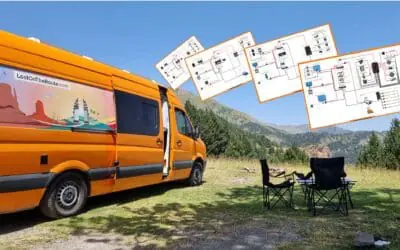
Van Electrical Diagrams for your DIY Project – Ready to Install
The Electrical System is often one of the most complicated steps in a DIY van conversion. How much energy is needed? What apparatus/devices to purchase? How to connect them? How much would it cost? These are all doubts and questions that normally everyone finds...

Kitchen for Camper | Best DIY Ideas for your Van Conversion
Cooking in Camper is one of those things, that makes you feel at home wherever you are! Gas, Diesel or Electric Stove? What equipment and accessories you need on the Road? How much space do you need? How to assemble the kitchen in your Camper? In this article you will...

The Best Fridge for Your Campervan – Which One to Choose?
Buying a trivalent or compressor RV refrigerator? Horizontal or vertical? 12V or 110/220V? In this article you will find all the information you need to choose the best fridge for Your Van, tailored to your Needs! 🙂 THE REFRIGERATOR IN THE VAN:...
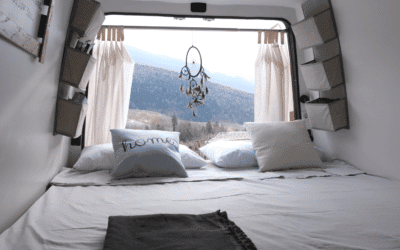
Van Conversion: How to Build a DIY Bed for your Camper Van
A Camper is not a Camper if it does not have a bed. Where to Sleep and... Dream! In this Guide you can find the inspiration you need for creating a DIY Bed in Your Campervan, And I'll show you step by step how I built a Complete Bed/Dinette on my VW Crafter....
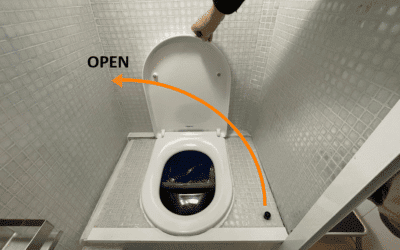
DIY Camper Bathroom: How to Self-Build a Toilet
If you are Campering a Van you surely must have wondered: How does the Bathroom in a Motorhome work? In this Guide I show you the various types of Bathrooms on the market, I explain how they work, and I show you how you can Build yourself an entirely...
Best 12V Fan for RV | DIY Installation Guide | Van Conversion
A Roof Fan helps keep your Vehicle's humidity under control and change stale air. In this guide you will find everything you need to know about mounting a Maxxfan Deluxe fan on the roof of YOUR van. ROOF FAN: WHAT IS IT FOR? Keeping an RV's...
How to Build a Shower in a Do-It-Yourself Camper
A Shower in the RV for some people is not necessary, for others it is a real necessity to be totally independent! In this guide I'll tell you how I built the shower of my converted van entirely Do-It-Yourself! INSTALLING A SHOWER IN A...
Complete Guide and Electrical Scheme for your D-I-Y Van Conversion
You dream of transforming your Campervan DIY and have never touched an electrical cable before? Or do you want to implement some changes to your Factory RV? In this guide you will find EVERYTHING (absolutely EVERYTHING!) you need to know to create the perfect DIY...
Converting a Van: How to Connect Electric Cables Without Mistaking
Want to know how to "connect" the electric cables in practice in a converted van? Stripping, Crimping, Wire Leads, Clamps, Tubing, Cable Ties and much more... You've come to the right place to learn All That! How to wire your van's electrical...


0 Comments