
Want to know how to “connect” the electric cables in practice in a converted van?
Stripping, Crimping, Wire Leads, Clamps, Tubing, Cable Ties
and much more…
You’ve come to the right place to learn All That!
How to wire your van’s electrical system: in practice!
Hello and welcome to another guide to the DIY Campering of a van! 🙂
In this article I will explain to you from a practical and manual point of view, all (but really all) the things you need to know to wire all the cables, batter,ies and devices of your electrical system.
Among them, we’ll talk about how to strip cables, how to crimp them, how to connect them, how to protect them, how to secure them, and much more.
What we won’t talk about in this article is instead where to connect them, how to choose their section and which ones to use for which devices. If you’re interested in this information, I recommend reading first:
- Complete Guide and Electrical Scheme for your D-I-Y Van Conversion
- Ready-made Diagrams For Your DIY Van’s Electrical System
With that said, let’s jump right into this article!
Happy reading 🙂
TABLE OF CONTENTS
Converting a Van:
How to Wire Your Electrical System
1. Tools for Wiring Electric Cables
2. Preparing the Van: Layout, Hoses and Conduits
3. Sliding Cables into Tubes and Keep Order
4. How to Strip the Wires: Wire Stripper and Cutter
5. All Methods for “Soldering” Multiple Electrical Cables Together
6. Lugs and Crimping: How to do it?
7. Useful (and Practical!) Tips for Wiring Your Electrical System
BONUS VIDEO: Guide to a Van’s Electrical System – Step by Step

Do you want to support LostOnTheRoute?
All of the Guides I publish on this blog are free and usable by anyone because I personally am a firm believer that information should always be a public good and accessible by anyone and not a commodity to be purchased. Sharing is caring 😉
That said, maintaining a great blog full of detailed articles takes a lot of time, a lot of beer (of inspiration ahah) and most importantly implies economic costs sometimes not so obvious too.
If you would be interested in helping with the costs of the blog, you can consider purchasing any of the recommended products through the links on the page or in the Amazon storefront. LostOnTheRoute in fact participates in the AmazonAffiliate program, and for every product purchased through the links, I receive a small commission, obviously at no extra cost to you🙂
Happy reading and have fun with your project!:) 😀
Dani

Check Out All DIY Van/RV Products of tested quality, in one place.
1. Tools for Wiring Electric Wires
Below you’ll find all the products and tools you’ll need to wire your RV’s electrical system totally DIY.
For your convenience, clicking the image of any product will directly open the Amazon page should you also be interested in buying it or simply interested in understanding the qualities of the products you need.
I relied on Amazon for much of my conversion and found it to be fast, convenient, and reasonably priced (living in a small town, many things I wanted here I couldn’t find!). That’s why I’m leaving you with links to products I’ve used myself.
For the sake of transparency, I also participate in the Amazon Associate program, and for any purchases made through the links on this site, I receive a small commission that I use to support the costs of this blog, obviously at no extra-cost to you 🙂.
Indispensable Tools for Wiring Your Electrical System

Wire Stripper
Useful for stripping wires quickly, removes insulation/sheathing in one click.

Crimping machine
Required to securely attach stripped cables to various types of cable lugs.

Wire Cutting Pliers
A pliers that cuts through metal to make clean, precise cuts.

Cutter
Essential tool for any convertion, it helps to strip large cables.
Accessories to Lay Cables, Protect them and Keep them in Order

Spiral Sheath
A flexible, insulating sheath to protect your cables in the future.

Corrugated Pipe
Similar to sheath, easier to push and insert into narrow channels.

Cables-Collector
The easiest solution for sorting lots of cables and keeping your system in order.

Cable Tie Mounts
They stick on with an adhesive and hold electrical ties in place.

Electrical Ties
Indispensable for securing cables and pipes of all kinds, there’s never too much.

Cable Probe
The probe is used to insert the cables in the tubes, essential for complex convertions.

PVC Labels
With so many cables, it’s easy to get confused. It pays to mark them down from the beginning.

Electrical Tape
Insulates cables, refines Crimps…and 100 other things! A must-have!
Accessories for Fixing Cables and Soldering Them Together

Cable lugs
They are used to connect 12V cables to the fuse box and for some equipment.

Large Cable Lugs
For larger cross-section cables, to connect batteries, inverters and bus bars.

Quick Clamps
The easiest way to join two or more cables with a simple click.

Screw Clamps
Cheaper than quick clamps. I only recommend them for thicker cables.
Now that I’ve listed all the useful tools you’ll need to install the electrical system in your converted van, let’s start looking at them a little at a time in more detail! 🙂
One of the first steps in the process of RVing your van, before you even begin to touch an electrical cord, install a window o lay the floor, should be defining the layout of your van.
If you don’t have your van idea clearly defined in your head, stop and think. Where would you like your electrical equipment to be placed? Yours refrigerator? The lights? The fan? Batteries? If you need help planning your Layout or just some inspiration, I recommend you read my article in the chapter on Planning a Van Layout in the Mega-Guide for DIY Van to Campervan Conversion.
An electrical system should be well studied from the beginning: to choose the section of the cables you have to take into account their length, to install sockets you have to know where they will be placed…and above all, before you start insulating your van and building the walls, it is important to make sure you leave open passages for the electrical cables.
If you’re sure you have your van idea firmly in mind, then we’re ready to get started!
In the next few paragraphs, I’ll explain how to prepare the “skeleton” of your electrical system so that it is protected, safe, and most importantly, affordable for the future.
2.1 Installing Tubing and Conduit to Protect Cables in Your Van
A Van is full of sharp metal edges that over time and the vibration of the vehicle can wear down to the point of even breaking exposed electrical wires.
For this reason, it is super-important to protect all your cables by inserting them inside protective tubes or sheaths: consider that some cables may no longer be accessible or difficult to replace once your convertion is over.
The idea is to create a system like those of a house: safe, comfortable and protected and that can last at least 20 years (in fact, the electrical cables have virtually no wear and tear if well protected).
To protect the electrical cables of your van, we are therefore faced with two almost equivalent products: corrugated pipes and sheaths. Below you will find pros and cons of both.
Spiral Sheath
PROS
- Longer lasting than the corrugated pipes
- Extremely Flexible
- Designed for moving parts, supports vibration well
CONS
- Not very Slippery to slip on
- Difficult to fit Cables on long/curved sizes
- Costs a little more than corrugated pipes
Corrugated Pipe
PROS
- Easy to Slide into the Gutters of Your Van
- Cables and probe slide in more easily
- Cheap
CONS
- It can be cut more easily than a sheath
- It must be well fixed for the cables to slide in.
After trying both, I can tell you that they are almost equivalent.
Personally I found it much easier to work with corrugated tubing (easier to insert into the cavities of my van and behind the walls) and so I used it for all the more peripheral circuits (e.g. lights, USB, solar panels etc.) where only one or two cables passed through.
On the other hand, I used the sheath conduits (white ones) to protect key points in my electrical system, where many more cables are joined in parallel.
3. Sliding Cables into Tubes and Keeping Order

3.1 Strategies for sliding cables into your van’s pipes/sheaths
Once the pipes and conduits are placed, it will be time to fill them with electrical wiring.
Depending on the length of the pipe, its cross-section and the bends you installed it with, it will be easier or harder to slide the wires into it.
Below, I list the different strategies to use in order to be able to slip the cablesas easily as possible:
- Try to slide the wire by pushing it from the bottom, if it gets stuck move it back and forth forcefully and it may unblock and continue to run.
- If that doesn’t work, try using ordinary soap: smear it all over the cable and back into the sheath. From experience I can tell you that soap when inserting cables changes your life!
- If the soap doesn’t work either (sometimes the wires get stuck and there’s no way to push them through), you’ll probably need a small cable probe. Probe is a tool specifically made to slip easily into your pipes and “pull your wires”. Normally the probe has a “head” that must be inserted first, and a “tail” to which is fixed the electrical cable to be pulled with abundant electrical tape.
- If the probe doesn’t work, use it in combination with soap and you’ll see that you solve your problems.
If the combination doesn’t work either, I recommend you to rethink your pipe layout (fewer and gentler bends), increase the cross section and, where possible, split the pipe in 2 at a midpoint to help you pull the cable from the first half of the pipe and push it into the second.
Sometimes pushing pipes and cables can take a while, however think that once these are in place they will probably be “forever”. For this reason, it is good to do a thorough job and make sure that there are no places where the pipe or cables can cut.
3.2 Keeping your camper van’s electrical system safe

The chassis of a van is full of sharp edges, so care must be taken to protect pipes and electrical wires properly.
In fact, the movement of the vehicle causes constant vibrations that can create friction between the pipes and sharp surfaces and, over time, could cause damage to the wires of your electrical system.
Protecting your pipes, conduits and electrical cables is relatively simple and inexpensive: all you need is to securely fasten the components of your electrical system with simple electrician’s cable ties.
Electrical ties are easy to put on, easy to pull, and if you ever want to take them off, easy in the future to cut and remove. You can use them to attach anything: tubing, conduit, cable assemblies, mounts, and anything else.
I have used hundreds of these in my van convertion and I must admit that they are one of the essential things to have when wiring up the electrical system of a converted van.
If there isn’t a convenient place to attach cables and hoses, I’ve also found it helpful to apply some cable tie mounts.
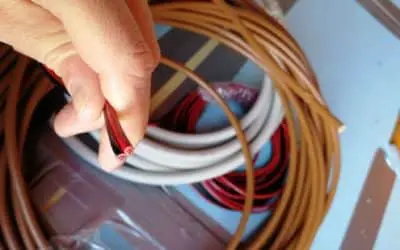
3.3 Keeping your cables in order: everything in its place!

One piece of advice I want to give you, if you’re about to start wiring your RV’s electrical system, is to be strict with colors and labels.
If there are only a few cables at the beginning of the RV project, by the end of the project you’ll be dealing with a large number of power cords (more or less depending on what you want to install in your van), and getting confused is easy.
After a while then, when you have to put your hands back on it to add something or do maintenance, it’s easy to forget the path of each cable and fixing a problem can be time-consuming.
For this, I recommend:
- Be strict in choosing colors: 12V (red positive – black negative), 230V (brown phase, blue neutral, yellow/green ground). If you can’t find cords of these colors around you (it happened to me), be strict about keeping a neat list of what colors you use and for what.
- Use colored labels to mark both pipes (where they start and where they go) and cables (what they connect, to what else). At the beginning of my convertion I used paper tape and a pen to mark my cables, then I realized that plastic labels are much neater, more efficient and longer lasting (paper tape wears out easily).
- In case you have many cables following the same path, I suggest you protect them and sort them with a cable collection wire. This will make your system look much more professional and clean.
Personally, I suggest you be neat and methodical from the start– trust me when I say, you’ll gain physical and mental health in the end 😉 Spend those extra minutes fixing and marking everything neatly and you’ll reap the benefits in the future.
4. How to Strip the Wires: Wire Stripper and Cutter
To strip electrical cables (i.e. remove the coating to leave only the metal conductor uncovered) there are various types of pliers and accessories, but for wiring the electrical system of a van I think two are enough; cheap and easy to use.
4.2 Use a Wire Stripper
The Wire Stripper is a specially designed tool for quickly stripping insulation/sheathing (rubber/PVC) from an electrical wire, leaving only the conductor (metal) exposed.
It is the easiest and fastest method for stripping small wires, while it is not suitable for thicker wires (read the instructions for each wire stripper).
Below is a video showing you how to use a wire stripper:
4.3 Use a box cutter
The cutter is the ideal tool for stripping electrical wires. It requires more time and sensitivity than a wire stripper, but it can strip cables of any size, both small and very large.
When using a box cutter, be careful to have a light hand and not cut through the conductor as well (especially with small wires).
Below is a video of me showing you how to strip a wire using a wire cutter:
5. All Methods for “Soldering” Multiple Electrical Cables Together
To join electrical wires so that they make contact, there are essentially four possibilities: quick clamps, “mammoth” clamps, lugs, and actual soldering.
In the next paragraphs I will briefly explain how they work and which ones you should use in the wiring of your van and under what circumstances you should choose one over another.
5.1 Quick clamps
Quick clamps (also called “electrical terminal blocks” or “lever clamps”) are the most modern invention for connecting two or more wires together.
How do they work? Simply raise the levers, insert the leads you want to join one in each hole, and lower the levers. Finished. The cables are locked together and make contact – electricity flows from one to the other!
The advantages of quick clamps are precisely their simplicity and speed: with one click, you can solder two or more wires together. For multiple splices (3 or more wires, e.g. if you decide to install LED spotlights in parallel) they are perfect. Personally, I’ve used them almost everywhere: simple, intuitive, fast and they have a very strong grip.
The disadvantages are the slightly higher price than “mammoth” clamps (but still very low for the advantage they bring), and the bulkiness (in small spaces they might be a bit too bulky).
5.2 Mammoth clamps (screw terminals)
The “mammoth” clamps are the classic electrician’s clamps, they take a little longer than the quick clamps but essentially work the same way.
How do they work? into which one conductor is inserted on one side, one on the other, and both are secured by tightening them with a screw.
The advantages in using this type of clamps are the cost (they cost very little!) and the convenience of finding them in any size (quick clamps are generally used for wires up to 2.5 mm² / 28-14 AWG in cross-section, while “mammoths” go as high as 35-50 mm2 / 0 AWG).
The disadvantages are that they take longer to fix and it’s hard to pull them into tight places where a screwdriver won’t easily reach.
5.3 lugs
Cable Lugs are small pieces of metal composed of two parts: a “hook” that can be of different shapes (ring, “fork”, cylindrical, etc.) and a hollow cylindrical base sometimes covered with a colored sheath.
How do they work? The conductor (metal wire) is inserted into the empty metal end, then with special pliers (crimping machine) you press the metal cylinder so that the conductor fits into the lug. The lug can then be used to connect the wire to another, or to other electrical equipment/devices.
Cable lugs are normally used to connect conductor cables to electrical equipment (e.g. batteries, fuse box, inverter, etc.). To connect some kinds of devices (es. fuse box) are straightforward needed too!
Only rarely, however, are they used to connect two wires together (using “male” and “female” lugs). If your goal is only to “solder” two wires together, I would advise not to use lugs. Much safer and more practical are the clamps.

5.4 Actual welding/soldering
The actual welding (fusing the conductors and solder it back together) is a method a bit more complicated and laborious than the others, however, it is not aerospace science!
How does it work? Using a special metal tip, you heat a wire of tin. Then, molten tin is placed between the ends of two conductors. Once it has cooled, the tin will have soldered the conductor into a single wire. The tin gives flexibility to the joint, and the whole thing can be insulated with electrical tape.
The advantages of a welded cable are its solidity, flexibility and lack of clutter (you won’t have bulky clamps lying around, and the cable can easily slide into pipes and conduits).
The disadvantages of soldering are that it is more time consuming than clamping, that it is permanent, and that if done poorly it becomes the most fragile way to join two wires.
Personally, I didn’t use soldering when I convert my van, preferring quick clamps that are easy to attach and detach when necessary, and of course, when necessary, lugs.
6. Lugs and Crimping: How to do it?
As we briefly saw earlier, cable lugs are metal terminals that are normally attached to the conductor of a cable to more easily connect it to an apparatus or other conductor. Lugs come in various forms, each designed for different purposes (pictured):

A crimping machine is used to attach a cable to a lug. What is it? Obviously, a crimping machine is a machine whose job it is to “crimp”.
If you’re not in the business and you’re wondering what that means: crimping means “pressing” the lug containing the conductor in such a way as to lock the cable in place so that it no longer comes out. Below I leave you with a GIF that shows you how to strip and crimp a lug to an electrical wire:

For large cables (such as those connecting batteries, inverters or bus bars) a simple crimping machine is not enough but you need one heavy duty crimping machine for heavy duty work. Although you can find some on amazon, their price is often high and my advice is to ask for the pleasure of some crimping from a local electrician. It’s sure to cost you a lot less.
7. Useful (and Practical!) Tips for Wiring Your Electrical System
Below I leave you with some useful and practical tips to help you create the electrical system of your camper van:
- Accessibility First! When designing your electrical system, think about the fact that every splice, cable and junction must remain accessible (with more or less effort). Imagine the worst-case scenario where a cable shears or a poorly done crimp breaks. You need to be able to fix faults without having to take half the RV apart! If you need to make connections on the inside of walls, I recommend using junction boxes to make future inspections easier.
- Secure everything with as many zip ties as you need! Remember that a camper van is a mobile vehicle and the electrical system will be subjected to constant vibration. Make sure all cables are extremely well secured and don’t have too much play to bang and scrape on surfaces.
- If you’re not sure, get informed or ask an expert! Working with electricity can be dangerous if you don’t know what you’re doing. So, if you’re unsure about anything (really anything!) ask me in the comments below, get informed on the internet, or alternatively, call a professional and ask for advice. Personally, once I created my electrical system, I called an electrician to come and examine it and make sure everything was correct and well connected. There’s no shame in asking for something you don’t know how to do or aren’t sure about! 🙂
- Study before you start wiring! Before you start pulling wires, crimping wires, or connecting terminals, do one thing: think! Make sure you have in mind everything you want to include in your electrical system: water pump, lights, sockets, fans, USB, devices etc… Once you’ve thought about what you want to put in, think about what route which cables will have to take. Study how to run them through your camper van setup and only when you have a clear diagram in your head, start wiring the system. If you need help, check out the article: Complete Guide and Electrical Diagram for your Do-It-Yourself Campervan.
- Insulating, insulating, insulating! To avoid possible damage or unwanted contact, my advice is to always use plenty of insulating tapes. I have no idea how many tapes I used to convert my van, but I can say that it was never enough. Insulating tape can be used to cover wires exiting terminals, in place of heat shrink tubing on cable lugs, to join multiple wires together, and in general, to reinforce and protect any junction. If you can’t fix it with duct tape, you’re not using enough 😉
8. Conclusion

Wiring an electrical system from scratch is intimidating. This may seem like a titanic feat. But trust me: it’s not!
If you’re not an electrician (like I wasn’t!), installing the electrical system in your RV is one of the projects that will take you the most amount of time. That said, from my experience I can tell you that once you get your hands on it you will be surprised at what you can do and how much you will learn .
With this article, I hope to have completed the previous one and given you all the information you need to be able to start creating the electrical system for YOUR camper van in total autonomy.
If something is unclear, escapes you or you would like more information, please write to me in the comments and I will see if I can clear up any doubts and possibly give you more tips to safely continue your camper project.
Thanks for reading, see you in the upcoming insights! 🙂
8. Bonus Video: Explanation of the Electrical System of a Van.
BEFORE YOU GO, CAN I ASK YOU FOR SOME FEEDBACK?
Writing detailed articles like this takes a lot of time and effort..
If you liked it, can I ask you to leave me a feedback message in the comments at the bottom of the page?
For a content-creator, knowing that you are being read and that your efforts are useful to someone is the best motivation to keep writing and doing better 🙂
Let me know what you liked or what you think could be added.
If you’d like, you can also share the article to help other people find it!
Thanks for the help 🙂

Read the Van Conversion Guides
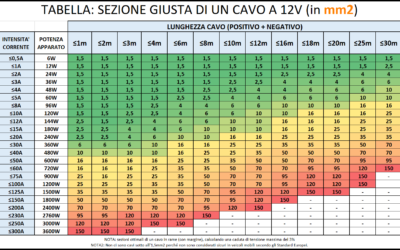
How to Calculate the Right Section of 12V Cables | EASY GUIDE
An undersized cable does not carry enough current. A cable that is too undersized can lead to a fire. An oversized cable, on the other hand, simply costs more and is a waste of money. Are you wondering what is the logicfor choosing one section of cable over...

Bluetti vs Ecoflow | Which is the Best Portable Power Station for RV/Vanlife?
The Portable Power Station is an increasingly used accessory on camper vans and RVs, but when does it really make sense to purchase and own or install one? In this article we try to shed some light on how these systems work, the best options on the market, and the...

Van Conversion DIY: How Much Does It Costs? | My Experience
How much does it cost an entirely DIY van to campervan conversion? The queen of all questions... In this article, I want to show you all the costs of my conversion from start to finish, so that you too can get an idea of what it might cost! ...
Van Electrical Diagrams for your DIY Project – Ready to Install
The Electrical System is often one of the most complicated steps in a DIY van conversion. How much energy is needed? What apparatus/devices to purchase? How to connect them? How much would it cost? These are all doubts and questions that normally everyone finds...

Van Interior Conversion: Best DIY Ideas for your Project!
The Interior Outfitting of a DIY converted van is both an aesthetic and structural choice. In this article, you will find useful information and inspiration ideas for customizing the Walls, the Ceiling, and the Floor of your Van! DIY CAMPERVAN SET-UP:...

Kitchen for Camper | Best DIY Ideas for your Van Conversion
Cooking in Camper is one of those things, that makes you feel at home wherever you are! Gas, Diesel or Electric Stove? What equipment and accessories you need on the Road? How much space do you need? How to assemble the kitchen in your Camper? In this article you will...
The Best Fridge for Your Campervan – Which One to Choose?
Buying a trivalent or compressor RV refrigerator? Horizontal or vertical? 12V or 110/220V? In this article you will find all the information you need to choose the best fridge for Your Van, tailored to your Needs! 🙂 THE REFRIGERATOR IN THE VAN:...
Van Conversion: How to Build a DIY Bed for your Camper Van
A Camper is not a Camper if it does not have a bed. Where to Sleep and... Dream! In this Guide you can find the inspiration you need for creating a DIY Bed in Your Campervan, And I'll show you step by step how I built a Complete Bed/Dinette on my VW Crafter....
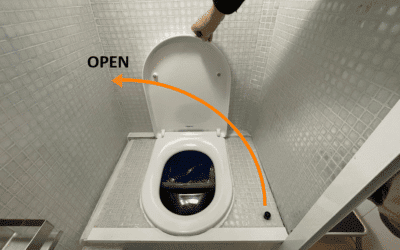
DIY Camper Bathroom: How to Self-Build a Toilet
If you are Campering a Van you surely must have wondered: How does the Bathroom in a Motorhome work? In this Guide I show you the various types of Bathrooms on the market, I explain how they work, and I show you how you can Build yourself an entirely...
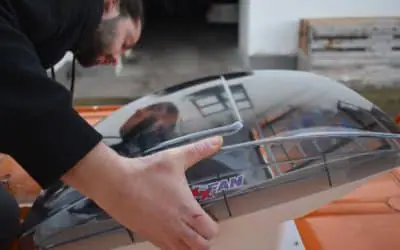
Best 12V Fan for RV | DIY Installation Guide | Van Conversion
A Roof Fan helps keep your Vehicle's humidity under control and change stale air. In this guide you will find everything you need to know about mounting a Maxxfan Deluxe fan on the roof of YOUR van. ROOF FAN: WHAT IS IT FOR? Keeping an RV's...
How to Build a Shower in a Do-It-Yourself Camper
A Shower in the RV for some people is not necessary, for others it is a real necessity to be totally independent! In this guide I'll tell you how I built the shower of my converted van entirely Do-It-Yourself! INSTALLING A SHOWER IN A...
Complete Guide and Electrical Scheme for your D-I-Y Van Conversion
You dream of transforming your Campervan DIY and have never touched an electrical cable before? Or do you want to implement some changes to your Factory RV? In this guide you will find EVERYTHING (absolutely EVERYTHING!) you need to know to create the perfect DIY...
Converting a Van: All the Camper Products I’ve Used and Where to Buy Them
Where to look for useful tools, accessories and products for campervans? Is it better to rely on local stores or online? In this article, I'll share my experience and show you what I used for my project. 80% OF THE TIME IT TAKES TO CONVERT A VAN,...
Heating for a Do-It-Yourself Camper: Gas, Diesel or Electric?
No one likes to be cold at home, not even if this is on Wheels! In this article, I'll show you all the possibilities to warm up your Van / RV and enjoy the warmth even on the coldest winter days. HOW TO HEAT UP A DIY CAMPER VAN Winter is definitely not...

Van Insulation: Complete DIY Guide for Beginners
A cosa serve l'isolamento in un Furgone Camperizzato? Come funziona la trasmissione di calore? Quali materiali si possono usare per coibentare il tuo Camper e quali sono i loro vantaggi e svantaggi? In questa Guida, troverai tutte le risposte a queste domande, ed a...


0 Comments