
How much does it cost an entirely DIY van to campervan conversion?
The queen of all questions…
In this article, I want to show you all the costs of my conversion from start to finish,
so that you too can get an idea of what it might cost!
CONVERTING A VAN DIY: HOW MUCH DOES IT COST?
Converting a van DIY and turning it into a small house on wheels is a crazy and exciting dream of freedom that more and more people are beginning to cherish every day around the world (and even here in Italy where I live), and many even turning it into reality!
One question that surely grips anyone thinking of embarking on a van conversion project, however, is: How much does it cost me? In the end, creating your own Do-It-Yourself Campervan still has an important economic cost and therefore it is good to think from the beginning about how much it might cost you to realize this dream.
THE BIG PREMISE: THERE IS NO SUCH THING AS A “STANDARD” COST
Here it is important to make a big premise: since each “home-made” project is totally unique, the cost can vary incredibly depending on the vehicle you choose to convert, your geographic location, your DIY skills, your needs, and the things you want to put in it. There is no standard cost for a DIY van campervan!
In fact, you can convert an old van for 3 thousand euros, or you can spend 50 thousand or more for a full-optional one.
The cost depends on your preferences, your budget, and the choices you make!
WHAT YOU WILL FIND IN THIS ARTICLE: MY VAN CONVERSION AND MY EXPERIENCE
That being said, I think reading about theexperience of others certainly can be helpful in getting a rough idea of costs.
For this reason, in this article I have decided to publicly share with you ALL the costs of our conversion, which I have methodically transcribed and divided into categories.
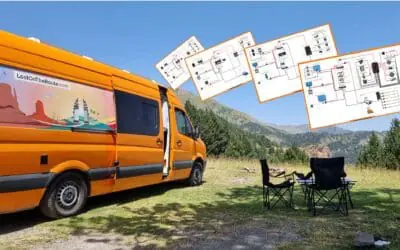
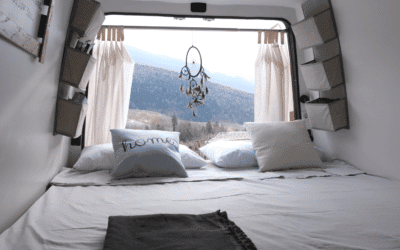
Before we begin, however, I want to leave you here with this video presentation of our Van to give you an idea of the end result we achieved with the expenses I will show you later.
TABLE OF CONTENTS
Van Conversion DIY:
How much does it cost?
1. The Cost of the Vehicle.

| Vehicle | euro |
| VW Crafter (2nd hand) - 2017 - 90.000km | 13.646,22 |
| VAT Taxes | 2.592,78 |
| TOTAL VEHICLE (+ TAXES) | 16.239,00 |
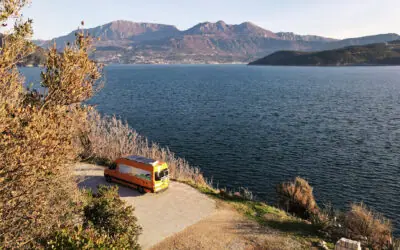
After a long and exhausting search, our choice of van to transform into home on wheels came down to a second-hand used German VW Crafter: year 2017, 90,000km, model H2L3, bright orange.
Planning a fairly premium conversion, and using/living in our vehicle full-time for a few years, we wanted to invest in a vehicle under 100,000km and in good condition, to avoid excessive maintenance.
If you are interested in some tips on how to choose the right vehicle for you, advice on where to look and what to look for, I recommend the following in-depth articles:
2. Mounting the Windows

| Windows | euro |
| Two Windows for Barn Doors | 187,09 |
| Lateral Window | 196,44 |
| Import Customs | 192,00 |
| 2x Windows Fitting Kit | 41,16 |
| U trim for Lateral Window | 18,84 |
| U-Trim for Barn Door WIndows | 23,38 |
| Shipping + Taxes | 164,31 |
| TOTAL WINDOWS | 823,22 |
Our van, when we bought it, had no windows. We decided to install one on the side door and two on the barn doors, entirely DIY.
If you’re still looking for the right van for you, one piece of advice I can give you is to take into account the cost of installing windows to guide your choice: finding a van with windows already in the right places can definitely be a major savings (both money and time).
If you are interested in learning more about how we installed our windows, I recommend you read the in-depth article:
3. Cost of Practices to Homologate

| IMPORT - HOMOLOGATION - PLATES | euro |
| 5 month German Insurance + Export Plate | 1060 |
| Trips to Germany (Fuel, Tolls, Covid Tests) | 550 |
| Homologation in Germany | 517 |
| Nationalization in Italy (motorizzazione) | 160 |
| Towbar Homologation in Italy | 300 |
| TOTAL HOMOLOGATION | 2587,00 |
Four-month Odyssey: homologating a campervan with a permanent setup is possible in Italy, but certainly not a feat for those with little patience.
To homologate our van, we chose to go through Germany: we bought the van in Germany, made a five-month export license plate, converted it, certified it with TUV, imported it, and finally got the Italian licence plates.
In this paragraph, I have included all import and approval costs (insurance, German license plates, tax stamps, translations endorsed in Italian, gasoline, etc.). If you’re from Germany, US, UK or other van-friendly countries, probably this cost will be much much less for you 😉
If you are interested in learning more about how I approved my van, or how you might approve yours, I recommend these two insights:
4. Thermal Insulation

| THERMAL INSULATION | euro |
| XPS Panels 125x60x4/2cm 26pcs | 156,25 |
| Reflectix | 5,2 |
| Poliuretanic Foam | 45,3 |
| Insulating Rubber Tape | 13 |
| TOTAL HOMOLOGATION | 219,80 |
If you plan to use the van in all seasons, good thermal insulation is almost a must.
We decided to insulate our van using XPS panels and polyurethane foam: these are materials that require some patience to install but definitely a good compromise between quality/price.
If you are interested in seeing in detail how we thermally insulated our camper van, I recommend the following in-depth study:
5. Interior Cladding (Floor, Walls and Ceiling)

| INTERIORS | euro |
| Wood stain | 62,80 |
| Water-based White Enamel | 119,80 |
| Plywood for Floor, Ceiling, Walls | 560 |
| Wood Batons for Floor, Ceiling, Walls | 95 |
| Aluminium Profiles for Steps | 38,98 |
| Floor Vynil (8,5mq) | 361,46 |
| Interior Covering Total | 1.238,04 |
The possibilities for lining a van internally are many and obviously the costs can vary greatly from project to project.
We chose the following coating:
- For the walls: 8mm thick marine plywood
- For the ceiling: 3mm thick plywood
- For the floor: interlocking PVC vinyl “click”
The walls and ceiling also were treated with 2 coats of wood stain (to protect them from mold and moisture) and painted with 2 coats of white water-based wood enamel (to make them easily washable and waterproof).
6. The Electrical System

| ELECTRICAL SYSTEM | euro |
| Solar Panels (3x200W 12V) | 270,00 |
| PVC Corners for Solar Panels | 20,40 |
| PVC Brackets for Solar Panels | 28,00 |
| 3-1 MC4 Connectors | 9,75 |
| MC4 Connectors + Roof Grommet | 4,95 |
| Electrical Ties | 8,00 |
| Simple 12V Switches | 8,99 |
| Two-Ways Roof Grommet | 4,45 |
| Cable Lugs | 28,97 |
| 3x100ah 12v Batteries | 1.437,00 |
| Giandel 3000w Inverter | 242,99 |
| Junction Box | 3,99 |
| Multi-Plug Adapter 4000W | 24,99 |
| Electrical Clips/Clamps | 21,99 |
| Bus Bars | 77,98 |
| PVC Tubes/Hoses | 34,05 |
| Interior Covering Total | 1.238,04 |
| Doble USB Socket x2 | 12,99 |
| Shuko Sockets | 49,25 |
| Victron VE Dongle | 50,58 |
| Victron Orion Battery Charger | 272,63 |
| Victron Bluesolar 150/55 Tr | 452,60 |
| Victron Phoenix Charger | 386,68 |
| Victron SmartShunt | 207,06 |
| Entrance Socket CEE for Caravan | 20,31 |
| Vimar Shuko Plugs | 7,19 |
| Fuse Box 12V | 21,99 |
| Electrical System Total | 4.348,27 |
One essential thing for us (and the one on which we spent a kidney most of our budget 😉 ) was a solid and efficient electrical system, and the security of never running out of electricity (working on the PC, this is vital for us!).
Therefore, the electrical system we created was designed to work independently in all kinds of conditions, even in winter and at high latitudes where the sun’s rays are weaker.
In short, what we have installed are:
- 3 methods of charging: Solar, Alternator and Grid Power
- 600Watts of Polycrystalline Solar Panels
- 300ah of LifePo4 Lithium Batteries
- 3000Watt inverter
- 6 Recessed 230V Electrical Sockets
- 16 12V Circuits
- Smartshunt and Display of Battery Charging
- Intelligent system that can be monitored entirely via Bluetooth
If you are interested in more details about my electrical system, or if you are interested in understanding how a Camper’s electrical system works and learning how to create your own entirely Do-It-Yourself system, I recommend the following insights:
7. Lighting

| LIGHTING | euro |
| Led Toilet Lamp | 13,01 |
| Dual USB-LED Strip Adapter | 9,99 |
| Acegoo LED Lightx x8 | 65,76 |
| Led Light Dimmers x2 | 49,99 |
| Led Strips | 16,98 |
| LightDims Led | 12,72 |
| Lighting Total | 168,45 |
The lighting of a camper van is definitely one of the aspects that more than many others really makes you feel at home wherever you are.
In our van, we installed:
- A 5Watt LED lamp in the Bathroom
- 8 Dimmable LED Spotlights (at 3Watts)
- 2 Reading Lights (at the head of the bed)
- 2 Led strips (under-shelves)
The bathroom lamp and reading lights were initially too bright, to the point of stunned eyes. To overcome this problem, we treated them by inserting 2-layers of LED filters (Lightdims).
8. Water System

| WATER SYSTEM | euro |
| Water Pump Shurflo Trailking 7 | 64,48 |
| Expansion Vessel | 33,00 |
| Air Vent | 1,80 |
| Shurflo Water Filter | 18,35 |
| Gaskets | 2,50 |
| Freshwater Tank 132L | 70,20 |
| Greywater Tank 80L + Cak Tanks KIT | 167,40 |
| Water Inlet | 23,83 |
| Hose Clamps | 17,30 |
| Pipe Fittings | 6,20 |
| Tank/Pump Fittings | 58,03 |
| Push-In Fittings + Clips | 51,13 |
| Tap Valves | 7,40 |
| John Guest Exhaust Valve | 45,10 |
| No-Return Valves | 10,30 |
| Drain Pipe 40mm | 26,67 |
| Drain Tap | 13,90 |
| Polietilene Hoses 12mm | 39,90 |
| Water Gauce + Screen | 72,50 |
| Water System Total | 741,89 |
Planning to live in our full-time camper van for long periods of time, after much reflection we agreed that having a shower was a must for our sanity.
At the same time, we tried to have a relatively large supply of clear water, to get to be self-sufficient for at least a week.
Our water system in brief:
- 135L Clear Water Tank
- 80L Dark Water Tank (under the van)
- Probe in Both Tanks to Monitor Levels
- A Sink in the Kitchen
- 2 Showers (one indoor and one outdoor)
- Water pump from max. 7/L minute
- Expansion Vessel (to prevent hiccup water)
Compared to the electrical system, the installation of the water system costs much less (and we did not make too low-cost choices anyway; the cost can still be much less!).
If you are interested in more information about the water system, I suggest you read the article:
9. Ventilation and Heating

| VENTILATION AND HEATING | euro |
| Maxxfan Deluxe | 368,00 |
| Maxxfan Shipping Cost | 17,95 |
| JP Heater Combi 6kw DE + Shipping | 1074 |
| Ventilation + Heating Total | 1459,95 |
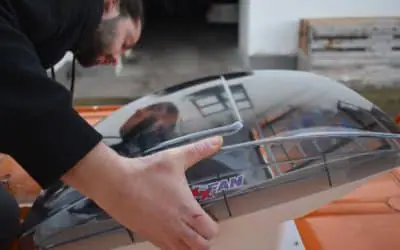
Keeping humidity under control and maintaining a pleasant temperature inside one’s camper van are essential aspects of high livability and being able to experience the vehicle for long periods of time.
For ventilation (eliminating odors, changing stale air, expelling moisture etc.) we decided to install a fan Maxxfan Deluxe, with a rain cover.
For heating instead, both water and air, we ordered from China a JP Heater combi6KW.
If you are interested in learning more about how they work or why our choice fell on these devices, I recommend the following articles:
10. The Kitchen

| KITCHEN | euro |
| Indel Isotherm Cruise 85L Fridge | 689,00 |
| Induction Hob | 102,66 |
| Air Vent | 4,87 |
| Kitchen Removable Water Tap | 79,90 |
| Sink Syphon | 22,96 |
| Sink | 98,97 |
| Kitchen Total | 1.006,36 |
When traveling by van, the best way to save money is definitely to cook your own meals.
Therefore, we decided to invest some extra money in a good kitchen, to save more in the future.
The main elements we installed are:
- An 85L Isotherm Cruise Compressor Fridge (enough for us to stay over 2 weeks without grocery shopping…and keep beer cold even in summer! 😉 )
- A Two Plate Induction Hob
- A Sink large enough to wash Dishes and Pans (50x45cm) with pull-out faucet
If you are interested in reading insights on the topic of cooking, I leave you with the following insights:
11. The Shower Bath

| SHOWER/BATH | euro |
| Urine Diverter | 42,99 |
| Shower Tray | 102,38 |
| 10L Urine Kildwick Container | 19,00 |
| Solid Waste Container (Bin) | 8,90 |
| Mapei Sealing Tape | 34,07 |
| Seal-Up Liquid Waterproofing Rubber | 34,85 |
| PVC Sealing Tape | 12,99 |
| MapeGum WPS 10KG | 56,65 |
| Shower Drain | 12,75 |
| WC Seat | 29,99 |
| Toilet Shelf | 10,83 |
| Shower Hose | 19,50 |
| Shower Door | 290,95 |
| Clothes Retractable Hanger | 29,81 |
| 2-ways taps | 77,98 |
| Shower/Bath Total | 848,63 |
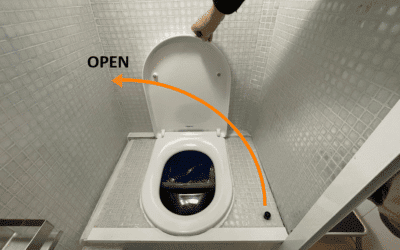
Planning, building and waterproofing the bath-shower was certainly one of the most ambitious projects in our camper project (and also one of the ones that took the most time!).
In a dedicated area of 105×62.5cm, we created both a shower and a Compostable toilet entirely built Do-It-Yourself.
For waterproofing, we used 2 layers of Mapei WPS liquid rubber, covered with mosaic tiles (one job, one adventure! hahah).
Surprisingly, the cost of all the work was not TOO excessive, on the contrary: DIY in this case saved us quite a bit of money(a high-end compostable toilet alone would have cost more than 1000Euro!).
(Note: In the costs given here, the cost of the outdoor shower is also included)
If you might be interested in insights into how we built our shower or what prompted us to build a Compostable toilet, I’ll leave you with the following articles:
12. Furniture (Structural)

| FURNITURE - STRUCTURAL | euro |
| Door Plastic Rivets | 11,90 |
| Mattress | 300,00 |
| Lagun Table | 189,95 |
| Lagun Shipping | 16,75 |
| Seamstress for Mattress Cover | 200,00 |
| Mattress Cover Waterproof Textile | 94,50 |
| Wood/Plywood for Furniture | 1570,00 |
| Mirror | 52 |
| Spice Shelves | 24,99 |
| Bolts | 9,22 |
| Screws | 26,51 |
| Blackout Curtain for Window Blinds | 37,49 |
| Pressure Pole for Curtains | 12,85 |
| Zipper/Magnets/Others | 21,69 |
| Corner Slabs | 6,80 |
| Magnets for Window Blinds | 26,99 |
| Wall Organizers | 39,98 |
| Furniture (Structual) | 2641,62 |
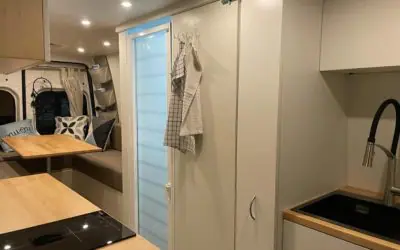
Furnishing a camper van is a very personal thing, and certainly, the aspect that differentiates each individual project the most. In the end, the beauty of DIY camper vans is that, at the end of the conversion, you find yourself with an unique vehicle, built exactly to satisfy your needs.
In our case, we tried to combine functionality with stylistic choices that would make us feel at home in any corner of the world.
Following this philosophy, we installed:
- One Bed Convertible into Dinette
- A Lagun table
- A Quality Memory Foam Mattress
- Custom Furniture built with what we would then stow inside it in mind
The main cost of this step certainly was the raw material: wood (4×4 lath, multi-layer dinette/bed tops, laminated worktops, custom veneer tops for furniture, etc.).
In the initial plan, in order to save money, we had thought of installing already pre-made furniture from Ikea to save us the hard work of having to build it, but once we saw the curved walls of our van, we thought that to optimize the use of space, it would be better to create customized furniture right to the millimeter.
13. Furniture (Objects)

| Furniture (Objects) | euro |
| Separate Waste Bins | 13,95 |
| Doormat | 12,95 |
| Hair Dryer | 19,50 |
| Cutlery Organizer | 2,50 |
| Blankets | 39,90 |
| Pillocases | 9,00 |
| 1000W Boiler | 18,99 |
| Rags | 2,50 |
| Plates (18pcs) | 19,95 |
| Straw Placemats | 10,00 |
| Extra Light Blanket | 9,95 |
| Pillows (Bed) | 14,00 |
| Bed Covers | 24,00 |
| Cutlery | 12,00 |
| TV 360° Support | 21,99 |
| Pillow Covers | 11,99 |
| Pillows (Day) | 24,99 |
| Foldable Step | 19,99 |
| Glasses | 1,5 |
| Towels | 10,00 |
| White Curtains | 11,99 |
| Organizers | 12,99 |
| Scottex Holder | 11,99 |
| Cooking Utensils | 4,00 |
| Collapsible Colander | 10,00 |
| TOTAL FURTNITURE (OBJECTS) | 351,62 |
In this small chapter, I have included the cost of all the items and accessories we purchased to make our van habitable.
As in the previous case, item choices are very personal choices, where you can spend a little or a lot depending on your taste and availability.
In this area, we did not want to invest more and went quite economical: in fact, our idea is to slowly “fill” our little house on wheels during our travels with typical utensils and accessories, objects to which we can tie a memory or a story.
14. Security

| SAFETY | euro |
| CO2 Carbon Monoxide Alarm | 28,99 |
| Fire Estinguisher | 13,90 |
| GPS Anti-Theft Moox | 119,00 |
| Magnetothermic Switches | 39,00 |
| Killswitch | 2,90 |
| TOTAL SAFETY | 203,79 |
Every Do-It-Yourself Camper Van, besides having an economic value (which can vary greatly depending on the project), definitely has a very high emotional value: in the end, it is the result of something created with passion and sweat through one’s own hands!
In order to enjoy it to the fullest and for a long time, I think it is essential to take safety measures.
In our van, we installed:
- a Carbon Monoxide Sensor (for sleeping peacefully)
- Two 2KG fire extinguishers (in the event of sparkles/fire principles)
- A Satellite Alarm to monitor the location of the van at all times (in case of theft)
- A small hidden killswitch (to prevent vehicle ignition and theft by malicious parties)
- Magnetotherms on the 220AC system, to prevent electrocution and potential causes of fire
Meroni UFO3 Door Locks and a Fiamma Duo Safe (to extra-lock all doors) Seems quite some protection, but if you think it well, it makes sense to spend money on security to prevent a greater loss: even with 4-5 anti-theft systems, the cost of security will likely be about 2/3% of the entire cost of your conversion.
15. Necessary Accessories Vehicle

| NECESSARY VEHICLE ACCESSORIES | euro |
| Electrical Extension Cable for Grid Power | 25,15 |
| Starter Cables + Lithium Charger Kit | 77,80 |
| Hose Reel for Water Load | 30,12 |
| Snow Chains | 198,67 |
| Necessary Vehicle Accessories | 198,67 |
In this section, I have included the costs of those accessories that I consider necessary to refuel the van (water, electricity, etc.) or solve potential emergencies on the road.
These include:
- The Extension for Recharging from the Column
- 220V-12V Emergency Charger Kit for Lithium Batteries
- Cables with clamps for bridging (in case the starter battery is completely discharged, I can reactivate it using the service batteries)
- Hose Reel for Water Refilling
- Snow Chains for Crafter/Sprinter
16. Extra Comforts (Optionals!)

| EXTRA-COMFORTS | euro |
| Double Swivel Seat | 348,00 |
| Bike Rack | 424,10 |
| Thule Levellers | 44,80 |
| Rear-view Camera | 99,99 |
| Samsung M5 SmartTV | 225,99 |
| Nestling Telescopic Ladder | 72,99 |
| Portable Gas Stove + 5 Cartridges | 36,50 |
| Pic-nic foldable chairs x2 | 41,00 |
| Pic-nic foldable table | 42,99 |
| Extra Comforts Total | 1.626,35 |
In this section, I have collected the costs of all the non-strictly essential accessories we installed.
These are the accessories that we could have done without, not strictly necessary but nice to have. In our case, we decided to invest a quite large sum to increase the usability and enjoyability of our DIY Campervan (being it our home too 😉 ).
These include:
- Plate for front swivel seats
- Bike rack
- Parking Wedges
- Rearview Camera for Parking
- TV/Monitor
- Picnic Set
In the future, we are also thinking of investing in an awning and a Mifi antenna for better Internet reception, but we have decided to wait and install them only when we find it really necessary (or for when we have more money!).
17. Tools and Materials

| EXTRA-COMFORTS | euro |
| Wire Stripper | 11,04 |
| Angle Grinder | 37,99 |
| Jigsaw | 79,95 |
| Sanding Sheets | 6,95 |
| Nylon Probe | 5,30 |
| Pocket Hole Template | 12,99 |
| Security Glasses | 13,99 |
| Solar Panels Bonding Glue | 17,80 |
| Metal Screws | 10,95 |
| Butyl Tape 2mm | 27,62 |
| American Tape for Cars | 6,99 |
| Pattex Vynil Glue | 9,50 |
| Hole Saw 85mm | 23,99 |
| Hole Saw 32mm | 10,45 |
| Primers | 13,35 |
| Paper Tape | 11,70 |
| Adhesive Clips for Electrical Ties | 7,49 |
| Electrical Tape | 0,95 |
| Sheet Metal Paint | 19,95 |
| Torx Keys | 17,70 |
| Metallic Profile - Support | 5,50 |
| Anti-Rust 0,5L | 12,95 |
| Tool Box | 3,90 |
| Thermal Sheet for Insulation | 1,90 |
| Cable Ties | 2,00 |
| WD40 | 2,99 |
| Sikaflex 521 | 108,87 |
| Vigorflex Transparent Sealant | 4,95 |
| Velcro | 2,00 |
| Metal Drill Bits | 2,80 |
| Metal Hand File | 5,20 |
| Spray Adhesive 3m | 17,57 |
| Phase Tester Screwdriver | 3,84 |
| Silicon Glues | 46,80 |
| Scissors for Metal Sheet | 8,90 |
| Work Gloves | 5,00 |
| Painter Brushes | 32,55 |
| Wood Putty | 3,95 |
| PVC Tape | 2,50 |
| Tools and Material Total | 702,73 |
In my case, finding myself converting a van for the first time, I needed to purchase quite a few tools and hand tools.
Some tools I already had at home (e.g., screwdrivers, drill, etc.), some I was able to borrow (circular saw, heavy-duty crimping machine etc.), but I think a good 80% I needed to purchase.
In this account of tools and materials I have included:
- Tools for Cutting, Filing and Working with Wood
- Tools for Wiring the Electrical System
- Adhesive Tapes and Scotch
- Glues and Silicones
- Paints and Impregnants
- Putty and Brushes
- Work clothing (goggles, gloves etc.)
18. Wrong Expenses

| WRONG EXPENSES | euro |
| Wrong Expenses Total | 560,92 |
On a final note: I thought of making a total also of all the “wrong” expenses and the costs of “mistakes”that I probably could have avoided by having more experience or a few more guides to read.
Van Conversion, in fact, is a project made up of many micro-projects, and to do it entirely DIY you have to take courage and put your hands in various areas: research, carpentry, electricity, plumbing, design, assembly, and much more!
Mistakes, both in purchasing and processing, are unfortunately physiological and part of the learning process and must be accepted.
If I were to redo the van a second time, surely I know I could do it even better and maybe even spend less. Personally, if this is your first experience, I would advise you to consider 1-2% of your budget for “mistakes and wrong expenses” – you learn by making mistakes!
19. How much did it Cost our Entire Van Conversion?
The TOTAL!

And here we come to the long-awaited final sum!
Below, you will find a table summarizing all the cost categories seen so far and the grand total I spent to buy, convert and homologate my campervan in Italy.
| CATEGORY | COST | PERCENTAGE |
|---|---|---|
| 1. Cost of the Vehicle | 16239 | 44,80% |
| 2. Mounting Windows | 823,22 | 2,30% |
| 3. Homologation / Bureaucracy (Italy) | 2587 | 7,10% |
| 4. Thermal Insulation | 219,75 | 0,60% |
| 5. Interior Cladding | 1238,04 | 3,40% |
| 6. Electrical System | 4348,27 | 12,00% |
| 7. Lighting | 168,45 | 0,50% |
| 8. Water System | 741,89 | 2,00% |
| 9. Ventilation and Heating | 1460 | 4,00% |
| 10. Kitchen | 1006,36 | 2,80% |
| 11. Shower / Toiler | 848,63 | 2,30% |
| 12. Furniture (Structural) | 2641,62 | 7,30% |
| 13. Furniture (Objects) | 351,62 | 1,00% |
| 14. Safety | 203,79 | 0,60% |
| 15. Necessary Vehicle Accessories | 198,67 | 0,50% |
| 16. Extra Comforts | 1906,35 | 5,30% |
| 17. Tools / Materials | 702,73 | 1,90% |
| 18.Wrong Expenses | 560,92 | 1,50% |
| Total | 36246,31 | 100,00% |
REFLECTIONS AND STATISTICS
The TOTAL cost of my camper van was therefore 36,246.31 euros broken down as follows:
TOTAL COST (EURO)
WINDOWED VEHICLE COST (EURO)
HOMOLOGATION (EURO)
OUTFITTING + TOOLS (EURO)
Is it more than what I had budgeted?
YES, and unfortunately quite a bit more (+44%!)!
I initially started with a budget of 25,000Euro and a much less ambitious idea in mind. Then, as the work went on, on the one hand I realized the details I had forgotten about and costs I had underestimated, and on the other I decided to insert many optionals, certainly not all of which are necessary, but in their totality make the vehicle truly a mini-apartment on wheels that makes us feel at home anywhere.
Could I have spent less?
Absolutely YES!
If I had to go back and do all the same work again, I would probably I could get by with at least 2000 euros less easily: between wrong expenses, all the tools I had to buy, leftover parts, information and a knowledge of the market that I did not initially have; I see various possibilities where one could save money compared to my project. Unfortunately and unfortunately, making mistakes is part of the learning process-if you don’ t try, if you don’t make mistakes, you don’t learn.
What were the most substantial expenses?
In order: the purchase of the vehicle (44 percent of the total), the electrical/solar system (11.7 percent) and approval fees (7 percent).
There is no such thing as an ideal camper vehicle. It can be done with a 3000Euro used van as well as with a 50,000Euro new one. I chose a used VW Crafter with 90km because I found it a compromise between life expectancy and price (plus it was orange! haha). Planning a few years around the world, I wanted a fairly reliable vehicle that was not too dated.
The electrical system grew a lot from my initial plan, mainly because a DEKRA inspector told me that in order to get the vehicle approved in Germany, I had to install a built-in induction hob, and not finding one with one fire, I had to install one with two fires (3400W) and to make it work, I had to add an extra battery than planned and rewire the system accordingly. In the end, after a thousand vicissitudes, I got the approval from TUV SUD and was told that even a portable stove would suffice.
Approval, on the other hand, is an odyssey. Doable, but an odyssey. Unfortunately, by converting van with a fixed setup in Italy, there is little chance of avoiding the bureaucratic rigmarole and trips to Germany, and of course these come at a cost. If I were to go back, I would probably consider buying a German van already approved as a “camper,” empty it out and re-fit it.
Would I make another van conversion again?
Absolutely YES!
Converting a van has been like a journey: a discovery, a dream…definitely full of unexpected events, but still an enjoyable, at times stressful, but fun process. If you are thinking about it yourself, my advice is to take the plunge: you are never completely ready for such a project!
Although the cost has risen beyond the initial budget, I can also honestly say that I never expected to achieve such an awesome result. In the end, we created a unique vehicle, very “homey,” with high quality products and with all the amenities we wanted (okay, maybe even a few more..) that, personally, I think is much more livable and technological than many factory camper vehicles.
In addition, during the process we have acquired skills, craftsmanship and knowledge in so many aspects: carpentry, plumbing, electricity, design, materials, engineering etc… that if we ever had to make another van, with the knowledge we have now it could take us 2 months instead of 4, and certainly we could do it even better and spend less.
HOW MUCH DOES IT COST TO CONVERT A VAN – TIPS FOR SAVING MONEY

Having shown you, in full transparency, all the costs we incurred in converting our van, I would like to leave you here with some tips from our experience, which I think you might find useful should you also decide to embark on a similar project.
1) In choosing a vehicle, take into account key features that could save you money later.
Windows in the right places, step, parking room, anti-theft, etc.
Any extras already on the van you purchase will be one less cost (and labor!) you will have to incur in the future.
2) If you plan a fixed set-up in Italy, consider an already homologated DIY van to be re-equipped.
If you plan to create a fixed set-up (and then go through Germany to homologate it), you might be interested in considering buying a German vehicle that has already been previously re-homologated as a “motorhome,” importing it into Italy, removing all the set-up, and re-equip it Do-It-Yourself. That way, you could avoid the whole homologation rigmarole and save a few thousand Euros(and your sanity! XD)
3) When you estimate your budget, increase it by at least 30%!
Having this article and my example in front of you, I hope it can help you consider all those small/big expenses that you very often overlook or, in your first experience, keep underestimating.
That said, from personal experience, I can tell you that anyone who camper vans tends to spend a little (or quite a bit!) more than they originally planned. During the process, you will definitely notice things you would like to add, things that are missing, or details that need to be improved. Increasing what you plan to spend by 30% is good advice to start from the beginning with the right idea of what you are going to spend and not have too big surprises in the future (then if you spend less, better, yuppii!!).
4) Research, read and inform. Then, if you still have doubts, ask those who know more!
Knowledge can save you a lot of time, and money!
Converting a van is a project that, as mentioned earlier, includes so many jobs and skills (carpentry, plumbing, electrical etc.). Almost no one can have ironclad skills on really all these topics, and that’s why you need information to learn!
For that, there is the wonderful world of the Internet, there are the guides on this blog, and there are plenty of professionals around you as well who are surely willing to give you advice when needed.
During my conversion, I talked to a many local professionals (carpenter, plumber, electrician, body builder, tailor, tiler, painter, etc.) to compare what materials to buy, how to treat them, precautions to use etc. Having more points of view, it helps to make fewer mistakes, and trust that you don’t need to buy counseling every time: many people are happy to have a chat and make their knowledge available toward others 🙂
5) Don’t follow what others do, but understand YOUR needs and availability!
At the end of it all, only you really know how you will use your Campervan and the needs you will have during your travels: plan accordingly!
There is no “right” or “wrong” way to convert a van: only there is the “right” way for you!
Each project is unique and special because it is made with one’s own hands! That’s why I say to you: take ideas, cues and inspiration from others, but then really think about what you want and can do yourself with your own time and hands! This way you can bring to life YOUR, very personal, dream on wheels 🙂
6)Consider Shipping Costs!
When considering whether to buy a product locally or online, take into account shipping costs and how much they affect the final price.
Personally, for the overwhelming majority of my van conversion I relied on Amazon (I placed 143 orders in 4 months!), partly because under pandemic many stores were closed, and partly because with Amazon Prime membership shipping and returns are always free and at home (if you’re interested in trying it out, you can click this link for a month of Amazon Prime Free).
Because of this, I almost had no shipping costs. Despite the fact that Amazon offers any kind of product, however, my advice is always to check first in your local stores in your city: especially for more “generic” items, prices there are usually even better than online.
7) Leave room to add details in the future!
Having gone over our initial budget (and not by a small margin!), at some point in our campering we found ourselves at a stage where we didn’t feel like spending any more money on extras at that particular time.
Even so, having the final design in our heads anyway and a clear idea of what we wanted to achieve, we left extra spaces (for a battery, for the burglar alarm, for a MiFi antenna, for the sliding bathroom door etc.), which we then filled in later when our speakers came back rosier.
The transformation project has no definite end, but like a real house, it can continue in the months and years to come. Therefore, it is good to think about the future: maybe you can start off low-cost today, but leave room in case you want to invest more tomorrow.
20. Van Conversion: How Much It Costs?
Conclusion

In this article I have shown you as transparently as possible how much it cost us to turn a used van into our dream on wheels.
Is it a lot? Is it little? It’s very relative — let’s say for us it was the right fit for what we wanted to achieve.
A “standard” cost to camper a van does not exist; it all depends on one’s availability, needs and requirements.
Obviously, with Do-It-Yourself you can achieve very particular results, incredibly unique and built on your own tastes: you can transform your vehicle into whatever comes closest to your idea of “home” (whether to be used full-time, or just for short weekend escapes!).
What about you, have you gotten an idea of how much your project may cost? Or have you already converted a van and would like to share with others some thoughts on the various costs you have incurred? Let me know in the comments below!
With this article, I hope to have given you interesting insights into the expenses you may have to incur and at least an idea of how much converting your van may cost: of course, remember that you can spend a tenth of what I spent, as or three times as much! 😉
Below, if you are interested, you will find the Amazon Showcase of LostOnTheRoute in which I have collected all the products that I have used in my van conversion project and that I can recommend 🙂
Thanks for reading, and see you in the next article!!! 😀
BEFORE YOU GO, CAN I ASK YOU FOR SOME FEEDBACK?
Writing detailed articles like this takes a lot of time and effort..
If you liked it, can I ask you to leave me a feedback message in the comments at the bottom of the page?
For a content-creator, knowing that you are being read and that your efforts are useful to someone is the best motivation to keep writing and doing better 🙂
Let me know what you liked or what you think could be added.
If you’d like, you can also share the article to help other people find it!
Thanks for the help 🙂

Read the Van Conversion Guides
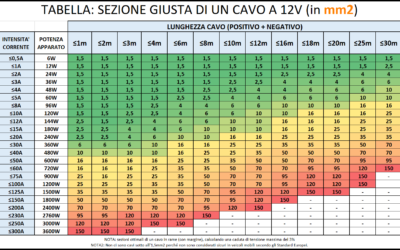
How to Calculate the Right Section of 12V Cables | EASY GUIDE
An undersized cable does not carry enough current. A cable that is too undersized can lead to a fire. An oversized cable, on the other hand, simply costs more and is a waste of money. Are you wondering what is the logicfor choosing one section of cable over...

Bluetti vs Ecoflow | Which is the Best Portable Power Station for RV/Vanlife?
The Portable Power Station is an increasingly used accessory on camper vans and RVs, but when does it really make sense to purchase and own or install one? In this article we try to shed some light on how these systems work, the best options on the market, and the...
Van Electrical Diagrams for your DIY Project – Ready to Install
The Electrical System is often one of the most complicated steps in a DIY van conversion. How much energy is needed? What apparatus/devices to purchase? How to connect them? How much would it cost? These are all doubts and questions that normally everyone finds...

Van Interior Conversion: Best DIY Ideas for your Project!
The Interior Outfitting of a DIY converted van is both an aesthetic and structural choice. In this article, you will find useful information and inspiration ideas for customizing the Walls, the Ceiling, and the Floor of your Van! DIY CAMPERVAN SET-UP:...
Kitchen for Camper | Best DIY Ideas for your Van Conversion
Cooking in Camper is one of those things, that makes you feel at home wherever you are! Gas, Diesel or Electric Stove? What equipment and accessories you need on the Road? How much space do you need? How to assemble the kitchen in your Camper? In this article you will...
The Best Fridge for Your Campervan – Which One to Choose?
Buying a trivalent or compressor RV refrigerator? Horizontal or vertical? 12V or 110/220V? In this article you will find all the information you need to choose the best fridge for Your Van, tailored to your Needs! 🙂 THE REFRIGERATOR IN THE VAN:...
Van Conversion: How to Build a DIY Bed for your Camper Van
A Camper is not a Camper if it does not have a bed. Where to Sleep and... Dream! In this Guide you can find the inspiration you need for creating a DIY Bed in Your Campervan, And I'll show you step by step how I built a Complete Bed/Dinette on my VW Crafter....
DIY Camper Bathroom: How to Self-Build a Toilet
If you are Campering a Van you surely must have wondered: How does the Bathroom in a Motorhome work? In this Guide I show you the various types of Bathrooms on the market, I explain how they work, and I show you how you can Build yourself an entirely...
Best 12V Fan for RV | DIY Installation Guide | Van Conversion
A Roof Fan helps keep your Vehicle's humidity under control and change stale air. In this guide you will find everything you need to know about mounting a Maxxfan Deluxe fan on the roof of YOUR van. ROOF FAN: WHAT IS IT FOR? Keeping an RV's...
How to Build a Shower in a Do-It-Yourself Camper
A Shower in the RV for some people is not necessary, for others it is a real necessity to be totally independent! In this guide I'll tell you how I built the shower of my converted van entirely Do-It-Yourself! INSTALLING A SHOWER IN A...
Complete Guide and Electrical Scheme for your D-I-Y Van Conversion
You dream of transforming your Campervan DIY and have never touched an electrical cable before? Or do you want to implement some changes to your Factory RV? In this guide you will find EVERYTHING (absolutely EVERYTHING!) you need to know to create the perfect DIY...
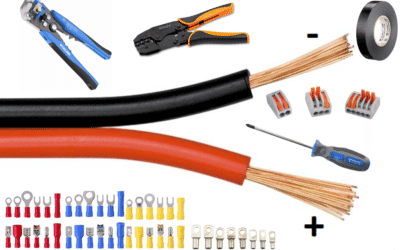
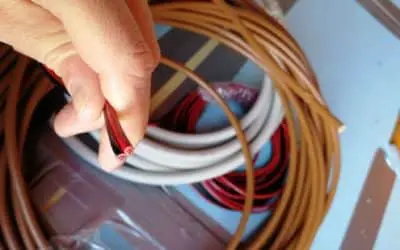
Converting a Van: How to Connect Electric Cables Without Mistaking
Want to know how to "connect" the electric cables in practice in a converted van? Stripping, Crimping, Wire Leads, Clamps, Tubing, Cable Ties and much more... You've come to the right place to learn All That! How to wire your van's electrical...


0 Comments