
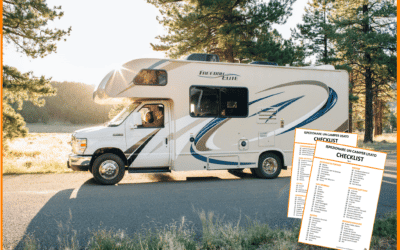
Did you buy a Van in Germany and convert it with a Fixed Outfit?
In this article I’ll explain all the key steps to get to place on your van the much sought after
Italian license plate!
NATIONALIZE A CONVERTED VAN IN ITALY
In the previous article How to Homologate a Converted Van in Italy – The Complete Guide we talked about all the alternatives to be able to legally circulate with a converted van in Italy.
As we have seen, there are only two ways to drive a converted van with fixed equipment: buy a converted van that is already homologated, or go through Germany: buy a vehicle in Germany, camper it in Italy, have it tested as a camper van in Germany and then nationalize it in Italy.
In this article, we deal with the last part of the homologation process, i.e. the testing in Germany and the bureaucratic (but relatively simple) process of nationalization in Italy .
Below, you will find the table of contents of the article.
TABLE OF CONTENTS
How to Test and Nationalize a Camper Van

1. Preliminary remarks: Fixed equipment and German vehicle
BEFORE WE BEGIN, A PREMISE
This article is for you if:
- you have purchased a van in Germany,
- you have finished your camper with fixed setup,
- the german export license plate on your van is still valid
- and you are ready to homologate (test) it in Germany.
If you are not yet at this point, I suggest you once again to read first the article How to Homologate a Camper Van in Italy – The Complete Guide.
If, on the other hand, you find yourself in the situation described in the four points above, congratulations! This article is the right one for you and here you will find all the information on how to proceed to nationalize your camper van and get the Italian license plate.

As with (almost) all things in Italy, the bureaucracy at times is and will be nerve-wracking; however, don’t worry. Step by step you can do it all and you’ll see that if I made it through the sea of paperwork without any guidance, with the advice I’ll leave you in this article You’ll definitely make it too, and much faster than me!
Let’s cut the chatter and get started! 🙂
2. Test your camper van in Germany
Where, How, and with Whom?
2.1 WHAT EXACTLY ARE WE TRYING TO DO?
If you’ve finished converting your van, the first step you’ll need to take in order to legalize your camper-van in Italy is to change the category of your vehicle and change it from N1 (cargo van) to M1 (passenger camper).

The category of the vehicle can be read in the vehicle registration book under J.
Having a category “M1” is not sufficient on its own, however, to be able to circulate freely with a motorised vehicle (in fact, vans up to 9 seats are also categorized as “M1”, but this does not mean that they can be converted without passing a test).
In fact, in addition to the category of the vehicle, we are interested in the fact that our van is officially registered as a “CAMPER”.
For this to be the case, what we need is for the words “AUTOCARAVAN” (or “WOHMOBIL” in German) to appear in points J.1 and J.2 of the vehicle registration document.
Below I show you the current wording on the registration of my camper van, once tested and nationalized in Italy:

Getting the M1 category and these markings on your vehicle registration, is whatI wrote this entire guide for and what you need to be able to legally travel in Italy with your camper van .
Unfortunately, as we have already seen inprevious article, obtaining this label in Italy, with the current laws, is practically impossible.
Nevertheless, being in Europe we can take advantage of the community laws and rely on a member state with much more modern and reasonable laws on the subject: Germany!
NOTE
Before I go any further, I want to share with you a concept to keep in mind:
What it says on the registration is what can legally circulate.
If it says AUTOCARAVAN, your vehicle can travel as an RV. If it says it’s approved for 3 people, you can ride with 3 passengers. If it says OWN USE, you can use your vehicle but you cannot rent your vehicle. Etc. etc. etc.
Keep this concept in mind as we will need it later 😉
2.2 WHICH GERMAN ENTITIES CAN CERTIFY THE CHANGE FROM VAN N1 TO MOTORHOME “M1 – AUTOCARAVAN”?
In Germany there are four entities that can legally certify your fixed equipment and change the category of your vehicle from N1 to M1. These four entities are:

All four institutions have offices abroad (even in Italy!), but the test for what they all told me (I called by phone all their offices in Italy!), must be done in Germany.
If years ago, some inspectors would come to Italy and promote vehicles without physically moving them to Germany, nowadays German laws are more stringent and this no longer seems possible.
2.3 ESSENTIAL REQUIREMENTS FOR SUCCESSFULLY HOMOLOGATING YOUR CAMPER VAN
As I explained in the previous article, German law determines that a mobile home (Wohmobil – in German) must meet minimum requirements which are:
- A Seat and a Table, where to eat
- A Bed, where to sleep
- A stove, where to prepare food
- A Wardrobe, where to store clothes and objects
- The set-up must be fixed stably
Theoretically, these 5 points are all you need to have in order for an inspector to successfully homologate your camper van (in addition to the valid German export license plate – with red stripe -).
As we’ll see in a moment, various agencies and inspectors may require other things to pass you the test, but they are essentially not required to do so by law. Keep this cue in mind, because then we’ll need it to find the easiest way to test your van (I’ll tell you!).
2.4 NON-ESSENTIAL REQUIREMENTS BY LAW, BUT REQUIRED BY DIFFERENT AGENCIES
Each certifying agency follows slightly different guidelines for approving or refusing to approve a converted van.
Below we’ll briefly look at the various requirements of each certification body and I’ll leave you the link to their guidelines so you can see them for yourself.
Some web pages are better written and more detailed than others, some practically don’t exist. From experience, however, I can tell you that no one describes with totality and 100% what a given inspector might (or might not!) demand of you.
NOTE: The sites are in German. If you don’t speak German, it’s still pretty easy to navigate them using Google Translate.
TUV North
Extra requirements: Entry step <50cm, CE approved auxiliary heater with readable nameplate, fixed cooktop, VDE certified 230V electrical installations (by a German electrician), CE glazing, ventilation, locked/unlocked drawers.
PDF TUV NORD Recommendations (in German)
TUV South
Extra requirements: gas system certificate (if installed), swivel seat certification
TUV SUD Guidelines (there is almost nothing on the official site)
TUV Rheinland
Extra requirements: two windows on different sides, ventilation according to DIN EN 721, non-slip floor, permanently installed cooker (even if “cartridge”), VDE-certified electrical installation (by German electrician)
2.5 my story: how and with whom I tested my camper van

PART 1. SEARCHING FOR A CONTACT
Once I flipped through and re-flipped through the various pages of all four certifying bodies and their (very poor!) guidelines, what I did was startemailing every contactI could find online.
By sending emails to the headquarters of each company, I soon realized that I wasn’t going to get anywhere: few people answered me, some told me they couldn’t give information to people outside Germany, others referred me to phantom guidelines that were the same ones I already knew.
So, I searched online for the individual offices of TUV and DEKRA ,that deal with the homologation of converted vans (Wohmobil Zulassung) and I contacted them directly by email and phone (I’m pretty good withGerman, luckily,but most of the people who answered me spoke also English).
The TUV Nord offices were the most willing to help me, but in the end I found a Dekra office in Bavaria closer to me, with a very helpful inspector, so I decided to rely on them.
The place was DEKRA Niederlassung Munich (and the email, in case you are interested in contacting them is: [email protected]). Before I made an appointment, I got in touch with an inspector and sent him all the pictures of my van so he could verify that everything was in order before going to Germany.
Without mincing words, he told me that everything was fine except for the induction hob which needed a VDE certification (a certification of compliance with German standards, which must be done by a German electrician), a circuit breaker and, having a power greater than 2000Watts, a fixed installation (direct cable inverter-mounted) and not through a wall socket.
Under 2000Watts, it would have even accepted a moving induction hob (if only I had known that before!).
The contact of this technician is [email protected]A very kind and helpful person. This is the email he sent me (translated into Italian):
EMAIL WITH DEKRA ENGINEER – INFO ON ELECTRICAL SYSTEM
I assume the vehicle has a place to sleep, a seat with a table, and storage space in addition to the stove. The vehicle must be completely empty because we need to redefine the empty weight. For this purpose, the vehicle is weighed at our test center.
As for the electrically operated cooktop, we distinguish according to the connected load:
- Cooking devices with a connected power of up to 2000 W can be operated via a socket (230V). They must be certified according to VDE and CE. If no fixed electrical system is installed in the caravan, you can use a sufficiently dimensioned connecting cable with protective earth conductor, certified according to VDE and CE, to connect the cooking appliance to the external power supply.
- Cooking appliances with a connected power of more than 2000 W, including the hob (230 V on-board voltage), must be securely connected. Accordingly, plugs are not allowed in order to minimize the occurrence of possible contact resistance and thus avoid a possible cause of fire.
- In principle, a permanent installation of the electrical system in motor homes above an operating voltage of 25 volts alternating current (AC) or 60 volts direct current (DC) must be carried out according to the guidelines of DIN VDE. Your installation must be checked by a specialist according to VDE and confirmed in writing. The installation must be three-pole, copper and at least 1.5 mm thick. Particular attention must be paid to the protective conductor (yellow/green), which must also be connected to the metal parts of the body. IEC 60364-7-721: 2017 or DIN VDE 57 100 721: 2019-10 apply. You must protect the system with an FI/LS switch.
I hope I was able to help you with this information.
Upon receiving this information, I modified my electrical system to comply with all required standards and wrote to dozens of electricians/electrical contractors in Munich until I found one who was willing to certify my system according to VDE standards (here the contact electrician in case you need it):

Contact of a (very kind) electrician in Munich
that can certify the system of a Van Camper according to VDE standards:
I sent the photos of the electrical system to him to be sure that everything was in order and once confirmed I took appointments with both the electrician and Dekra and we were ready to go to Germany to test the van.
THE ADVENTURE BEGINS

Fingers crossed, in our camper van, my sister and I left for Germany. I had an appointment with the electrician in the morning and with Dekra for noon so we could return in the day.
Driving up, I still didn’t know how much trouble that darn induction hob would give me .
Once I reached the electrician in fact, he told me that an additional circuit breaker was missing (I had already mounted one on the inverter and one on the induction hob) to protect all AC circuits, and without that he was not able to certify my system.
The world fell apart on me. There was no time to assemble it, I was already in Germany, he had confirmed that everything was perfect by email (with photos!), and now, once I arrived in Munich, he told me that a life preserver was missing. He was very kind, he almost felt guilty and bad for me, but the fact remained: he couldn’t certify the system and I didn’t have time to install a circuit breaker before the testing appointment with Dekra.
Dejected, we took the van to Dekra anyway and I explained the situation to Robert, the technician I had previously spoken with by email. I asked him if he knew anyone who could certify my system but he didn’t know how to help me . As nice and helpful as everyone was, the testing expedition now seemed to almost fail because of a small circuit breaker.
From the bad luck, comes great fortune (also called “botta di culo”).
Bitter and disappointed, we started looking for someone around Munich who could install the missing circuit breaker in record time and certify the electrical system according to these damned VDE standards (the Dekra technician told me he could wait until the end of the day if we made it).
Jumping from one place to another, and scrolling on the internet the impossible, we literally crossed Munich far and wide until we arrived in a village near there called Anzing and…. we found paradise!
Well, we arrived in this place: IC Intercamp (20 minutes from Munich).


Here too, as in all the other places we visited, our question was always the same: “can you install the circuit breaker and certify the system according to VDE standards?”
The guy’s innocent response was, “But what do you need this VDE certification for? “.
And we explained to him the whole cascading story: that we had trucked a van and were trying to test it with Dekra, but to do so we needed a VDE certification, and that to get it the electrician was asking us to install a circuit breaker.
At that point he said laughing: “Look, I have a TUV SUD technician here today, if you want he can test the van today even without certification and even without an appointment”.
Our response, “EEEEEEEEEEEEEHHH????!!!!!!!.” We couldn’t believe it: no appointment, no certification, no crazy request.
End of story: of course we accepted.
This inspector climbed into our van FIVE minutes, took a couple of pictures here and there, signed our papers and officially our camper van was no longer an N1 van, but a full-fledged M1 camper.
Cost? About 100 Euro!
So, simple. Without seeing plumbing, electrical, installations, NOTHING! We couldn’t believe it!
MORAL OF THE STORY
Before leaving for Germany, I read a lot on the internet about how the testing of a vehicle is very much at the discretion of the inspector on duty. Well, I can confirm that! With the right contact, everything is quick and easy.
In the end, all that is needed to homologate your van is a signature and a stamp on a sheet of paper. Dekra, TUV North, TUV South or Rheinland is indifferent. Indifferent where you go or with what entity. What really matters is the examining engineer himself!
Obviously, being prepared with the least possible criticality and following the guidelines is a must. But the hair in the egg can always happen, and it is always up to the examiner to make a broad view or not.
And here I want to do you a huge favor! I’ll leave you the contact info for the inspector who approved my truck here. I hope it helps you, we went through the adventure of a lifetime to find this contact ;D
CONTACT FOR TESTING IN GERMANY
Bumps in the road can happen (as in my case!), but in the end the important thing is not to lose heart. All you need is to find the right contact and make sure that your camper van meets all its requirements.
Like the inspector I found, there are many others (there are many TUV/DEKRA offices in all major cities and in many small towns in Germany); and with a little patience and by making some calls you can find them.
If you don’t have the problem of an oversized electrical system like mine , probably finding an inspector to pass your vehicle will be much easier than in my case.
NOTE: If you plan to install agas system, to pass the test everyone will require a certificate of compliance, which can be booked as the test with the various TUV/DEKRA.
Once the technician has approved the change from N1 to M1 “Wohmobil”, the last thing you have to do in Germany is to go to the DMV for the office to transcribe the TUV/DEKRA ratings on your vehicle registration document. We will see this in the next passage.
2.6 UPDATE THE BOOKLET AT THE GERMAN DMV
First of all, rejoice!
You are a full-fledged RV owner!
The hard part has been done! Yuhuuu! 😀
From now on, all you’ll have to do is tedious office paperwork.
After passing the TUV/DEKRA examination the first thing to do is to go to any German motor vehicle registration office (KFZ-Zulassungstelle) and transcribe the new vehicle category M1 “Wohmobil”.
To do this, you simply have to go to a German DMV (usually no appointment is needed, but it is always better to go well before closing time as there are often queues), bring your ID, the vehicle registration document (Teil I + Teil II) and the TUV or Dekra inspector’s certificate.
The DMV will update the booklet by changing the vehicle category from N1 to M1, and adding to the item 22. of the booklet observations/integrations proposed by the TUV inspector (time about 30 minutes, cost 42 Euro).

Once the book is updated, at the DMV you can request a translation of the book (which is done in all European languages) at a cost of 15 Euros. This translation is very important because you will be asked by the Italian DMV, make sure it is well translated in all its points and has the stamp of the German DMV.

Once the procedure is complete, you will be stripped of the export license plate you arrived with (that is in fact a license plate for N1) and your insurance will no longer cover your vehicle.
To return to Italy, you will then have to apply for a short license plate (Kurzkennzeichen – with yellow band – cost approx. 25Euro) and a short insurance (cost approx. 13Euro). I made it from this little store in Monaco, located next to a DMV.
Once everything is done, it will be time to return to Italy with your new CAMPER! 😉
2.7 REPEAT ALL STEPS TO TEST YOUR CAMPER VAN IN GERMANY

STEP BY STEP SUMMARY – TESTING IN GERMANY
- Contact a TUV/DEKRA inspector in Germany (I left you two contacts, DEKRA –TUVSUD)
- Make sure with him that your camper van meets all of his requirements (make sure 10 times!).
- Make an appointment for testing (Wohmobil Zulassung)
- Visit the TUV/DEKRA workshop in Germany and get your vehicle modifications certified.
- Take the certificate to the German Motor Vehicle Authority (KFZ-zulassungstelle) and have the registration updated.
- Ask the DMV for a translation of the updated registration certificate in Italian and make sure it is stamped.
- Request a short license plate (Kurz-kennzeichen) and a short insurance for your motorhome
- Go back to Italy (not without first enjoying a German beer to celebrate your victory!).
- Prepare yourself for the Italian procedure to nationalize your vehicle 🙂
- Time to do the whole rigmarole in Germany: 1 day (or two, more leisurely!)
3. Nationalizing a Van Camper in Italy (pt.1):
the Inland Revenue Service
Once the trip to Germany was over, the hard part was done. Now you own a full-fledged motorhome and the only thing you will have to do now is to “nationalize” your German motorhome and make it an Italian vehicle.
The procedure is not difficult, but like all things in Italy unfortunately can take a (good) bit of time.
In order, the things you will need to do are:
- Register your vehicle with the IRS.
- Pass an overhaul at the DMV
- Register and insure your new motorhome
In the next few paragraphs, I’ll walk you through all the key steps to make your research work easier.
So let’s start with theIRS.

3.1 REGISTERING YOUR CAMPER VAN WITH THE IRS
For the past couple of years (July 2020 – view new rule), even for private individuals it is necessary to declare second-hand vehicles bought abroad at the tax agency; which once received and verified the declaration, will “unlock” the chassis and give the go-ahead to the DMV for registration and license plate.
This necessity was introduced to stop the wild market that had been created in recent years in which private individuals bought vehicles in Germany at low cost (perhaps in black) to resell them in Italy without paying any tax on profit.
Now in fact, the IRS checks how the vehicle was paid for and whether or not it is actually a used vehicle.
Does this new standard affect our case? Ni.
From an economic point of view, no: in fact, if the vehicle is older than 6 months or has covered more than 6000km, there will be no VAT to pay (since it has already been paid in Germany).
From a bureaucratic point of view, yes: you’ll have to take the trouble to go to the IRS and declare the purchase of your vehicle and show how you paid for it.
To do this, you will need to bring with you:
- Purchase contract showing that the van was purchased in the EU
- Original vehicle documents (booklets Teil I + Teil II)
- Chassis number (usually found engraved under the driver’s seat)
- Payment Transfer / Receipt
- (Possible transport document)
- Declaration that the purchase was made as a private individual outside the exercise of business, arts and professions
- C.E.D. of the registration request issued by a car practices agency (cost approx. 20 Euro)
3.2 DECLARE THE CAMPER VAN – STEP BY STEP SUMMARY

STEP BY STEP SUMMARY – DECLARATION TO THE REVENUE AGENCY
- Request an appointment with the IRS
- Forward the file attaching all the documents we have just mentioned
- Waiting for the revenue agency to “unlock” the chassis and give the go-ahead for testing at the DMV
- Once cleared by the IRS, the RV is eligible at the DMV for testing
- Time to do all the paperwork at the IRS:
- 10-15 days to make an appointment, up to 30 days to get the go-ahead to practice
- (I know you got used to it in Germany, but welcome back to Italy! *sigh*)
4. Nationalizing a Van Camper in Italy (pt. 2):
the Italian Motorization
We are one step closer to the goal.
All that is missing now is the testing at the DMV.
4.1 WHAT IS CHECKED BY THE ITALIAN DMV?
Breathe a sigh of relief: the Italian DMV will no longer check your fixed set-up.
In fact, you are not submitting a van, but a fully certified RV! Therefore, the DMV inspector will have no need to check the interior of your vehicle.
Whatthey will check instead, as with any vehicle overhaul, are headlights, any warning lights on, total weight of the vehicle, wheels, brakes and the entire exterior of the vehicle. The inspector’s goal is to make sure that everything in the booklet is actually reflected in the vehicle.

4.2 WHAT DOCUMENTS DO YOU NEED TO BRING TO THE DMV?
First of all, as with any other transition, what I recommend you to do is to contact by phone the DMV you plan to go to, and specifically ask them for the documents they will need (I’ve heard other people have had different experiences than mine at other DMVs).
The essential documents that you will have to bring to the Italian motorization during the test are:
- Updated official vehicle documents (Teil I + Teil II)
- Translation of the booklet made by the German DMV
- ID card/Passport
- (Possible proxy if you want to send another person in your place)
In addition to these, I was asked by the inspector:
- Court-approved translation into Italian of item 22. of the booklet (“remarks and exceptions”)
Once you have all the documents ready, what you’ll have to do is simply make an appointment with the DMV and show up on time for the test day (which is actually, as we said, a kind of overhaul).
If the inspection goes well and they don’t find anything strange, within two days at the latest the DMV will provide you with Italian license plates.

4.3 TWO GLITCHES THAT WASTED MY TIME (AND HOW TO AVOID THEM!)
Unfortunately for me, my first time at the Italian DMV was no good *sigh* and the process to nationalize my vehicle was not as fast as I thought.
My adventure with the Italian DMV, in fact, lasted about two months, due to bureaucratic slowness and misunderstandings that sincerely could have been avoided.
In this paragraph, I’m going to tell you about two pitfalls that have happened to me, so that you can be prepared and can prevent them from happening to you.
INGHIPPO 1. Item 22. of the booklet had been translated too abbreviated by the German DMV
As I told you in the previous paragraph, in addition to the essential documents, I was also required to provide a court-authenticated translation of Item 22 of my registration certificate (remarks and exceptions).
The examiner at the DMV told me that the abbreviations provided by the TUV inspector and transcribed by the German DMV on my registration were too abbreviated and therefore not clear enough.
To avoid this problem, I suggest you to ask in Germany that the modifications of point 22 (which is nothing else than the description of the equipment, e.g. bed, kitchen, furniture, etc.) be written in full by the TUV/DEKRA inspector.
In this way, you can probably avoid having to request an endorsed translation and the international translation of the booklet made by the German DMV should be sufficient.

INGHIPPO 2. The trailer hitch is not marked on the vehicle registration document
My camper van (bought second hand) was fitted with a trailer hitch as standard. It was practically born with that hitch (and the license plate attached to it certified it).
Unfortunately, the trailer hitch wasn’t on my registration and the DMV inspector told me that he couldn’t give me the vehicle.
He told me that I needed to call the manufacturer (Volkswagen in my case, my vehicle being a VW Crafter) and have them certify that that vehicle was born with the hitch.
Apparently, in Germany it is normal to no longer write the towbar on the registration, but in Italy it is compulsory.
At that point, I contacted Volkswagen by phone, explained the situation, and asked if they could give me the document I needed.
They told me that there was no problem, but that they could do it only if the vehicle had Italian plates.
At that point, I felt like I was in a candid-camera: the DMV couldn’t plate my vehicle without the certification, and Volkswagen couldn’t issue the certification without an Italian license plate. Basically, I was in an Italian limbo of bureaucratic insanity .
Solution?
I had to take my van to:
- disassemble the trailer hitch,
- take it to the DMV and get it registered without a hitch,
- then reinstall the trailer hitch,
- request certification from Volkswagen,
- and finally update the booklet.
I mean, could they really not get their act together? Oh no, we’re not in Germany here! (*facepalm*)
If your vehicle has a trailer hitch, I suggest you (always in Germany) to ask the TUV inspector to add it in the notes/remarks so that the German DMV will put it on your registration.
I hope this information is helpful to you, I don’t wish on anyone thebureaucratic odyssey I had to go through to nationalize my Do-It-Yourself RV.

Useful tips for nationalizing your motorhome van
and Conclusion
MORAL OF THE STORY: HE WHO ENDURES, WINS!

Well, after 4 months to camper my van and 4 months to homologate it, the DMV finally certified the vehicle and gave me the coveted Italian license plate. My van has officially become an Italian Do-It-Yourself Camper.
Honestly, I didn’t expect to have to go through this whole bureaucratic odyssey. Having said that, I absolutely do not want to discourage you from undertaking such a project, but on the contrary give you confidence and confirm that with a little patience, transforming a dream into reality is possible.
The biggest obstacle I encountered in the process of homologation and especially nationalization, which slowed me down more than anything else, I think was thelack of clear and detailed information.
With the previous article How to Homologate a Camper Van in Italyand this guide, I hope to have contributed a little bit to fill that information gap and to be able to help those who, like you who are reading this, are probably thinking of launching into a similar madness.
I hope that with this guide you will be able to better untangle the bureaucratic jungle that are the Do-It-Yourself Converting and the homologation of a camper van in Italy, and I really wish you to lose much less time than I did.
Before concluding this article, I’d like to leave you with some tips/reflections from my own experience:
1) Call and Ask for Confirmation, two, three, five times! Before you go anywhere (and especially in Germany) contact the inspector, officer, electrician, DMV, or whoever you’re meeting with, and make sure several times that everything is in order. Be heavy and leave no tiny detail to chance! I, despite having prepared everything and asked for confirmations, took a serious risk of having a dry run in Germany. Ask over and over again, don’t get in trouble!
2) It takes as long as it takes, be resilient! Just like every single step to convert a van, it will probably take more time than you imagine to plate it. If you’ve already started your van conversion, you already know what I’m talking about 😉 So, take your time (especially in Italy), and don’t stress too much about some delays that are likely to occur, you will eventually get what you are looking for! 🙂
3) In Germany, speaking German obviously helps, but at least a little English is a minimum! If you don’t speak German or English, and you want to go to Germany in person to get your motorhome approved, I recommend that you have someone accompany you who speaks at least one of these languages. In the end, you will have to report on topics that are not easy and without the right language skills it may be very difficult (or impossible). If you don’t think you can do it, without risking, I suggest you to rely on some Italian agency that deals with homologations (see contacts at the end of this article).
If you have any doubts about any step, feel free to write me in the comments below and I’ll try to help you as much as I can 🙂
Likewise, I ask that you also write me below in case you find any inaccuracies (which can always escape me) or if you had a similar experience and would like to share it to help others in the nationalization process.
Thank you so much for reading, and I wish you a happy conversion!
See you in the next guide! 😀
BEFORE YOU GO, CAN I ASK YOU FOR SOME FEEDBACK?
Writing detailed articles like this takesa lot of time and effort..
If you liked it, can I ask you to leave me a feedback message in the comments at the bottom of the page?
For a content-creator, knowing that you are being read and that your efforts are useful to someone is the best motivation to keep writing and doing better 🙂
Let me know what you liked or what you think could be added.
If you’d like, you can also share the article to help other people find it!
Thanks for the help 🙂

Read the Van Conversion Guides
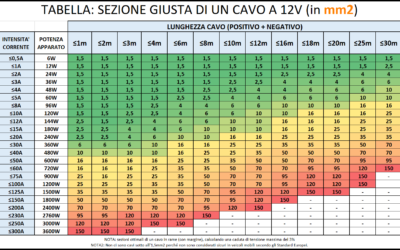
How to Calculate the Right Section of 12V Cables | EASY GUIDE
An undersized cable does not carry enough current. A cable that is too undersized can lead to a fire. An oversized cable, on the other hand, simply costs more and is a waste of money. Are you wondering what is the logicfor choosing one section of cable over...

Bluetti vs Ecoflow | Which is the Best Portable Power Station for RV/Vanlife?
The Portable Power Station is an increasingly used accessory on camper vans and RVs, but when does it really make sense to purchase and own or install one? In this article we try to shed some light on how these systems work, the best options on the market, and the...

Van Conversion DIY: How Much Does It Costs? | My Experience
How much does it cost an entirely DIY van to campervan conversion? The queen of all questions... In this article, I want to show you all the costs of my conversion from start to finish, so that you too can get an idea of what it might cost! ...
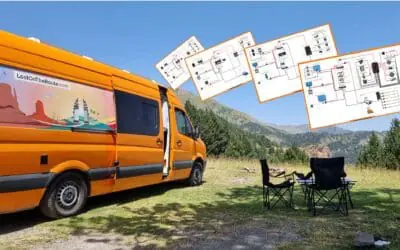
Van Electrical Diagrams for your DIY Project – Ready to Install
The Electrical System is often one of the most complicated steps in a DIY van conversion. How much energy is needed? What apparatus/devices to purchase? How to connect them? How much would it cost? These are all doubts and questions that normally everyone finds...

Van Interior Conversion: Best DIY Ideas for your Project!
The Interior Outfitting of a DIY converted van is both an aesthetic and structural choice. In this article, you will find useful information and inspiration ideas for customizing the Walls, the Ceiling, and the Floor of your Van! DIY CAMPERVAN SET-UP:...

Kitchen for Camper | Best DIY Ideas for your Van Conversion
Cooking in Camper is one of those things, that makes you feel at home wherever you are! Gas, Diesel or Electric Stove? What equipment and accessories you need on the Road? How much space do you need? How to assemble the kitchen in your Camper? In this article you will...
The Best Fridge for Your Campervan – Which One to Choose?
Buying a trivalent or compressor RV refrigerator? Horizontal or vertical? 12V or 110/220V? In this article you will find all the information you need to choose the best fridge for Your Van, tailored to your Needs! 🙂 THE REFRIGERATOR IN THE VAN:...
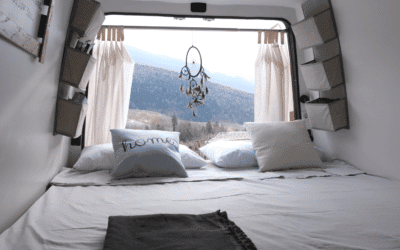
Van Conversion: How to Build a DIY Bed for your Camper Van
A Camper is not a Camper if it does not have a bed. Where to Sleep and... Dream! In this Guide you can find the inspiration you need for creating a DIY Bed in Your Campervan, And I'll show you step by step how I built a Complete Bed/Dinette on my VW Crafter....
DIY Camper Bathroom: How to Self-Build a Toilet
If you are Campering a Van you surely must have wondered: How does the Bathroom in a Motorhome work? In this Guide I show you the various types of Bathrooms on the market, I explain how they work, and I show you how you can Build yourself an entirely...
Best 12V Fan for RV | DIY Installation Guide | Van Conversion
A Roof Fan helps keep your Vehicle's humidity under control and change stale air. In this guide you will find everything you need to know about mounting a Maxxfan Deluxe fan on the roof of YOUR van. ROOF FAN: WHAT IS IT FOR? Keeping an RV's...


0 Comments