
A Camper is not a Camper if it does not have a bed.
Where to Sleep and… Dream!
In this Guide you can find the inspiration you need for creating a
DIY Bed in Your Campervan,
And I’ll show you step by step how I built
a Complete Bed/Dinette on my VW Crafter.
VAN CONVERSION: IDEAS FOR BUILDING A BED FOR YOUR DIY MOTORHOME
The bed is an essential and indispensable part of any motorhome, and will certainly be for your future campervan too.
In fact, the bed is the travel companion that will keep you company wherever you go; it is where you will spend a good portion of your travel time, resting and dreaming about future destinations. That’s why it’s important for it to be convenient, practical, comfortable and above all: the right size!
In this article I will guide you through the various types of bed that exist (single bed, French bed, double bed, queen size etc.), the various ways of mounting them in an RV (fixed bed, bed/dinette, rollaway bed, murphy bed, elevator bed etc.) and the possible positions inside your van (bed in the back, side bed, overhead bed etc.).
We will leave nothing for granted!
In the first part of the article, I will show you several examples of creative DIY beds, built by vanlifers who have already grappled with this project before you.
In the second part, however, I will show you how I built a convertible dinette bed on my VW Crafter (with all the step-by-step photos) and finally, we will talk about mattresses and useful accessories to protect, store and make your home’s bed on wheels more comfortable.
Let’s cut the pleasantries and get started!
Happy reading!!! 😀
TABLE OF CONTENTS
How to Build a Bed in DIY Camper Van

1. How to choose the best bed type for your Van?

To find the perfect bed model for your RV, it is important for you to understand YOUR own needs.
In this section, you will find simple questions that it is good to ask yourself before you start planning and building your DIY bed.
1.1 HOW MANY BEDS DO YOU NEED ON YOUR RV?
Most vanlifers who decide to convert a van are usually alone or in pairs.
Being one or two, it certainly simplifies things and opens the door to a variety of bed options.
Nevertheless, maybe you might have needs for more beds: do you have children? How many? Do you plan to make friends or welcome hitchhikers along the way? Will you be traveling in three or maybe four?
Since beds are a fairly voluminous and basic structure of your RV conversion, difficult and expensive to replace once fixed, it is good to define from the beginning the maximum occupancy for which you are building your RV and, accordingly, define how many beds you need.
1.2 WHAT IS THE BEST BED SIZE FOR YOUR NEEDS
Space inside a van, no matter how small or large, is still gold: very, very, precious!
Having a bigger bed, of course, is always nice. However, it also usually means compromising a larger portion of space, which should be taken into account.
Quite often, in fact, in a space, as confined as a van, one may have more important needs to fit in than a king-size bed.
Below I leave you with the standard measurements of various bed models that are normally found in homes (and for which it is easy to find ready-made mattresses of the correct sizes):
- Standard single bed: 80cm×190cm / 195cm / 200cm
- Single bed large: 90cm×190cm / 195cm / 200cm
- Bed one and half 120×190 cm / 200 cm.
- Bed French double bed 140×190 cm / 200cm
- Standard Double Bed: 160×190cm / 200cm
- Letto King Size double bed: 180×190 cm or 180×200 cm.
A bed, as you can see, is on average between 190 and 200cm long.
Starting from the full-size bed onwards, it is possible for 2 people to sleep comfortably. Obviously, the lower you go, the more spacious and comfortable the bed will be.
Starting with the French double bed, one can sleep more or less comfortably in 3 with a child in the middle.
Personally, I recommend that you choose the size of the bed BEFORE you start designing everything else in the van. This will make your life easier in choosing what kind of bed to mount, where to mount it, and how to best serve it (electrical outlets, shelves, storage, height etc.).
1.3 SLEEPING IN AN VAN: STRAIGHT OR SIDEWAY?
At the design stage, the question of putting the bed parallel or perpendicular to the direction of travel will certainly pop into your head:
- Sleep parallel to the direction of travel (for long): head toward the back of the vehicle, and feet toward the driver’s compartment
- Sleep perpendicular to the direction of travel (sideway): head on one side of the van and feet on the other
If you are converting a medium-large van (Mercedes Sprinter, Fiat Ducato, Ford Transit etc.) the average interior width of the cargo area is normally between 1750-1800mm (not counting wall thickness and insulation).
For people With a height of more than 180cm, I personally wouldn’t even consider the sideways bed option (unless you accept that you can’t fully stretch, have to sleep a bit curled up or diagonally), and I would directly advise you to plan a straight DIY bed (parallel to the direction of travel).
If, on the other hand, you are less than 175-180cm in height, a side-by-side bed might be a good solution for you.
In fact, by arranging the bed horizontally, you can save a lot of space (from 30-40cm for a bed with a French width, to 60-70cm for a full-size bed).
It sounds like a few centimeters when you say it like that, but when you think that we are talking about 30-40-60cm in volume, you really can fit the world into such a small space!
The best way, in my opinion, to figure out what size bed is right for you is to simply lie on your bed at home, measure it, and imagine it on your van: is it big enough for you? Better slightly larger? Or could you also stay comfy with some inches less? Answer these simple questions, and you will have your measurements 🙂
1.4 CAMPERVAN BED DIY: FIXED BED OR ROLLAWAY BED?
The bed is one of man’s oldest inventions. For thousands of years, humans before us have been thinking about, redesigning, and reinventing the bed over and over again–and really there are thousands of patterns and ideas to take inspiration from!
Each type of bed, of course, has advantages and disadvantages over another.
A fixed bed, for example, has the advantage of always being assembled and ready to use! Its disadvantage, however, is that it takes up a lot of space that could be used for other things.
A rollaway/hidden bed (of which there are many types), has the advantage of saving space, however, at the same time it requires continuous assembly and disassembly with each use…etc.
In the next chapter, I will show you various types of DIY Bed Ideas, analyze their pros and cons, and we’ll try together to find the best one for your project!
2. 10 Creative DIY Bed Ideas for Van Conversion

In this chapter, I want to show you ten creative and brilliant DIY bed ideas in campervans that I found on the web while browsing in search of inspiration during the designing phase of my van.
Of course, there are many many others, but these ten in my opinion are the most clever, ingenious, creative and interesting ones I have found .
With these examples, I hope to give you an idea of what is possible to create in a van and help you find the option that best suits your needs!
Let’s begin!
2.1 THE FIXED BED
The fixed bed is the most classic of all beds, and despite its simplicity, it still remains one of the most popular.
A fixed bed in an RV does not move or disassemble: just like the one at home!
Usually, the fixed bed is placed at the rear of the van so as not to obstruct the opening of the side door.
The advantages of mounting a fixed bed are:
- It is always assembled and ready to use
- A lot of free space is created under the bed, which can be used for cabinets, drawers, or as a “garage” from behind
- Simple, intuitive and relatively easy to build
The Disadvantages of a fixed bed are:
- It takes up a lot of space, which could be used for other things
- You will have to devote more space to create a seating
- Can be complicated to install in low-roof or small vans
When is it recommended?
If you are converting avery spacious vehicle (even something more than a van), a fixed bed might be right for you. At the same time, it can suit you if you want to find your bed always ready and don’t feel like having to make and unmake it every morning and evening.


2.2 THE CONVERTIBLE BED/DINETTE WITH TABLE
The convertible bed into a dinette is another popular option in DIY van to campervan conversions (I built one on my VW Crafter, too, and I’ll show you how I did it in the Chapter 3).
The bed/dinette consists of a sitting area with side benches and a table in the center, where if necessary the table top can be lowered (to complete the bed top) and the mattresses on the benches slide down to make up a full double bed.
The advantages of building a bed/dinette on your Van are:
- During the day, you have a comfortable living room where you can eat and work on your PC (if you work remotely)
- If you invite guests, you will have extra seats for them to sit in
- Under the benches, however, there is plenty of free space available
The Disadvantages Of mounting a bed/dinette on your Van are:
- Having to unmake the bed every morning and make it every night
- Less space in the rear garage
- The contents of the benches cannot be accessed when the bed is made
When is it recommended?
The dinette bed I can recommend it to anyone who wants to make the most of your space, both day and night; for those who need a spacious table for working or for those planning to invite other people often.
Personally, having installed it I can tell you that making/unmaking the bed takes more or less 3 minutes, and this time for me is expendable in exchange for a living room and a bed both very spacious. I will tell you more about the bed/dinette in the Chapter 3.


2.3 THE WALL BED (MURPHY BED)
A rollaway/wall bed (also called “Murphy Bed”) is a type of space-saving bed in which the mattress is stowed vertically when closed, and opened when needed by rotating it downward using a special mechanism.
Personally, I find it a really convenient and original idea for DIY van conversions and have long considered installing a murphy bed on my van as well.
The advantages of installing a rollaway bed on your camper van are:
- The bed opens with a simple pull
- No need to make and unmake the bed every day, it is always already made
- When not in use, the bed is almost unnoticeable and out of the way
The Disadvantages Of installing a murphy bed on your van are:
- When not in use, the bed occupies vertical space that could be used for something else
- Murphy beds are more expensive than other bed models and more difficult to install them DIY
- Weaker than a regular bed, may need more maintenance
- Unsuitable for vans with curved walls (e.g. Sprinter Van, Crafter etc.).
When is it recommended?
The murphy bed is a good option for a double bed for two people; for those who want a sitting area during the day and have the bed always ready for the night.
Installing it is a little more complicated than other bed models, and requires a little more DIY experience (however, impossible is nothing when you’re converting a van ahah!). It is more suitable for vans with nice straight walls (saves more space).
It is important to note that, given its operation, it is not possible to use the space underneath as storage or a garage.


2.4 PULLOUT BED (PULLOUT BED)
The pullout bed consists of a kind of sofa/bed: during the day, the cabinet is a sofa with the mattress acting as both a support and a backrest; at night, the cabinet opens and the whole mattress becomes a support for the bed.
The mechanism for building a pull-out bed is really simple and within everyone’s reach: I’ll leave you the link to this youtube video explaining how to build it (it is in English).
Theadvantages of building a pull-out bed are:
- Easy and Practical to Build DIY
- Functional and Space-Saving
- The space under the cabinet can be used by creating doors or simple drawers
The Disadvantages of building a pull-out bed are:
- Having to make and unmake the bed every day (however, it is relatively quick)
- It is necessary to cut the mattress to size
- The bed can be a maximum of twice the width of the bench
When is it recommended?
The pull-out bed (or sofa/bed) is a solution that optimizes the use of space (all the space is used) and is suitable for smaller vans (where space is even more valuable) or otherwise for anyone who does not want to compromise even an inch of their space.
The sofa bed is an excellent option For an unconventional layout and for those thinking of installing their kitchen/bath/shower at the rear of the van and the bed behind the driver’s seat.
If installed in the rear instead, the pull-out bed still offers an excellent space accessible from the rear garage, (roughly half that of a fixed bed).


2.5 THE ROCK’N’ROLL BED – “VOLKSWAGEN VAN” STYLE
The “rock ‘n’ roll” beds are the famous seats from old Volkswagen vans, which lay down and turn into a bed when needed.
Nowadays there are various types, but their operation is essentially the same: a seat that becomes a bed. The DIY part in this case must be limited to simply installing what you buy. It would not be possible to create such seats on one’s own as they would not be legal to travel with (at least in the EU – they must be marked CE).
The advantages of a rock ‘n’ roll seat/bed are:
- Extra approved seats that can be used for extra passengers
- Seats easy to lay down and turn into Bed
- Under the benches, however, there is plenty of free space available
The Disadvantages Of mounting a bed/dinette on your RV are:
- Fairly expensive solution that leaves little room for DIY Customization (only fixing already fabricated seats)
- Storage space is lost under and near the seats
- It is not as comfortable as a real bed with a real mattress, and also the bed has to be made and unmade every day
When is it recommended?
The “rock ‘n’ roll style” bed/seat is recommended for smaller projects, for those who need seats and beds for extra passengers,or for those who simply do not feel like getting their hands dirty with more complicated options.


2.6 CEILING BED
The Ceiling Bed is a romantic icon of campers and vanlifers: a tiny pop-up room where one can sleep and at the same time admire the surrounding landscape.
In fact, inside a folding roof normally fits a double bed large enough and comfortable enough for two people. Installing a folding roof in a DIY project is definitely not the easiest option for building a bed, however, if you like the idea and are up for the challenge, why not? 🙂
The advantages of installing a folding roof and a ceiling bed are:
- Always Ready Bed
- Minimal space taken inside the van (you gain lot of free space!).
- From the bed you can see, hear and immerse yourself in your surroundings
- Extras: Aesthetically Cool to see in Photos!
The Disadvantages Of installing a folding roof and a ceiling bed are:
- Very Very Difficult to Install DIY
- One of the Most Expensive Options
- Temperature control can be problematic (too hot or too cold)
- Extra: Having a moving roof can complicate the mounting of solar panels (but there are solutions still)
When is it recommended?
The bed in the folding roof is a very romantic option however certainly very difficult to install DIY and not ideal for a 4-season camper. Personally, I think it is ideal for those planning to travel with more than two people (families or groups) to get two additional beds.
The convenience of having the bed ready at all times taking minimal space is great, as is the beauty of being able to immerse oneself in the surrounding nature. If you are thinking of installing one, I recommend you see some tutorials and figure out if it’s worth it to you to install it by yourself or leave the installation to professionals.


2.7 THE BUNK BED
The bunk bed, like those found in regular houses, is used to make extra sleeping places by using the same space on several levels vertically. Despite the fact that they can be constructed in various ways (tail, sideways, suspended, traditional etc.) the theory of the bunk bed always remains the same: a bed underneath, and a bed on top.
The advantages of installing a bunk bed in your van are:
- Always-ready beds
- Maximum use is made of vertical space for extra sleeping places
- With a little elbow grease, they are easy to build DIY in a variety of ways
The Disadvantages Of fitting a bunk bed in your RV are:
- It is necessary to make sure that, especially the bed on top, is firmly fixed and will last over time
- A bunk bed however takes up space that could otherwise be used to stow items
- The upper bed needs a ladder, and if made too close together, bunk beds can give a sense of claustrophobia
When is it recommended?
The bunk bed is definitely recommended for High-roof and spacious vans, for those who need some extra beds (e.g., families) or for those who want to travel in two but are not a couple (e.g., two friends-the bunk bed gives a little privacy and can be supplemented with two curtains to give even more privacy).


2.8 THE BED/DINETTE WITH EXTENDABLE BENCHES
The bed/dinette with extendable benches is another very creative idea that allows you to turn a small living room (dinette) into the bed of your van.
The operation is simple: a plank of the bench back is placed in the center between the two benches, the cushions slide toward the center, and voila, the mattress is complete. Unlike the bed/dinette with table, in this case since there is no table, the time needed to convert the living room to a bed is even faster.
The advantages of building a bed/dinette on your camper van are:
- During the day, you have a comfortable living room where you can relax and work
- if you invite guests, you will have extra seats for them to sit in
- There is still plenty of free space available under the benches
The Disadvantages Of mounting a bed/dinette on your truck camper are:
- Having to unmake the bed every morning and make it every night
- Less space in the rear garage
- There is no central table to lean on to eat (however, this can be solved in many ways)
When is it recommended?
The dinette bed with extendable benches is similar to the convertible bed seen above (which used the table for support) and is recommended for those who plan to use their van in a more social way (they can seat up to 6 people!).
This solution is also great for making the most of your space, both during the day and at night, and for making the bed the less bulky as possible when not in use.


2.9 THE ELEVATOR BED
The Elevator Bed is a fairly recent cool gimmick: an always-made bed that during the day is attached to the ceiling and at night, using a electric or manual mechanism, is lowered into position.
This type of bed, is a nice challenge even for DIY enthusiasts, but definitely one of the most ingenious systems for installing a bed on an van or RV. In fact, in the case of an overhead bed, the space occupied by the bed is only that of the mattress (and any supports to allow it to be lowered and raised).
The advantages of building an overhead bed (elevator bed) in your RV are:
- the bed takes up minimal space and is always ready!
- if you invite guests, you will have extra seats for them to sit in
- There is still plenty of free space available under the benches
The Disadvantages of building an overhead bed (elevator bed) in your RV are:
- no tall furniture can be placed under the bed
- not easy to build Do-It-Yourself and integrate with the rest of the project (lights, ceiling, walls etc.)
- the elevator bed, over time, needs more maintenance than a regular bed
When is it recommended?
If you like the idea and are up for the DIY power challenge, the elevator bed is truly extraordinary: always ready, takes up minimal space, and leaves plenty of room to live in your camper van during the day. Bonus: anyone who sees it will always be amazed!


2.10 WHO SAID YOU NEED A BED? TRY THE HAMMOCK!
If you don’t want to build anything fixed, you are flexible and you like the hippy style, why not installling a hammock instead of a bed?!
The hammock is a solution that is as easy to install as it is to remove when needed: all you need are two firmly attached hooks and voila, already you have a place to relax and sleep.
Moreover, no small detail, they are damn cheap and they can also be used outdoors.
The advantages of a hammock in your van are:
- The least expensive option among all bed types
- Easy to assemble and disassemble in seconds
- It takes up virtually no space and can also be used for outdoor camping if desired
The Disadvantages of mounting a hammock in your van are:
- Not everyone can sleep comfortably in a hammock for long periods (can cause back and neck pain)
- It is only for one person (there are hammocks for two, but you can hardly sleep in them for more than a nap)
- It is not as spacious as a mattress and obviously rocks and moves (you may like it or not!).
When is it recommended?
A hammock as a bed? You must like. It rocks, it moves, and getting off is not always easy-there are those who like it and those who don’t.
Personally, I find the hammock a very interesting option for temporary setups of a few days, while I find it a bit extreme for sleeping in it every night for longer periods.
In vans with fixed/permanent setups, on the other hand, a hammock can be a great solution for temporarily creating some extra sleeping space (if some friends join the trip!) or simply as an “extra” to have a different nap than usual.


3. How I built the Bed in my DIY Camper Van
(convertible to Dinette!)

Once inspiration was sought, it was time to get to work.
After thinking for a long (long!) time about which bed model was ideal for my needs, I was left with 3 models: the ceiling bed, the murphy bed, and the dinette. I was sure I wanted to install a movable/foldaway bed on my van to have more work space during the day, but I wasn’t sure which one.
The ceiling bed (elevator bed) in my opinion is the most comfortable bed ever: it only takes up the space of a mattress and you don’t have to make and unmake it every day.
With my DIY skill level back in the day, however, building one seemed like a very daunting, expensive, and time-consuming challenge. Having to homologate my van in Germany by the license plate deadline, I had no time, so I thought I would stay on something relatively easier.
I found the murphy bed very interesting, but my camper van being a VW Crafter, its curved walls were not ideal for installing one: it would have wasted too much space!
In the end, therefore, I decided to build a bed/dinette with a convertible table: spacious during the day, a big bed at night. Obviously, there is having to make and unmake the bed every day involved, but once you get the hang of it it really only takes less three minutes (yes I timed myself!).
To get more storage space both in the benches and from the rear garage, I also decided to elevate the dinette floor 32cm above the floor of the rest of the van.
In the next paragraphs, I will show you step by step how I designed and assembled the bed-dinette in my RV!
3.1 MATERIALS AND TOOLS I USED
Below I show you all the products and tools I used that you will presumably need if you also wanted to build a bed-dinette similar to mine.
For your convenience, for products that can be purchased online byclicking the image of any product, the Amazon page will open directly for you: this way you can understand the qualities of the materials/tools I used and if you want, even buy the same products I used.
For the sake of transparency, I would like to point out that I participate in the Amazon Associate program and that for any purchase made through the links on this site, I receive a small commission that I use to support the maintenance costs of this blog, obviously at no extra-cost to you ?). If you might also be interested in viewing all the products I used to create my Camper Van, I have collected them all in the LostOnTheRoute’s Amazon Showcase..

Straight Angle Steel Brackets
Perfect supports for making 90-degree angles and securing wooden laths to each other.

Chest Hinges
To create openable chests on the sides of the dinette.

Vinyl Glue for Wood
A glue, which together with screws, helps hold the structure together and gives flexibility.

Lagun Swivel Table Support
An innovative system to be able to make the table swivel and float.

Circular Saw with Blade for Wood
The ideal accessory for getting laths cut at 90 degrees.

Wood Saw
Useful for cutting vents in the “slats” of benches.

Jigsaw
I recommend more than a wood blade; it is easy for them to break.

Drill Driver
With drill bits for drilling wood drills for all types of screws.
3.2 LET’S START WITH THE THEORY: DESIGN THE BED LAYOUT!
Building a bed/dinette in practice is not nearly as difficult as creating it on paper!
Before starting the actual work in fact (not even too difficult for that matter), I was faced with the question: How do I fit everything I want to fit into it optimally?
Let me explain further:
1) AT FLOOR LEVEL (between 0-32cm)., I had planned to install:
- On the right side of the van all the electrical sisytem,
- In the left side of the van both the clear water tank, the water pump, the expansion tank, and the JP Heater for the heating
- centrally located (under the raised floor of the dinette) I wanted to create a meter-long sliding drawer that could be opened from the front of the van for extra storage space.
- in the back of the van, under the bed I planned to create a garage accessible from the back, and install an outdoor shower
Important Considerations
- To all this, all the passages for the various utilities had to be added: the various heating pipes, water pipes, and electrical cables.
- In addition, since everything can break down in the future, everything had to be designed to be easily accessible and replaceable in the future: the clear water tank must always be able to come out when needed, it must be possible to work on the electrical or water system without having to disassemble half a motorhome each time, etc.
2) AT THE LEVEL OF CHEST-BENCHES (32cm-62cm), I had planned:
- To use all the space inside the benches for storage (blankets/bedding pillows, towels, products etc.)
- to install a Lagun support to create a Swivel/Floating Table
- the seat of the benches, like that of a regular chair, would have to be about 45cm (bench + mattress) to be comfortable
- the table would have to fit perfectly between the benches to turn the dinette into a bed
Important Considerations
- Since I had planned the utilities (water, electricity, and heating) inside the dinette benches, I needed to find a way to use the space inside the benches for storage, but at the same time be also convenient in case you need to get to the services quickly (without having to pull all the things out of the benches each time!).
- During the day, the middle parts of the mattress (the ones that cover the table at night) act as the backs of the benches. By acting as a backrest, however, they obviously decrease the seating space. Therefore, it was necessary to take into account the thickness of the mattress to create comfortable and sufficiently wide seats.
3.3 DESIGNING THE LAYOUT: TECHNOLOGY TO THE RESCUE!
I had everything in my head: what I wanted and what I had to do.
I had decided to make the dinette-bed raised off the ground (32cm) to gain storage space both underneath and inside the benches.
It was one thing to have it in my head, though, and one thing to be able to basically fit all the pieces of the puzzle together and create the perfect structure for my van’s bed/dinette.
As I was stressing over drawing on paper inch by inch the floor plan of my van and where each individual bed bearing column should go, my sister (designer) gave me an idea: modernize and use technology!
So to draw the entire floor plan of my bed-dinette (and everything else in the van by the way) we used a software called Rhinoceros, a special software for designing and creating 3D environments.
This program, allowed us to draw our entire van orthogonally and see it in 3D before we even made it!
Configuring all the details and learning how to use the software definitely took quite a bit of effort, concentration, and time, but really once we created the van floor plan it was an incredible help to realize where everything was to be installed (with millimeter accuracy!).
Below, I’ll leave you with a few pictures of the floor plan of the DIY bed-dinette. of our camper, to give you an idea of how useful it can be to use software to design your van exactly to your liking.
BED-DINETTE PROJECT – SEEN FROM ABOVE

CONVERTIBLE BED-DINETTE – 3D FLOOR PLAN

BED-DINETTE – SKETCH 3D

Rhinoceros is a very powerful program, but also quite difficult for a novice to learn (without the help of my sister who already knew how to use it, it would have taken me much much longer to design it.
A good alternative to this software, which is easier to learn but still can serve the goal of drawing your van is SketchUp.
Once the whole bed structure was drawn in 3D, it was time to start construction!
Below, I show you all the steps with all the step-by-step photos!
3.4 IN PRACTICE: HOW TO BUILD A BED-DINETTE ON A DIY CONVERTED VAN
1. The first step in the construction of my bed, was to build the “skeleton” of the benches. To do this, I used 4x4cm wooden laths. I cut them to size with a circular saw and joined them using both vinyl wood glue and angle brackets. To attach the laths to the van walls, I used 50mm long screws, and to attach the corner brackets to the floor, I used 15mm screws.

NOTE: Though the result of the benches is symmetrical when the design is finished, the structure I built below what will be seen at the end is not symmetrical, but follows the spaces needed for the various components of the services stored under the benches. In fact, to build a bed-dinette, it is very important to already have an idea of what will be underneath.
2. To prevent moisture from somehow affecting the wood of my frame over time (some moisture is always generated under a mattress anyway), we covered all my wooden laths and tops with two protective coats of water-based wood stain (neutral color).


NOTE: Personally, I recommend priming/staining any wooden part of your van. Together with the varnish, the impregnating agent protects the wood from water and moisture and increases its longevity.
3. Once the wooden supporting structure was created, I cut out 4 2cm-thick plywood shelves to size:
- One for the left bench
- One for the right bench
- One for the headboard of the bed
- One for the floor and to cover the water tank.
In the photo below, I was trying to lay the flatbed on the frame at the back (rectangular but with beveled corners to follow the curvatures of my van at the corners).

4. After making sure that all the floor plates were the right size, I attached the floor plate above the supporting structure (by simply screwing it in several places). Above the floor, I then built the missing part of the structure, again using 4x4cm wooden laths and, for the vertical seat walls, again 2cm thick plywood panels.


5. In the raised floor plateau (which also covers the clear water tank), I cut out access for the freshwater manhole, clear water probe, tank vent, and access to an emergency valve in case water needs to be shut off (in case of emergency).

6. After painting the central walls with two coats of white water-based enamel, I installed the swivel table stand (a Lagun Table).

7. Attaching the table stand was relatively simple: it is simply attached using 4 supplied screws and 4 bolts on the back.

8. At this point, with a hole saw (60cm diameter) we drilled the three remaining flatbeds (the ones that would end up under the seat of the benches. The holes serve, like the spaces between the slats of a bed, to allow the mattress to breathe at the bottom, and to avoid moisture buildup that over time could encourage mold growth .

9. At this point, it was time to assemble the bench seating.
So that the side benches could be opened from above, I cut a longitudinal strip of the two tops (8cm wide) with a circular saw, and joined it to the other side of the top using a meter hinge. To fix a meter hinge, simply insert a screw for each hinge hole.


10. Once the horizontal planes were ready, I screwed the support strip (the 8cm wide one) to the bed frame. The rest of the plane, on the other hand, is tied to the strip via the meter hinge, and otherwise simply rests on the remaining part of the structure. In this way, you can open and close the chests with ease.

11. To take advantage of the storage space inside the dinette benches, but at the same time leave the downstairs accessible should some service need to be serviced, I created four simple custom-made wooden boxes.
Each box rests on specially installed wooden slats, fits perfectly in place, and makes maximum use of the available height.
If needed, the wooden boxes can simply be lifted up and removed, freeing up access to the downstairs without having to pull out the items contained in the benches one by one. Personally, I think it is a very simple solution, but at the same time very functional.


12. Once the benches were installed, it was time to try to assemble the bottom of the bed and check that everything was in order. The central part of the bed, is covered by the 60x100cm table (which, to convert the dinette to a bed, folds down) and a small extra axe (60x25cm) that we store inside a cupboard when not in use.
The measurements of all components fortunately were perfect(thank you 3D design!).

3.5 THE FINAL CHERRY: THE MATTRESS
To finish the bed, one key thing was still missing: the mattress!
After giving it a lot of thought, I came to the conclusion that on the mattress I would take I was going to spend a lot of time and life on it., both night and day. Therefore, I decided to invest in a quality, custom-made product that would last a long time.
My initial idea was to buy a memory foam mattress on Amazon (there are many and really good prices!) and cut it by myself into the 5 pieces that were needed to convert my bed to a dinette and vice versa.
Then, my neighbor recommended a specialized company (Flexilan 2000 – based in Turin) from whom he was ordering mattresses for his Agritur. After contacting them, they informed me that in addition to being able to make me a custom-made mattress (with beveled corners at the bottom and the size I needed – 173cmx200cm – with a height of 16cm), they could cut it directly into the pieces I needed.
Still wanting to invest in a quality mattress and comparing myself to this offer, I decided to go with them. The mattress arrived within two weeks and was really good quality.
Before putting it in the camper, I had a local seamstress create custom-made pillow covers, too, with awater-repellent but breathable material purchased from this site. this way, there is no risk of accidentally flooding the mattress during the day.
In total, the upholstery material and the work of the seamstress cost me about 250 Euro, which I personally find a fair price for a quality, custom-made job that will allow me to maximize the longevity of the mattress .
NOTE: As much as I like to try my hand at absurd Do-It-Yourself projects, thesewing task I preferred to delegate it, knowing that I could never get a good result in a short time anyway 😉
This, is the end result:
THE MATTRESS OF THE DINETTE BED DIVIDED INTO 5 PIECES

OPEN CHESTS WITH CONTAINERS

DINETTE VERSION

BED VERSION

To convert the bed to a dinette and vice versa takes approximately three minutes. It’s a routine that we do every day, and over time it has become faster and faster.
Assembling it all took some planning and work, but all in all now that it is finished we are very happy with the end result: we now have a place to work remotely from (and write these articles in our spare time 😉 ) and to sleep and relax at night 😀
4. How to choose the right Mattress
for your camper van

Choosing the right mattress for your campervan Is something very important: in fact, you will sleep on it every single night of your trip and, in case you chose to install a convertible bed, probably during the day as well.
Ideally, the mattress you choose should therefore be snug , comfortable and last a long time.
Therefore, to choose the right mattress for your van, you will need to consider three factors:
- the Bed Layout you have chosen (fixed or convertible)
- The dimensions of your vehicle (length, width, and height)
- your budget
NOTE: It is important to . choose the layout of the bed you are going to install on your RV BEFORE you buy the mattress. Personally, I recommend that you leave the mattress as the last thing, so you can measure in person the exact size you need and find one that is the exact size.
4.1 THE MATTRESS FOR A FIXED BED
Choosing a mattress for a fixed bed (murphy bed, folding bed, elevator bed, etc.) is very simple: all you have to do is take good measurements of your bed (height x width), decide the height of the mattress (a compromise between bulk and comfort) and find the one that best suits you.
Since we do not have to cut the mattress, any material will do: gel mattress, water mattress, latex and even a spring mattress.
4.2 THE MATTRESS FOR A CONVERTIBLE BED
If you have decided to install a convertible bed on your RV, you will probably need to cut your mattress into two or more pieces.
To accomplish good work, it is necessary:
- Measure the full size of your bed in “bed mode” (width by length)
- define the dimensions of the individual pieces (in my case, I divided the mattress into 5 pieces)
- define a proper height for your mattress (a thicker mattress normally brings greater comfort, however keep in mind that too much height could make daytime sitting uncomfortable–e.g., in a dinette, or a pull-out bed)
- decide whether to buy a mattress already pre-cut, commission it custom-made (I had it custom-cut by the company I bought it from – service at no extra cost) or cut it DIY (in this case, I recommend foam or latex mattresses, which are easy to cut with a electric knife, here I leave you a Video-tutorial on how to DIY cut a mattress.)
- cover each piece with a waterproof, breathable cover that is easy to wash when needed (this is not mandatory but I highly recommend it, to increase the longevity and hygiene of your mattress)
4.3 CHOOSE THE RIGHT MATTRESS HEIGHT FOR YOUR VAN / RV
Inside a camper van, every single inch counts .
An extra inch of mattress is definitely an extra inch of comfort, however, it can also be an inch less storage space or an inch less height to reach the ceiling.
In the case of a bed-dinette for example, having to maintain an ideal seat of 45cm, an extra centimeter of mattress means one centimeter less space inside the side benches, and one centimeter less seat space (when the backs are in place).
Therefore, when choosing a mattress, it is important to find the right balance between comfort and bulk.
Personally, I would suggest you stay in the thickness range of 12-20cm (at home it is normally 20-30cm): not too thin that it is uncomfortable, but not too thick that it takes up too much space either (I got a 16cm one). In the end, more than thickness, what makes a mattress comfortable is undoubtedly its quality.
4.4 HOW TO CHOOSE THE MATERIAL OF THE MATTRESS
Materials can be made of different materials, and choosing the best one for you is obviously a very personal choice. Below I leave you the various options I researched with a small description:
- Spring mattresses: the old classic mattresses. They tend to warp a bit over time if low quality, and you can’t cut them DIY to fit convertible beds (see spring mattresses for campers)
- Inflatable Mattresses: inflatable mattresses are not only the ones for going to the beach, but there are also good quality ones. They weigh very little, which is why they can help reduce the fuel consumption of your Van, however, they tend to be very thick and their longevity is definitely less than a classic mattress. Positive, on the other hand, that they cost little (cf. best inflatable mattress for motorhome)
- Latex Mattresses: Rubber-derived foam, very comfortable and easy to cut. Some people, however, may be allergic to latex
- Memory Foam: probably the best material for a mattress (but also the most expensive!); it is breathable and adapts to the user’s body (based on weight, body disposition, and heat given off) (see memory mattress)
- Water Foam: a foam similar to polyurethane Memory Foam, with a much lower cost but properties that are very close to the previous foam (it adjusts to the user based on weight, but not based on warmth). Often mattresses have a layer of water foam underneath and a thin layer of memory on top: see best hybrid foam mattress for RV)
Personally, I chose a combination of memory foam (10cm) and water foam (10cm) and found the mattress great both as a bench seat (not too soft) and for sleeping at night.
In width, I chose a mattress a couple of inches wider than necessary, so that the combined pieces of the dinette would fit firmly together, leaving no holes during the night. I can confirm that once the bed is assembled, the “gaps” between the mattress components practically disappear.
5. Useful accessories for a comfortable bed
on Your Van

Personally, I love sleeping as much as I love traveling, and I like to make the most of every single moment I can devote to resting. After all, a good night’s sleep is important to recharge your batteries and enjoy your days on the road to the fullest.
Below, I want to share with you some bed accessories I have found that I think can increase its comfort and can improve the sleeping experience on the van in general.
5.1 12V THERMAL BLANKET – TO STAY WARM
If you don’t have a heater installed in your van, or you don’t feel like leaving it on all night anyway (it uses up power and can be noisy), there are still some great solutions for sleeping warm:
- 12V Thermal Blanket: a warming blanket that uses very little energy, you choose the temperature and it maintains it all night long.A great way to stay warm during the coldest nights without heating or without having to keep it on (consuming gas, diesel or electricity) all night.
- 12V Thermal Mattress Cover:similar to the blanket, except that this sheet is to be placed directly on the mattress instead of used as a blanket. Perfect for couples who would otherwise steal the blanket 😉
5.2 COMFORTABLE PILLOWS AND QUALITY BLANKETS
If you don’t have a heater installed in your van, or you don’t feel like leaving it on all night anyway (it uses up power and can be noisy), there are still some great solutions for sleeping warm:
- Comfy Pillows:during our van conversion, we abused Amazon Prime (the convenience in terms of price to save money is top-notch) and ordered the pillows as well. For the price, the quality of sleep we can say is really good, we had a great time.
- Winter Quilt: a quilt for winter nights. We got it a little smaller in size than our bed because since we didn’t have edges where the quilt could fall, it would double up and get too hot (normally comforters in the house come up to the foot of the bed).
5.3 OTHER USEFUL ACCESSORIES FOR THE BED IN A VAN
If you don’t have a heater installed in your van, or you don’t feel like leaving it on all night anyway (it uses up power and can be noisy), there are still some great solutions for sleeping warm:
- 3D Eye Mask:There are people who don’t need it (like me) and others who use it daily (like my sister). In our van, we have the Maxxfan fan exactly above the bed, and so from dawn onward some light always comes in. This very comfortable 3D mask does not put pressure on the eyes and can help those who have trouble sleeping with a little light.
- Soft Earplugs for Sleeping: Depending on where you park, there may be silence or noise. These earplugs, by canceling out sounds, can help people who are sensitive to outside noise fall asleep.
- Thermal Insulating and Shading Material for Curtains: The windows of an RV are both the main point where light passes through and the weakest point for heat insulation. We created custom-made curtains for our windows using this material (heat-insulating and 100% blackening) and some simple magnets (sewn at the ends of each tent): easy to put on, easy to take off, darkens, and contributes to a minimum of thermal insulation (read the Complete Guide on Thermal Insulation, to understand more about how heat transfer works in a van).
- Folding Step: Since our dinette is raised by a step 32cm from the ground, the bed is definitely high (32cm+45cm seat = 77cm from the ground total). For climbing up and down, we purchased a folding step, which we use at night and put away during the day. This step, also comes in handy as foot support when we use the front swivel seats (of which we will discuss in the near future).
- Samsung Smart TV and Desktop: In our van we installed a 27” Smart TV right at the end of the bed. We have chosen a Smart TV that can transform into a Laptop Monitor, should we need to watch videos with a bigger screen. It works entirely through the internet and therefore does not need a TV antenna: Youtube, Prime Video, Netflix, TV channels… nothing is missing 😀 To save space, we installed it vertically using a this universal swivel TV stand with which we can both rotate it and move and tilt it horizontally.
- Caramaps APP e Park4Night App: two essential apps for every camper or vanlifer. Park4Night helps with find pitches and parking spaces where to sleep, and allows users to add new ones, leave photos and reviews. Caramaps is a total APP that allows you to find parking lots, campgrounds, areas equipped for water supply, drainage etc. If you haven’t read it yet, I recommend you read the article 15 Essential Apps for Campers and Vanlife
6. Best Bed Ideas for a DIY Campervan – Conclusion.

In this article, I have presented you with various ideas for building a bed in your van entirely DIY, and even showed you step-by-step how I built my bed-dinette.
Now all that’s left is for you to take all the insights from this article, evaluate the various options, and choose the bed that best fits the van layout you have in mind and YOUR needs.
If you have any doubts, need clarification or more information on some of the points covered in the article, please let me know in the comments below and I will try to help you as best I can 🙂
What about you, what bed have you decided to build for your van?
As always let me know in the comments below, and happy conversion!😀
See you in the next conversion steps! 🙂
BEFORE YOU GO, CAN I ASK YOU FOR SOME FEEDBACK?
Writing detailed articles like this takes a lot of time and effort..
If you liked it, can I ask you to leave me a feedback message in the comments at the bottom of the page?
For a content-creator, knowing that you are being read and that your efforts are useful to someone is the best motivation to keep writing and doing better 🙂
Let me know what you liked or what you think could be added.
If you’d like, you can also share the article to help other people find it!
Thanks for the help 🙂

Read the Van Conversion Guides
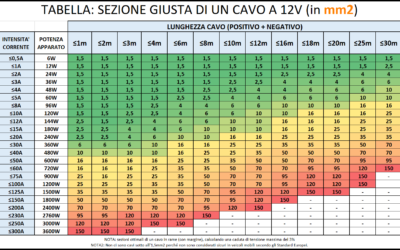
How to Calculate the Right Section of 12V Cables | EASY GUIDE
An undersized cable does not carry enough current. A cable that is too undersized can lead to a fire. An oversized cable, on the other hand, simply costs more and is a waste of money. Are you wondering what is the logicfor choosing one section of cable over...

Bluetti vs Ecoflow | Which is the Best Portable Power Station for RV/Vanlife?
The Portable Power Station is an increasingly used accessory on camper vans and RVs, but when does it really make sense to purchase and own or install one? In this article we try to shed some light on how these systems work, the best options on the market, and the...

Van Conversion DIY: How Much Does It Costs? | My Experience
How much does it cost an entirely DIY van to campervan conversion? The queen of all questions... In this article, I want to show you all the costs of my conversion from start to finish, so that you too can get an idea of what it might cost! ...
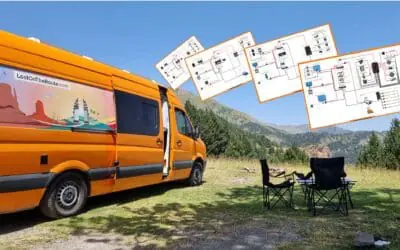
Van Electrical Diagrams for your DIY Project – Ready to Install
The Electrical System is often one of the most complicated steps in a DIY van conversion. How much energy is needed? What apparatus/devices to purchase? How to connect them? How much would it cost? These are all doubts and questions that normally everyone finds...

Van Interior Conversion: Best DIY Ideas for your Project!
The Interior Outfitting of a DIY converted van is both an aesthetic and structural choice. In this article, you will find useful information and inspiration ideas for customizing the Walls, the Ceiling, and the Floor of your Van! DIY CAMPERVAN SET-UP:...

Kitchen for Camper | Best DIY Ideas for your Van Conversion
Cooking in Camper is one of those things, that makes you feel at home wherever you are! Gas, Diesel or Electric Stove? What equipment and accessories you need on the Road? How much space do you need? How to assemble the kitchen in your Camper? In this article you will...

The Best Fridge for Your Campervan – Which One to Choose?
Buying a trivalent or compressor RV refrigerator? Horizontal or vertical? 12V or 110/220V? In this article you will find all the information you need to choose the best fridge for Your Van, tailored to your Needs! 🙂 THE REFRIGERATOR IN THE VAN:...
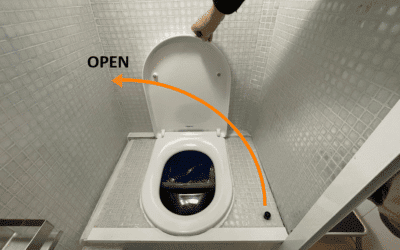
DIY Camper Bathroom: How to Self-Build a Toilet
If you are Campering a Van you surely must have wondered: How does the Bathroom in a Motorhome work? In this Guide I show you the various types of Bathrooms on the market, I explain how they work, and I show you how you can Build yourself an entirely...
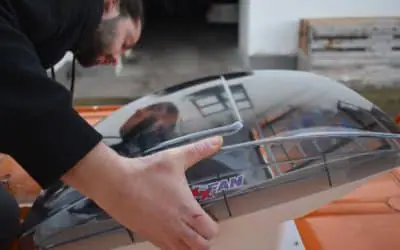
Best 12V Fan for RV | DIY Installation Guide | Van Conversion
A Roof Fan helps keep your Vehicle's humidity under control and change stale air. In this guide you will find everything you need to know about mounting a Maxxfan Deluxe fan on the roof of YOUR van. ROOF FAN: WHAT IS IT FOR? Keeping an RV's...
How to Build a Shower in a Do-It-Yourself Camper
A Shower in the RV for some people is not necessary, for others it is a real necessity to be totally independent! In this guide I'll tell you how I built the shower of my converted van entirely Do-It-Yourself! INSTALLING A SHOWER IN A...
Complete Guide and Electrical Scheme for your D-I-Y Van Conversion
You dream of transforming your Campervan DIY and have never touched an electrical cable before? Or do you want to implement some changes to your Factory RV? In this guide you will find EVERYTHING (absolutely EVERYTHING!) you need to know to create the perfect DIY...
Converting a Van: How to Connect Electric Cables Without Mistaking
Want to know how to "connect" the electric cables in practice in a converted van? Stripping, Crimping, Wire Leads, Clamps, Tubing, Cable Ties and much more... You've come to the right place to learn All That! How to wire your van's electrical...


0 Comments