
How many solar panels do you need on your Camper?
Mono or polycrystalline?
How to fix them on the roof of your camper van?
Here you will find all the answers to your questions 🙂
VANLIFE IN FREEDOM: THE PLEASURE OF GETTING OFF THE GRID!
When I decided to convert a van, my idea was one: to travel far and wide, away from the beaten track, to remote places where backpacking (which I love anyway!) is difficult to get to.
For this, I didn’t want to build a regular camper. I didn’t want to depend on the grid at every stop.
My goal was to create a van that could stay disconnected from the grid for as long as possibleand survive independently off-grid even for weeks or months. For this reason, installing solar panels was in my mind a trivially obvious choice.
Solar panels these days have achieved some really remarkable performance (and are continually improving!). Powering your lights, fridge, fan, inverter, and all the electrical equipment in your camper van solely through solar energy is no longer a mirage!
In this guide, I will explain in detail everything you need to know about solar panels for your van: the types of solar panels that exist on the market, which ones to choose, how best to use them, how to attach them to the roof of your van, how to connect them the right way, and more.
If you also dream of traveling unplugged from the power grid, this article is the one for you! Happy reading 🙂
Last Updated: 08/01/2023
TABLE OF CONTENTS
Van Conversion: Choosing and Installing Solar Panels

1. How many watts of solar power do you need
In your van/RV?

1.1 Ideal solar power in Camper: charging your batteries in a day
As we have seen in the article Maxi-Guide to the electrical system with Wiring Diagram,the first thing you need to do before you start buying any electrical accessories and wiring up your system is to figure out your daily energy needs and purchase the right service batteries to meet them.
If you haven’t done it yet, I recommend that you read the Maxi-Guide before continuing with this article, and come back once you are sure of your energy needs.
On the other hand, if you have already done it, you probably already know how many ah (Amper/hours) of batteries you will need to meet your needs. In my case for example, having wanted to install an induction electric stove top for cooking in addition to the various 12V accessories, my estimated maximum daily consumption was 300ah (or a little less) .
Ideally, a good solar system should be able on most days to fully charge your service batteries in the time frame from sunrise to sunset.
As you can well guess, not every day will be ideal: when it is cloudy, the performance of the solar panels is reduced (however, not to zero). Winter days are shorter, there are fewer hours of sunshine and the solar rays are less perpendicular to the panels. In some places the only parking available is in the shade. Sometimes it may rain or snow.
Although in some situations charging with solar panels will be difficult or close to impossible (which is why I recommend installing different methods of charging, such as alternator or column/generator input as I explain in the complete guide to electrical installation), what you should aim for is, again, to have sufficient solar power to fully recharge the batteries on most days of the year..
1.2 Understanding the Power of Solar Panels needed for your Camper Van

The power rating of solar panels is measured in watts.
What does this mean? It means that when you need to buy your solar panels for your camper van, the most important data to check (we’ll talk about the others later) is the Wattage.
A 100Watt solar panel produces under normal conditions about 100Watts every hour (a little more in summer, a little less in winter), produces twice as much energy as a 50Watt panel, and half as much as a 200Watt panel.
In addition to power (measured in Watts), solar panels are also characterized by a voltage (measured in Volts) that describes the voltage level at which the panels operate. Don’t give it too much thought at the moment, we’ll talk about that later.
The important thing to keep in mind for now, that the Wattage is the most important thing, and that a 100Watt solar panel nominally produces 100Watts of current in one hour (100Watts/hour), regardless of its voltage (be it 12V, 24V, 48V or other).
As you already know, battery capacity is measured in ah (amper/hour) and the normal voltage of service batteries is 12Volt.
Starting from the sacred formula of electricity:
Watt = Amper * Volt
We can then work out how many watts of solar panels we need to recharge our batteries in a given day of “x” hours.
Watts*Hours = Amps/Hours * Battery Voltage
Inserting the data of the batteries of my camper van in the formula as an example (300ah of Lifepo4 batteries at 12V), and the minimum hours of sunshine in winter in Italy (8 hours) we find that:
Watt*8hours = 300ah * 12Volt
Watt*8=3600
Solving the formula I find that to totally recharge my batteries in a day with 8 hours of sunshine, I will need at least:
Watts = 3600/8 = 450 Watts of solar panels
This means that with 8 hours of sunshine, 450Watt solar panels would be able to fully recharge the service batteries of my van (300ah) in winter in Italy (Italy on average gets 14-15 hours of sunshine in summer, and 8-9 in winter).
Of course, theory is not real life. In fact, at least in a couple of daylight hours of a day (at sunrise and sunset) the sun’s rays are so tilted with respect to the solar panels that they hardly produce any power, while in the other winter hours it is already a lot if you get to 50% production.
Therefore, having free space on the roof of my camper van, I preferred to install 3600Watts/6 hours = 600Watts of solar panels; so that I could recharge my batteries 100% with only 6 hours of sunshine (or at least go close to it).
This way, even if I travel further north (where there are fewer hours of sunlight in the winter) I would still get a decent amount of recharge. In summer of course, solar panels will have no problem charging the battery bank and will take much less time than in winter; however, it is always good to think and plan for the worst case scenario .
NOTE: The cost of solar panels, compared to other components of an electrical system (batteries, charge controller), is not excessive. My advice is, if you have free roof space in your van, oversize your solar system by 25-30% over your “calculated” normal needs. This way the batteries will recharge faster and you’ll get an almost full charge even on those days with bad weather conditions.
Update after one year of full-time use: panel nominal power rating is difficult to achieve. Our 600W panel system has come up to produce over 500W of instantaneous power in summer, while barely reaching 300W in winter. If we had not over-dimensioned the solar system compared to our calculations, it would have been insufficient. Instead so, along with alternator charging, it still allowed us to cover our energy consumption and travel off-grid even in winter. Tip: If you plan to consume a lot of electricity (e.g., for induction cooking), optimize your roof space as best you can to put as many panels as possible! 🙂
2. Which Solar Panels exist and which are the most suitable for a Converted Van / Camper
At the moment, solar panels on the market are mainly divided into three categories: monocrystalline, polycrystalline and thin film (also called amorphous).
First of all, it is important to say that the operation of all panels, as well as their performance and price, is similar. If at one time there were big differences in terms of both price and performance, nowadays the technologies of monocrystalline, polycrystalline, and, in the last 2-3 years, also amorphous, are very close and in many ways are equivalent.
So let’s take a look below at the small differences between the three types of solar panels you can consider for your camper van.
If instead you want to know directly which solar panels I chose for my van and read my final advice , jump to 2.5.
2.1 TYPES OF PHOTOVOLTAIC PANELS FOR YOUR DO-IT-YOURSELF MOTORHOME
Monocrystalline

Yield between 16/20%
Works best when rays are perpendicular to the panel
Slightly higher cost than polycrystalline
Produces slightly less energy at sunrise/sunset than a poly
Polycrystalline

Yield 16/20%
Works slightly better with fog and slanted rays
Slightly lower cost than monocrystalline
The most popular technology in the world at the moment
Thin Film / Amorphous

Average yield 12-16%, but some more expensive ones go up to 20%
For the same power, it requires a larger area
Works slightly better at high temperatures and low light
Faster evolving technology with less environmental impact
As you can see, the energy efficiencies of the three types of solar panels are nearly equivalent. Nevertheless, having a very limited space where you can install them (the roof of the van you want to convert), small differences in performance at the end of the day can have a significant impact.
For this reason, in my choice I felt like exclude amorphous panels (12-16% efficiency vs. 16-20% of mono/polycrystalline): needing a lot of electricity (for the induction hob) I needed to make the most of every available inch, so I preferred to steer my choice to the first two technologies.
Not for this reason you should immediately discard the option of thin-film panels: if for your camper project you have moderate electrical needs amorphous panels could still be an idea to consider: sometimes you can find bargains at a good price and from an environmental point of view, they are the most sustainable panels.
2.2 MONO OR POLYCRYSTALLINE? HOW TO CHOOSE THE RIGHT SOLAR PANELS FOR YOUR RV?
Moving now our attention on monocrystalline and polycrystalline panels, I’ll tell you one thing: after much, much, much research, what I can tell you is that the two technologies are practically equivalent and the prices are similar .
One type works slightly better with perpendicular sun rays, the other with slanted rays; one with slightly lower temperatures, one slightly higher etc… at the end of the day, their theoretical output is virtually identical, so my advice is to don’t get too hung up on choosing between the two technologies.
More than finding reasons to choose between monocrystalline or polycrystalline solar panels in fact, the factors that I think should guide your choice are:
- the manufacturer of the panels (should be reputable and serious)
- the efficiency (visible on the data sheet of each photovoltaic panel)
- the performance warranty (given by the manufacturer and seller).
- the proportions (depending on the roof of your van, some length-width combinations may be more comfortable or fit better than others in terms of space utilization)
- the cost (the prices of solar panels vary greatly, depending on the dealer you can find them for twice as much as for half)
To sum up the concept, it is not as important to choose between monocrystalline or polycrystalline (they do practically the same job!) as it is to choose between specific modules that you find on the market.
2.3 RV SOLAR PANELS: RIGID OR FLEXIBLE?
In addition to traditional solar panels (with rigid aluminum support), flexible solar panels are becoming increasingly popular in recent years.
This type of panels, use the same technologies as before (thin film, but also monocrystalline and polycrystalline) and have the peculiarity of being able to flex (up to 30 °).
Because they have no rigid backing and are much thinner than traditional panels, flexible panels are much lighter (up to 10 times) than traditional panels.
For this reason, they’re definitely an option to consider for your camper van conversion: they’re easier to install (they don’t need supports, some are already adhesive) and in the long run can lead to lower fuel consumption.
The downside, however, is that the yields are usually lower than traditional panels (for the same area occupied); or the prices are much higher (for the same yield).
PRO
- Fast and Easy to Install
- Weighing little, they reduce fuel consumption
AGAINST
- Generally Lower Yield (14-16%)
- The highest performing ones (18-20%) cost significantly more than traditional modules
- They are less robust, and are more easily scratched
- They do not maintain an air gap under the panel, which can lead to excessive overheating when temperatures are high (summer)

Personally, after considering the pros and cons, I decided to trust the greater strength of classic panels. The factors that influenced my choice the most were higher efficiency (I needed to maximize the available area on the roof of my van) and greater longevity.
Surely, having less weight on board (about 20kg per solar panel) can lead to savings in the long run, but if a panel were to break, replacing it would cost more than the savings saved.
That being said, I repeat that these were my considerations, and that’s not to say that what was good for my conversion project would be the best for yours too and vice versa. In the end, each conversion is a universe unto itself :)
So, consider the pros and cons of each type of solar module and make your decision based on YOUR needs😉
2.4 Understanding and Choosing the Correct Voltage for Your Solar Panels
As we saw at the beginning of this article, solar panel power is measured in Watts (W), which is given by the voltage at which the panels work (Volts), multiplied by the intensity of the current they transmit to the cables (Ampere).
On the market, you can find solar panels with the same power (for example 100Watt), but working at different voltages (12V, 24V, 48V etc.) and releasing current at different intensities (8A, 4A, 2A etc.).
What are the differences between different voltage panels?
- 100 Wattsare 100 Watts, regardless of the voltage of the solar module that produces them
- The higher the voltage of the panels, the lower will be the current intensity (W=A*V) released, and thus the smaller the cable section necessary to connect the panels
- The voltage of the panels is indifferent as long as you have a charge controller capable of transforming the current released by the solar panels in 12V current useful to recharge your batteries.
In summary, when choosing solar panels, it is important to make sure that the charge controller you decide to install can transform the energy produced by the panels into energy that can be stored and used by your batteries.
If you don’t know what a charge controller is (an electrical accessory you can’t do without if you are thinking of installing solar modules), I suggest you read the Maxi-Guide on Electrical Installations (section 6.1) and come back once you’ve covered the topic in depth.
NOTE: To recharge the batteries, it is necessary (and sufficient) that the solar panels provide electricity with a voltage of 20%-30% higher than the voltage of the batteries. That doesn’ t mean you can’t use 12V panels to charge your 12V batteries. In fact, all panels sold at “12V”, actually release energy between 18-22V, more than enough to recharge 12V batteries commonly used in camper vans.
2.5 THE CHOICE: WHICH SOLAR MODULES DID I INSTALL ON MY DIY CAMPER?

Personally, after much searching, reading and studying, I decided to buy for my van camper three of these polycrystalline photovoltaic modules 200Watt 12V at SolarEnergyPointan Italian company leader in the industry that I can certainly recommend.
The main factors that oriented my choice were the good performance, the excellent price, the quality of the manufacturer and, very important, the size of the modules (perfect proportions to make the most of the available area on the roof of my camper).
These are my tips to help you choose the right panels for your camper van:
- The difference in performance between monocrystalline and polycrystalline is minimal (no stress, choose the most convenient)
- Rigid panels weigh more, however, they are stronger and more durable. Personally, I consider them superior.
- Look for panels of the proportions you need for YOUR conversion project. Measure the space you can and want to cover with solar panels and find the best combination to install the necessary power for your electrical system.
- The manufacturer and the dealer are the guarantee of quality: make sure you buy photovoltaic modules of proven quality and you can be sure that they will last for years.
Two words about Solar Energy Point (because they deserve it!)
After several searches and price comparisons, I decided to order through their site, which is very complete with all the technical specifications of each product.
The delivery was quick, and the service and support excellent. Free of charge, they offered me advice on cables, mounts, brackets, glues, and whatever else to use when mounting their products.
They are serious, professional and their prices are very competitive. They also offer ready-made solar kits for campers (which I have not purchased, preferring to create a custom solution, but may interest you depending on your project).
Considerations after 1 year of full-time use: both the summer and winter performance of our panels has been somewhat below our expectations. Talking to camper friends who have mounted Renogy panels with the same wattage, our production is 10-15% lower. Going back we would probably spend that extra money to put in better performing panels, in the long run, using them every day, it’s worth it (you can see the store Renogy here).
3. How to attach the panels to the roof of your camper van
Once you’ve chosen and purchased the ideal solar panels to camper your van, the question you’ll have to ask yourself is: how do I attach them to the roof of my van?
There are several ways to install solar panels on the roof of an RV, which can vary (even greatly) the final cost of the installation.
Below, I outline three ways to attach your solar panels to the roof of your camper van.
3.1 POSSIBILITIES FOR FIXING SOLAR PANELS
Metal Brackets

They are used to attach rigid solar modules to the roof of the RV using screws and bolts.
Pro
Fixing with Screws
Low cost (20-30 Euro/set)
Against
Having to drill holes in the roof of the Van for every screw
Not feasible if the inside of your roof is already insulated/coated
Corner Brackets

Hard plastic mounts that simply stick to the roof of your camper van.
Pro
Fastening Without Screws
Low cost (30-40 Euro/set)
Against
Quasi-permanent solution. The glue is very difficult to remove.
If your van roof has ribs, it may need modification.
Roof Rack

The most “elegant” and least “messy” option. By far the most expensive, though.
Pro
Fastening without screws
Aesthetic and Quick to Assemble
Against
Very high cost (300-600Euro)
You need to find the right size of solar panels
After careful consideration and a thorough evaluation of the options, I personally decided to go with the hard plastic angle brackets: a very good quality/price solution to get what I need (fixing my solar panels) without drilling into my roof.
These are the reasons that led me to this choice:
- In my project, I was interested in installing solar panels in a permanent way (I do not plan to remove them)
- I didn’t want to drill holes in the roof of my van: over time, every extra hole equals a greater risk of water infiltration and rust (if not waterproofed properly). In my opinion, the fewer the better!
- As cool as a Roof Rack was, the price was too high for what I wanted to spend to attach the solar panels. The aesthetic touch is certainly interesting, but being on the roof of a van almost 3 meters high (that no one sees except by climbing) the benefit did not seem worth the cost.
- I believe that if supports and glue are sold that are specially created to attach solar panels to the roof of a vehicle, they are secure and there is no reason to doubt their tightness.
Combining all my preferences, I came to the decision to install the photovoltaic modules using angle brackets (again, this was my choice, not necessarily what works for me is also ideal for your project and vice versa 😉 ).
In the next few paragraphs, I’ll show you step-by-step how I installed my solar panels using angle brackets to help you should you also choose this mounting option.
3.2 Tools Needed to Attach Solar Panels to the Roof of Your Camper.
Below you will find all the products and tools you will presumably need to mount your solar panels using angle brackets.
For your convenience, clicking the image of any product will directly open the Amazon page should you also be interested in buying it or just interested in understanding the qualities of the products you need.

Tape Butyl (30-50mm)
Useful to “level” your roof if it is curved or with annoying deformations

Corner Supports for Solar Panels
Fast, practical and inexpensive method of securing your panels to the roof.

Jigsaw
Useful if you need to modify the corner supports and fit them to your roof.

6mm2 cables for solar panels
Cables suitable for any type of solar installation on a camper van

Drill / Screwdriver
For attaching the base of solar panels to angle brackets.

WD40 Lubricant
Includes fan, plastic stands, screws and remote control.

Sikaflex 521 UV Resistant
The #1 Adhesive Glue and Sealant for DIY Camper Vehicles

Gun for Silicones and Glues
To Apply the Adhesive Glue Needed to Seal the Fan

Drill / Screwdriver
For attaching the base of solar panels to angle brackets.

Telescopic Folding Ladder
A convenient way to reach the roof of your van easily whenever you want.
Do you want to support LostOnTheRoute?
All of the Guides I publish on this blog are free and usable by anyone because I personally am a firm believer that information should always be a public good and accessible by anyone and not a commodity to be purchased. Sharing is caring 😉
That said, maintaining a great blog full of detailed articles takes a lot of time, a lot of beer (of inspiration ahah) and most importantly implies economic costs sometimes not so obvious too.
If you would be interested in helping with the costs of the blog, you can consider purchasing any of the recommended products through the links on the page or in the Amazon storefront. LostOnTheRoute in fact participates in the AmazonAffiliate program, and for every product purchased through the links, I receive a small commission, obviously at no extra cost to you🙂
Happy reading and good work!:) 😀
Dani

Check Out All DIY Van/RV Products of tested quality, in one place.
3.3 How to install solar panels with angle brackets on your Camper – Step-by-Step Guide (with Photos!)
Now that we’ve seen the tools you’ll need for mounting solar panels with angle brackets, it’s time to get started with the step-by-step guide.
In the next few paragraphs I’ll show you through photographs, how I did install the solar panels on the roof of my DIY camper and connect them together.
At the end of the article, if there is still something unclear, I leave you also a short video to show you quickly the whole process.
Let’s cut to the chase and keep converting our van!

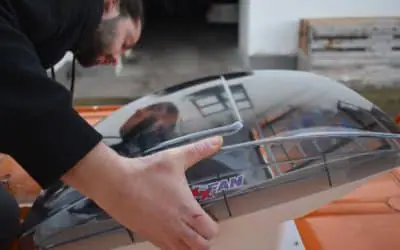
1. First, take measurements and figure out exactly where you want to install your solar panels

2. Next, try “leaning” the solar panels to verify that you actually have the correct space

3. Once you are sure of the position, drop the panels back down and drill out the corner supports and the metal supporting the modules with a drill (use a bit thinner tip, than the screws you are going to use)

4. Once the guide holes have been drilled, before inserting the screws I suggest you use a little WD40 lubricant: the screws will go in much easier (in my case, without WD40 it was almost impossible to tighten them).

5. Once lubricated, it’s time to insert the screws. To attach the angle brackets, I recommend using good-sized self-tapping metal screws.

6. I don’t recommend using screws with bolts, because once the supports are glued, you won’t be able to remove the panels (not even for maintenance).

7. Try to tighten as many screws as possible before installing the roof supports. It’s much easier to insert the screws comfortably on the ground than on a ladder.

8. Una volta che i moduli saranno pronti con i loro supporti angolari, rimettili sul tetto e verifica se qualcuno di loro va ad interferire con le scanalature del tuo van. Se si, continua a leggere come adattarli. Se no, passa già al punto 13.

9. Using a marker, carefully mark on the corner brackets the shape of the holes you will need to cut to fit the roof of your camper van.

10. Using a jigsaw, carefully cut out the supports following the previously drawn line. A metal blade helps make a precise cut.

11. Re-test the panels on the roof until the supports end up flush on top of the ribs A hand file helps to create a more precise carving.

12. When the supports are ready, it will be time to try them one last time and mark exactly where to glue them with paper tape.

13. With that done, it will be time to proceed with the glue. To glue your solar panels, I recommend you to use abundant Sikaflex 521 (the right glue for these jobs)

13. If some grooves are too deep, you can help bring them level by using one or more layers of butyl tape (with Sikaflex on top and bottom)

15. Once you’ve put glue on all the backings of each panel, it’s time to lay them down. Lay them down carefully, if you can get someone to help you: it makes the operation much faster, more practical and precise.

16. Once all the panels are laid, fill in any remaining gaps between the supports and the roof of your van with Sikaflex 521 glue. Wipe off any excess with paper towels and let the glue sit for a minimum of 24 hours (48 is better).

Once the glue dries, the angle brackets and solar panels will be anchored to the roof of your van and solid as stone. After about 48 hours you can already trust yourself to drive without the thought of them coming off.
In the next few paragraphs, I’ll explain how to connect your panels properly and how to install the grommet.
Below instead, I leave you a short video of my installation, so that you can also see on video the steps that I have explained through photos 🙂
4. Van Conversion: How to Connect Solar Panels and What Cables to Choose
If you have only installed one solar panel, the wiring is very simple: just connect the positive (+) pole of the solar module to the positive (+) pole of your charge controller, and the negative (-) pole of the solar panel to the negative (-) pole of your charge controller.

If, on the other hand, you have installed more than one solar panel, you should know that there are two types of connection, each with its own advantages and disadvantages.
4.1 Ways to Connect Solar Panels: In Series or Parallel
Depending on how you connect the wires from the different modules you have installed, you can get groups of solar panels with differentvoltages (Volts) or current strengths (Amps).
The two ways of connecting photovoltaic modules are “in series” and “in parallel”. Below is a visual image that shows you what is meant by both methods of linking. Next, you’ll find a small description of the connection and a thought on what is the best way to connect your solar panels to meet your needs.
Solar Panels connected in Series

Connecting multiple solar panels “in series” means connecting the positive (+) pole of the first panel with the charge controller and its negative (-) pole with the positive (+) pole of the next panel. Continue in this manner for the number of panels you intend to install and the last negative (-) pole of the last panel should be connected to the negative (-) pole of the charge controller.
By connecting several photovoltaic modules in series, you will obtain as a result an energy that has a current intensity (Ampere) equal to that of a single panel, but with a potential difference (Volt) that is the sum of that of each panel.
IN BRIEF: Volts add up, Amps remain constant
Advantage
- Sufficient voltage to charge the batteries (min. 15-16V) is ensured even when there is little light (e.g. sunrise and sunset, cloudy sky etc.)
Disadvantage
- if a single panel is in shadow, the electrical production of the whole system is compromised
- To handle higher voltages, you may need better performing (and pricier) charge controller.
Solar Panels Connected in Parallel

Connecting multiple solar panels “in parallel” means connecting all positive (+) poles to each other (normally via an MC4 adapter) and to the positive (+) pole of the charge controller; and the same with all negative (-) poles.
Connecting several photovoltaic modules in parallel, you will obtain as a result an energy that has as current intensity (Ampere) the sum of the electricity emitted by each panel, with a potential difference (Volt) that remains the same as that of the chosen modules.
IN BRIEF: Constant Volts, Amps Add Up
Advantage
- If a panel does not produce energy because in the shade, the production of the others remains unchanged
Disadvantage
- In adverse weather conditions, 12V panels (which normally operate between 17-22V) may not reach the minimum voltage to recharge your 12V batteries.
- Higher amperage, requires larger section cables
4.2 Which connection is best for your RV?
Deciding between connecting the panels in series or in parallel is not an obvious choice: in fact both possibilities have pros and cons.
- In optimal conditions, with the sun high in the sky, the two configurations are totally equivalent: both produce the same electrical power (A*V=Watts – in the previous case 36*3=12*9=108Watts) with a voltage high enough to charge the service batteries (battery voltage + 30%).
- In conditions of partial shade coverage (normally caused by a cloud, a tree, a “half sun, half shade” parking lot, etc.) connecting the panels in parallel helps to not compromise the production of the entire system . Note: covering a single cell of a solar panel, almost entirely stops all the others from producing power too. If the panel is connected in series to other modules, they will also be affected).
- In low light conditions (e.g. sunrise, sunset, cloudy skies, high latitudes, etc.), 12V solar panels connected in parallel may not reach the minimum threshold of 17Volt, useful to recharge your batteries, producing in fact zero. On the contrary, panels connected in series, will almost always have a useful voltage for charging (>17V) and therefore can help recharge your batteries even in low light conditions.
DoAfter analyzing the pros and cons of each option, I personally chose to connect my solar panels in parallel (3 panels of 200Watt – 12V). In the summer I was very comfortable. Come winter though, I noticed a big drop in daily charging watts, so I decided to change the connection and make it in series.
Changing the connection in series, I noticed good improvements in performance, probably due to the fact of being able to take advantage of the hours of “low” sun, which the panels connected in parallel could not use.
In conclusion:
my tips on how to install and take advantage of
the best solar panels on your Van.
INSTALLATION TIPS
- Choose a quality MPPT charge controller that allows you to absorb the energy produced by your solar panels in the best possible way both in case they are connected in parallel and in series (if you do not know what a charge controller is and why you need one, I suggest you read the Maxi Guide to Electrical Installations paragraph 6.1)
- Install your panels using cables with a section large enough to conduct the maximum intensity (Ampere) produced by your panels connected in parallel (normally for a van you use cables from 6-8-10mm2, depending on the power of your modules)
- If you purchased 12V PV panels, connect your PV panels in parallel if you plan to travel in the summer or in places where bad weather days are rare.
- In winter or for travel at high latitudes, however, I recommend a series connection, so you can take advantage of the less intense sunlight.
- Note that changing the connection type of your solar panels (if the system is built well and the cables are designed long enough) takes 5 minutes. (detach the interlocking MC4 connectors, and swap them).
- Personally, I’ve decided to install a SmartShunt (which I can super recommend) to monitor my consumption and production of the charging circuits; that way, by analyzing the data, it’s easy for me to know when I should go for a parallel connection or when I should switch to a series connection.
MAINTENANCE TIPS
- Make sure to keep your solar panels clean to maximize performance (at least once a month, it’s good to give them a quick wipe)
- To get the highest yield, don’t park in the shade
- In case of damage to one panel, disconnect it from the others in order not to compromise the performance of the whole system.
If I went back, here’s what I would change about my system:
having a very good MPPT charge controller, I would no longer buy 12V solar panels, but 24V, and I would install them in parallel. In this way I could take the best of both worlds: take advantage of low light situations (the voltage would always be higher than the minimum necessary threshold) and avoid the problem of partial coverage of a panel that can penalize the entire system. Unfortunately, I made the mistake of choosing the solar panels before the charge controller. So that you don’t make my mistake, I recommend that you choose all of your system components, before you buy them. Update 1 year later: if I went back, I would spend a little more money on top-of-the-line panels (like the Renogy) that provide higher performance even in low light conditions).
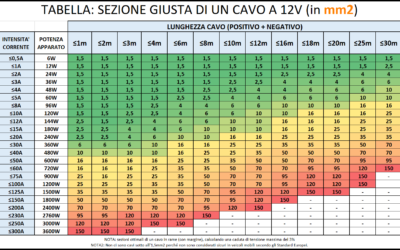
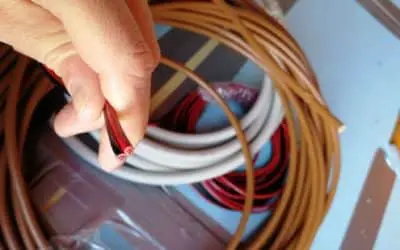
4.3 What section of cables should you use to connect the solar panels on your camper van?
What wire section to install has been a question that has nagged at me for so long during my van conversion… yet the choice is relatively simple.
First of all, there is a distinction to be made: for panels in series and for panels in parallel.
If you mount the panels in series, the intensity of current (Ampere) that will pass through all the cables, will be the same intensity of current that comes from a single panel (in fact, with panels in series, the voltage is added but the intensity is the same).
If you mount the panels in parallel, the current intensity (Ampere) will be the sum of that produced by the various panels, and for this much higher than for the same panels mounted in series. To find out the maximum intensity your system could produce, multiply the maximum intensity of a panel by the number of panels you have installed.
NOTE: In the data sheet of your panels you can find an entry in which is indicated the “maximum current” that the panel can produce: you will have to provide your wiring to support this amperage.
Once you have calculated themaximum amperage your solar system can produce and the length of the cables leading from your solar panels to your charge controller, you can use the following table to find the right cable section for your needs:

NOTE: Using the sections indicated in the table you can be sure that the potential loss due to your cables will be less than 3% (which is normally considered a “fair” potential loss that does not compromise the total performance of the system).
NOTE 2: Using undersized cables will not transfer 100% of the power produced by your solar panels to your batteries and would be a waste.
NOTE 3: Personally, I recommend that you choose the cross section of your cables as if you were going to connect them in parallel. This way, if one day you decide to change the type of connection, you won’t have to rewire the entire system.
5. How to Install the Cables Duct on the Roof of Your Van
The last step, once your solar panels are connected together, is to bring the electrical wires inside your camper van, where your charge controller will be installed.
To do this, you’ll have to use acable duct: a piece of plastic with two waterproof entrances, specially designed for this type of operation.
Below, you will find the steps to install the piece:
17. After marking with a pencil the exact location where you plan to glue the roof duct, drill two holes slightly larger than your cables using sheet metal drill bits (more holes, yeah!).

18. After cutting the holes large enough, coat the cut with rust inhibitor first, and once dry, with a little sheet metal paint (this way you protect your body from rust).

19. Once the paint is dry, glue on the protective grommets (included with the grommet) with Sikaflex 521. These will protect your cables from sharp sheet metal.

20. When the guards are secure, run the two wires (positive and negative) through the two holes in the roof and run them out the required length.

21. Run the wires through the holes Make sure the waterproofing sheathing is screwed on tightly from both the inside and outside to prevent seepage in the future.

22. Once the cables are securely attached to the grommet, glue the grommet to the roof of your DIY Camper with Sikaflex 521 glue.

6. Solar Panels for RVs and Van Conversion – Conclusion.
In this article, we looked together at how to choose, install and connect solar panels on your DIY RV.
The next step after the installation of photovoltaic modules is to connect them to the charge controller (necessary for any electrical system) and then to the service batteries in order to store solar energy to be used for your consumption. For these steps, see Complete Maxi-Guide on the Electrical System of a Motorhomeparagraph 6.
In conclusion, installing solar panels on your motorhome is a choice of freedom that helps you to be more independent from the electricity network and to be able to travel longer without the thought of having to necessarily find a campsite where to connect to the column.
Obviously, depending on the size of the system and the use you intend to make of it, installing PV modules on your camper van can be a bigger or smaller investment.
I can tell you that the installation doesn’t have to scare you: for me, it was one of the easiest “projects” of my van conversion and the Do-It-Yourself assembly, with a little bit of will, is within everyone’s reach.
In addition, I want to tell you that once you invest you will fall in love: producing your own energy simply through the sun and wherever you are is something magical and extremely convenient.
I hope this guide was helpful to you. 🙂 If you need more help or think any point is not clear enough, let me know in the comments below! 😉
Thanks for reading and happy camming!
Until the next guide! 😀
BEFORE YOU GO, CAN I ASK YOU FOR SOME FEEDBACK?
Writing detailed articles like this takes a lot of time and effort..
If you liked it, can I ask you to leave me a feedback message in the comments at the bottom of the page?
For a content-creator, knowing that you are being read and that your efforts are useful to someone is the best motivation to keep writing and doing better 🙂
Let me know what you liked or what you think could be added.
If you’d like, you can also share the article to help other people find it!
Thanks for the help 🙂

Read the Van Conversion Guides
How to Calculate the Right Section of 12V Cables | EASY GUIDE
An undersized cable does not carry enough current. A cable that is too undersized can lead to a fire. An oversized cable, on the other hand, simply costs more and is a waste of money. Are you wondering what is the logicfor choosing one section of cable over...

Bluetti vs Ecoflow | Which is the Best Portable Power Station for RV/Vanlife?
The Portable Power Station is an increasingly used accessory on camper vans and RVs, but when does it really make sense to purchase and own or install one? In this article we try to shed some light on how these systems work, the best options on the market, and the...

Van Conversion DIY: How Much Does It Costs? | My Experience
How much does it cost an entirely DIY van to campervan conversion? The queen of all questions... In this article, I want to show you all the costs of my conversion from start to finish, so that you too can get an idea of what it might cost! ...
Van Electrical Diagrams for your DIY Project – Ready to Install
The Electrical System is often one of the most complicated steps in a DIY van conversion. How much energy is needed? What apparatus/devices to purchase? How to connect them? How much would it cost? These are all doubts and questions that normally everyone finds...

Van Interior Conversion: Best DIY Ideas for your Project!
The Interior Outfitting of a DIY converted van is both an aesthetic and structural choice. In this article, you will find useful information and inspiration ideas for customizing the Walls, the Ceiling, and the Floor of your Van! DIY CAMPERVAN SET-UP:...

Kitchen for Camper | Best DIY Ideas for your Van Conversion
Cooking in Camper is one of those things, that makes you feel at home wherever you are! Gas, Diesel or Electric Stove? What equipment and accessories you need on the Road? How much space do you need? How to assemble the kitchen in your Camper? In this article you will...

The Best Fridge for Your Campervan – Which One to Choose?
Buying a trivalent or compressor RV refrigerator? Horizontal or vertical? 12V or 110/220V? In this article you will find all the information you need to choose the best fridge for Your Van, tailored to your Needs! 🙂 THE REFRIGERATOR IN THE VAN:...
Van Conversion: How to Build a DIY Bed for your Camper Van
A Camper is not a Camper if it does not have a bed. Where to Sleep and... Dream! In this Guide you can find the inspiration you need for creating a DIY Bed in Your Campervan, And I'll show you step by step how I built a Complete Bed/Dinette on my VW Crafter....
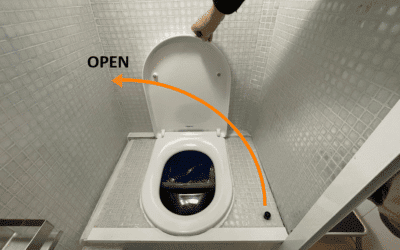
DIY Camper Bathroom: How to Self-Build a Toilet
If you are Campering a Van you surely must have wondered: How does the Bathroom in a Motorhome work? In this Guide I show you the various types of Bathrooms on the market, I explain how they work, and I show you how you can Build yourself an entirely...
Best 12V Fan for RV | DIY Installation Guide | Van Conversion
A Roof Fan helps keep your Vehicle's humidity under control and change stale air. In this guide you will find everything you need to know about mounting a Maxxfan Deluxe fan on the roof of YOUR van. ROOF FAN: WHAT IS IT FOR? Keeping an RV's...
How to Build a Shower in a Do-It-Yourself Camper
A Shower in the RV for some people is not necessary, for others it is a real necessity to be totally independent! In this guide I'll tell you how I built the shower of my converted van entirely Do-It-Yourself! INSTALLING A SHOWER IN A...
Complete Guide and Electrical Scheme for your D-I-Y Van Conversion
You dream of transforming your Campervan DIY and have never touched an electrical cable before? Or do you want to implement some changes to your Factory RV? In this guide you will find EVERYTHING (absolutely EVERYTHING!) you need to know to create the perfect DIY...


0 Comments