
12/24V switches are the switches you use to turn DC circuits on and off: 12V in cars and campers, 24V in trucks and on boats.
In this article you’ll find complete instructions and wiring diagrams to correctly install any 12/24V switch you might need in your vehicle’s electrical system!
Enjoy the read! 🙂

Single, Multiple, Dimmer,
Two-Way, On/On, On/Off Switches…
In this article I show you how to correctly wire
12/24V Switches with Simple Diagrams!
WHEN DO YOU USE 12/24V SWITCHES
12/24V switches are the switches you use to turn DC circuits on and off: 12V in cars and campers, 24V in trucks and on boats.
In this article you’ll find all the instructions and complete wiring diagrams to correctly install any 12/24V switch your vehicle’s electrical system might need!
To keep things simple, the diagrams in this article use plain light bulbs, but remember that the wiring is exactly the same for any 12/24V device you want to install! 🙂
Enjoy the read! 🙂
Table of Contents
1. How to Wire a Single 12/24V Switch to One Light/Device
2. How to Wire a Single 12/24V Switch to Multiple Lights/Devices
3. How to Create Two Lighting Zones with 12/24V Switches
4. How to Wire a Rocker Switch Panel to Control Several Devices
5. How to Wire 2 Switches to a Single Light/Device
6. How to Wire a 12/24V Dimmer Switch to Your Lights
7. Conclusion and Further Reading

1. How to Wire a Single 12/24V Switch
to ONE Light/Device
Connecting a 12V (or 24V) light bulb to a battery is super simple:
- Red wire from the battery Positive (+) to the light’s Positive (+) wire
- Black wire from the battery Negative (-) to the light’s Negative (-) wire
Once the wires are connected, the circuit is closed and current is free to flow 🙂
The only problem?
Without a switch, the light bulb (or any other device!) stays on all the time: not exactly ideal for saving power or for sleeping at night!
A Light Bulb without a Switch Stays On All the Time

Luckily, switches exist, and installing them is super simple!
In this first example, to turn the light off whenever you want, all you need is a simple “ON/OFF” switch, that is, a switch with only two positions: on and off.
These are the most common and basic switches out there, and this is how you install them:
- The 12/24V switch goes in the middle of the red positive (+) wire that runs from the battery to the device
- Connect the red wire coming from the battery to the switch’s red wire
- Connect the switch’s black wire to the second section of red wire that runs to the device
Diagram to Install an ON/OFF 12/24V Switch on a Light Bulb

2. How to Wire a Single 12/24V Switch
to Multiple Lights/Devices
Now that we know how to connect an ON/OFF switch to one device, let’s see how to connect a single switch to several devices, for example a set of LED spotlights.
To do this, the switch is wired exactly the same way as before:
- The 12/24V switch goes in the middle of the red positive (+) wire that runs from the battery (or fuse box) to the devices
- Connect the red wire coming from the battery to the switch’s red wire
- Connect the switch’s black wire to the second section of red wire that runs to the devices
What changes is the circuit after the switch, where several spotlights can be connected in parallel.
Diagram to Connect an ON/OFF 12/24V Switch to Multiple Lights

Connecting several light bulbs in parallel is very simple too:
- Every light bulb needs its own red (+) wire and black (-) wire
- The red (+) wire coming from the switch is split to reach each light bulb (in the diagram I use lever connectors for convenience; here’s a practical guide if you want to learn how to join wires together)
- The black (-) wire coming from the battery (or fuse box) is split to reach each light bulb
This way, with the switch ON, all the lights connected to it turn on, while with the switch OFF every circuit (and therefore every light!) is off.
3. How to Create Two Lighting Zones
with 12/24V Switches
Let’s say that in your camper, boat or van conversion you need to add several groups of lights and control them with different switches (for example, 3 spotlights in the “living area” and 3 spotlights in the “sleeping area”).
Building on what we’ve learned so far, the wiring is very simple here too: just repeat the previous setup twice!
In this case, to keep things tidy (and to protect the circuits!), I added a fuse box to the diagram.
WHAT IS A FUSE BOX?
A fuse box is basically an electrical component that lets you “branch out” the (+) and (-) wires coming from the battery into several circuits, and at the same time protect each of them with a fuse.
Connecting to a positive or negative stud of the fuse box is exactly the same as connecting directly to the battery’s (+) and (-) terminals, which is why from now on I’ll use the two images interchangeably.
NOTE: if you don’t know what fuses are, or want to know more about how a fuse box works, I recommend reading our Complete Guide to the Electrical System of a DIY Camper 🙂
Diagram to Connect Several Groups of Lights/Devices to Several 12/24V Switches

As you can see in the image above, the red (+) wire coming from the battery splits in two after going through the fuse box. The same happens to the black (-) wire.
This way, the two circuits are independent from each other, and each switch only controls the “lighting zone” it’s connected to 🙂
4. How to Wire a Rocker Switch Panel
to Control Several Devices

If you want a switch for each of your 12V devices (lights, water pump, fan, heater etc.), installing a rocker switch panel is an obvious and smart choice to keep your electrical system tidy!
Take a quick look on Google or Amazon and you’ll see there are tons of 12V switch panels: round or rectangular buttons, with or without LEDs, with built-in USB ports, with a built-in voltmeter etc.
Whatever model you choose, though, they almost all work the same way, whether they have 2 switches or 10!
Here I’ll show you how to wire a 4-switch panel, but keep in mind that the same information applies to any 12/24V switch panel you end up with 🙂
12/24V Rocker Switch Panel with LEDs: Front and Back

The typical reaction of anyone seeing these switches for the first time is: “what a tangle of wires!”.
Don’t worry, I’ll explain in a simple way how these switches work and how to connect your devices! 😉
First, let’s look at the back of one of the switches: each switch usually has 5 pins (see the image below).
Each switch has 5 pins, and 4 of them are already wired when you buy the panel!

This is what the 5 pins are for:
- PIN 5 and PIN 4: the two pins on the right side of the switch have nothing to do with the device you’ll connect. They are simply the positive (PIN 5) and negative (PIN 4) of the small LED light inside the switch.
- PIN 2 and PIN 3: these are the two ON/OFF pins: one receives the positive from the fuse box (PIN 2), and the other sends the positive on to the device (PIN 3). The switch could work with just these two pins, because all the others are only there to power the LED inside the switch 🙂
- PIN 1: this is where you connect the negative (-) coming from the battery/fuse box. It acts as a bridge for the negatives from one switch to the next.
As you can see, the actual switch is only between PIN 2 and PIN 3, while the rest of the switch and all the jumpers simply bridge one switch to the next.
To connect your devices to the switches, all you have to do is run a red (+) wire from PIN 3 of each switch (the only free one!) to the device, and then run a negative wire from the device back to the negative of the battery or fuse box: see the diagram below!
Diagram to Wire a 12/24V Rocker Switch Panel

Step-by-step summary:
- Connect a red (+) wire from PIN 3 (the only free pin) of each switch to the device it controls
- From the device, run a black wire back to the negative of the battery/fuse box
NOTE: if the switch LEDs bother you (at night when you sleep, for example), simply remove all the black wires from the switch panel: the switches will keep working, just without the built-in LED 😉
5. How to Wire 2 Switches to a Single Light/Device
Let’s move on to another common case: controlling one light from two switches.
This setup is handy when you want to control the lights from different spots in your vehicle (for example, from the camper door and from the bed, without getting up!).
GET THE RIGHT SWITCHES: ON/ON
To control one light from two switches, the first thing to do is get the right switches!
So far we’ve used “ON/OFF” switches, which let current through in the “ON” position and open the circuit to block it in the “OFF” position; now we need “ON/ON” switches instead.
ON/ON switches are special switches with 3 pins on the back: depending on the switch position, the middle pin is connected either to the top pin or to the bottom pin.
This way, depending on the switch position, current can flow to one end of the switch or to the other.
CONNECT BOTH SWITCHES – SIMPLE DIAGRAM
Thanks to these special switches, you can control the same light bulb (or group of lights) from either of the two switches.
Below you’ll find the wiring diagram, and further down I show you how ON/ON switches work inside 🙂
- Red wire (+) from the battery (or fuse box) to the middle pin of the first switch
- Red wire (+) from the top pin of the first switch to the top pin of the second switch
- Red wire (+) from the bottom pin of the first switch to the bottom pin of the second switch
- Red wire (+) from the middle pin of the second switch to the positive of the light bulb/device
- Black wire (-) from the light bulb back to the negative (-) of the battery (or fuse box)
Diagram to Control a 12V Light Bulb with Two ON/ON Switches

If you’re wondering what kind of magic is behind these switches, I made a simple, clear infographic showing the path the current takes in this circuit for every combination of switch positions:
How Two ON/ON Switches Control One Light Bulb

As you can see, flipping either of the two switches changes the light from on to off and vice versa 🙂
6. How to Wire
a 12/24V Dimmer Switch to Your Lights
Last but not least, let’s see how to wire one of the most modern and loved switches in campers and RVs, especially for lights and spotlights: the dimmer.
Dimmer switches are a step up from “ON/OFF” switches, where the light can only be on or off.
With a dimmer you can smoothly control the brightness of your lights, fading the intensity to match the moment: not just ON/OFF anymore, but every shade in between!
Wiring a dimmer is slightly different from the switches we’ve seen so far, because it doesn’t sit only on the positive (+) wire coming from the battery, but on the negative (-) one too. Here’s a simple diagram:
Diagram to Wire a 12/24V DC Dimmer Switch to One Light (or More!)

A dimmer switch usually has 4 wires:
- a positive (+) wire, usually red, to connect to the battery positive (+)
- a negative (-) wire to connect to the battery negative (-)
- a positive (+) output wire to connect to the positive of the lights (+)
- a negative (-) output wire to connect to the negative of the lights (-)
Wire colors change from model to model, so always follow the labels printed on your dimmer.
If you’re wondering why both the positive and the negative wire have to go through the dimmer, let me explain how this kind of switch works 🙂
HOW A 12V DIMMER SWITCH WORKS: A FUN FACT!
When you flip a switch, the light turns on.
When you flip it again, the light turns off.
On, off. Circuit closed, circuit open. Current, no current.
Your finger flips the switch and you can see. It flips it again and you’re in the dark, seeing nothing: all normal so far!
Our Eyes See the Light Turning On and Off, and Send the Signal to the Brain

All normal, but only if you flip the switch slowly!
Now try flipping a switch on and off really fast (exactly what your mum always told you not to do as a kid!).
You’ll still notice the on and off moments, but even in the dark moments your brain manages to take in the room around you and its details.
That’s because the darkness is so short that it disappears “almost” immediately, and a moment of light comes back for you to look around.
Well, a dimmer switch is an electrical component that uses this ability of our brain to make us believe it’s changing the intensity of the light, when in reality it’s just switching it on and off very, very fast.
Let me explain:
If a light turns on and off up to 50-60 times per second (also called “50-60 Hertz“), our brain can still perceive the flicker (or “strobe”) of the light going on and off (just like in a nightclub!).
Above that threshold, the link between our eyes and our brain can’t keep up, and if the light turns on and off hundreds or thousands of times per second (100+ Hertz), we simply see a steady light 🙂
When Lights Turn On and Off More than 100 Times per Second, We See a Steady Light

What the dimmer does is keep that super-fast on/off rhythm and change how long the light stays ON in each cycle.
When the light is ON for only a small part of each cycle, our eyes see a dim light.
When the light is ON for most of each cycle, we see a bright light. Engineers call this trick PWM (pulse-width modulation).

To do all this smoothly (without us noticing a thing), the dimmer’s electronics need both the positive (+) and the negative (-) wire, which is why both have to be connected 🙂
Next time you look at a dimmed light bulb, remember that it probably isn’t really on the way you see it: it’s switching on and off thousands of times per second! ;D
7. Conclusion and Further Reading

And here we are at the end of this article on 12/24V switches.
I hope the diagrams helped you understand how these handy electrical components work, and made it a bit clearer how to install them 🙂
If you have doubts or questions, or think something could make this article even more complete, let me know in the comments below (I always love getting some feedback!).
And if you’re converting a van or redoing your vehicle’s electrical system, I also recommend taking a look at our in-depth guides:
Before you go, here’s a list of resources and guides that might come in handy if you’re building your van/camper’s electrical system or upgrading an existing one:
- The Complete Guide to the Electrical System of a DIY Camper, with Diagram
- Simplified Van Electrical Diagrams, Ready to Install
- How to Choose the Right 12V Cable Size: Complete Guide
- Bluetti vs EcoFlow: Which Portable Power Station for Vanlife?
- How to Connect Electrical Cables Safely: Practical Guide
And here you’ll find the complete collections of all our DIY van conversion articles (there are a lot of them! 😉 ):
As always, thanks for reading,
and see you in the next article! 😀
BEFORE YOU GO, CAN I ASK YOU FOR SOME FEEDBACK?
Writing detailed articles like this one takes a lot of time and effort.
If you liked it, could you leave me a quick feedback message in the comments at the bottom of the page?
For a content creator, knowing that people read your work and find it useful is the best motivation to keep writing and keep getting better 🙂
Let me know what you liked, or what you think could be added.
If you feel like it, you can also share the article to help other people find it!
Thanks for your help 🙂

Read the DIY Van Conversion Guides

Cappadocia by Camper: The Dream Trip in the Heart of Turkey
For campers and wild camping enthusiasts, Turkey itself is a true paradise: few restrictions, wild camping tolerated more or less everywhere, gas at less than 1 Euro per liter, and hospitable people offering you çay (tea) on every street corner. At the...

Internet in Your Camper | How to Stay Connected EVERYWHERE!
Traveling and living full-time in our orange van, and working mainly on our computers, having a stable internet connection in our camper has always been a priority for us. After trying many different things, we found Starlink to be the ultimate solution. In this...

10 Clumsy Blunders (we made) that can Ruin your Campervan Trip
There's always a first time, and that goes with campervans too! In 2021 we converted a van and started traveling the world full-time in 2022: we didn't know much about living on a camper! We jumped into this new adventure full of enthusiasm, but of course we were not...

Bluetti Power Station in a Camper: Is It Worth It? Let’s Find Out!
In this article we take a close look at Bluetti Power Stations and show you the AC180 model up close (kindly provided by Bluetti for us to test!). First, we'll go through all the features of Bluetti Power Stations, and then we'll try to understand together when a...

The Mega-List: Every Product for Your Camper Electrical System
I recently published a "super-ultra-complete" video guide on YouTube about camper electrical systems. In the video, I tried to gather everything I know on the subject and make it available to anyone who wants to build a custom system from scratch, or upgrade an...

Best Inverter for Your Camper Van: The Complete Guide!
Inverters are a key electrical component in modern campers: they give you household AC power (230V in Europe, 120V in the US, just like at home!) wherever you are. In this article we'll see in detail what inverters are, how they work, the best models on the market,...

PowerQueen Lithium Camper Batteries: Low Cost, Maximum Performance!
Smaller, Lighter, More Versatile, Safer and Above All Surprisingly Cheap! PowerQueen Batteries Are a Bargain to Switch to LiFePO4 without Spending a Fortune! powerqueen: are they the best lithium batteries for campers? In the past, I've written at length...
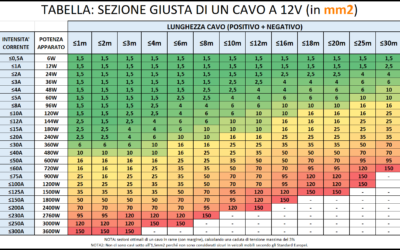
How to Calculate the Right Section of 12V Cables | EASY GUIDE
An undersized cable does not carry enough current. A cable that is too undersized can lead to a fire. An oversized cable, on the other hand, simply costs more and is a waste of money. Are you wondering what is the logicfor choosing one section of cable over...

Travel Montenegro by Camper: Discover Budva, Kotor & More!
On our roadtrip journey from Italy to Turkey, Montenegro was the first non-EU country we crossed and honestly we didn't know much about this tiny country before visiting it: long story short, we remained damn positively impressed! For those who don't know, Montenegro...
Bluetti vs Ecoflow | Which is the Best Portable Power Station for RV/Vanlife?
The Portable Power Station is an increasingly used accessory on camper vans and RVs, but when does it really make sense to purchase and own or install one? In this article we try to shed some light on how these systems work, the best options on the market, and the...

Travel to Albania | Essential Tips for a Memorable Trip!
Traveling to Albania is underrated and often avoided because of safety concerns. Well, let me tell you that, if you're traveling the Balkans, skipping Albania would be a HUGE mistake! In this brief article, you will find why you should add Albania to your travel...

Van Conversion DIY: How Much Does It Costs? | My Experience
How much does it cost an entirely DIY van to campervan conversion? The queen of all questions... In this article, I want to show you all the costs of my conversion from start to finish, so that you too can get an idea of what it might cost! ...


0 Comments